Apply Fail-Safe to Chatbot
Introduction
While interacting with a chatbot, customers are always asked to reply with text. What should the chatbot do when the customer types a wrong answer?
Fail-safe is a feature that you can apply to your chatbot flow. When it identifies text response that does not match with any of the required answers, it can redirect your customer to the previous node or the live chat support.
Before jumping into this session, you need first learn about Node to Match and Priority.
Node to Match & Priority
In a conversation flow, when the user goes from one node to another, there is a process called node matching. In default, the following child nodes are matched randomly.
For example, node A has a keyword trigger of "Hello" and node B has a any text trigger. If the user types "Hello", the probability of triggering node A or B is 1/2.
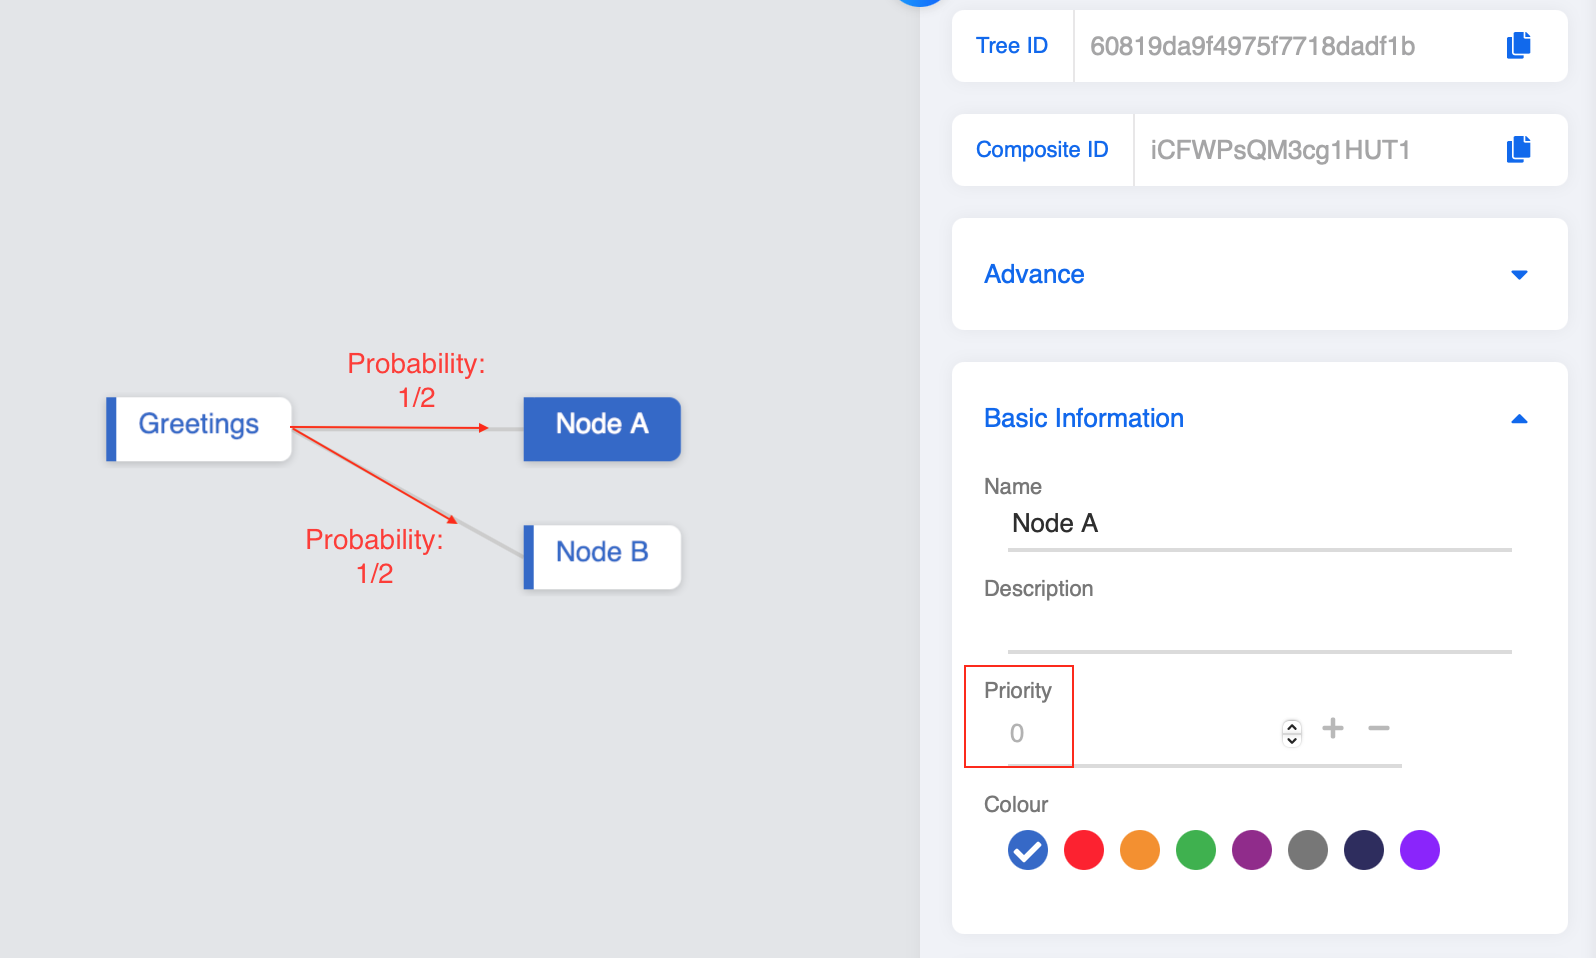
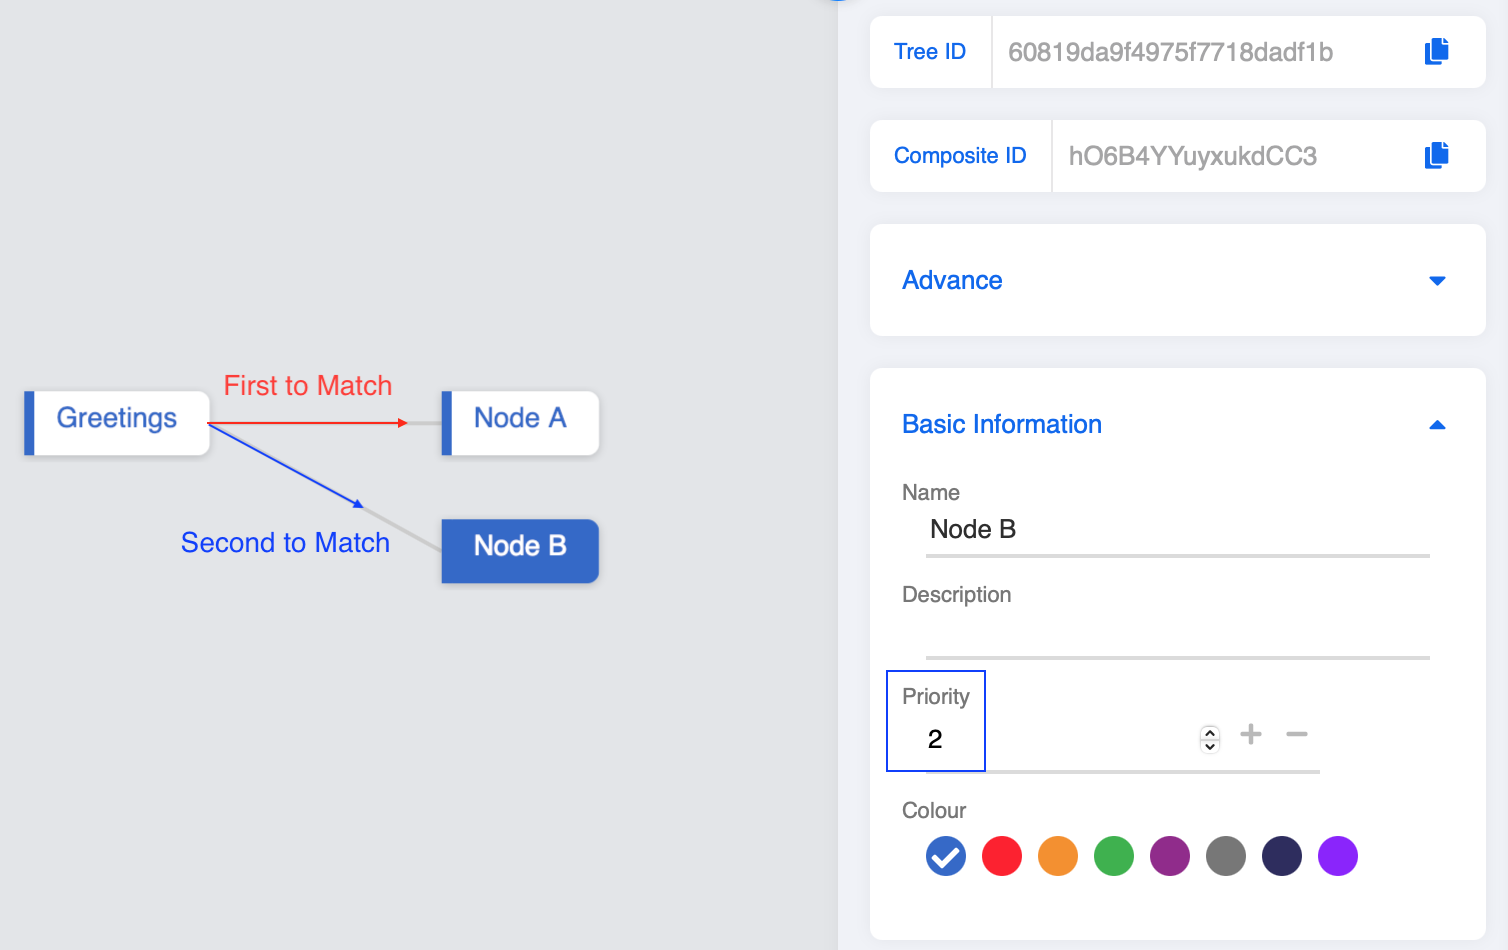
However, we can control the order of node matching by changing the priority. In default, every node's priority is 0. Smaller priority value means higher priority. Nodes with the same priority are still matched randomly.
For example, if node A's priority is 0 and node B's priority is 2, then node A will be matched first. Node B will only be matched if node A's trigger cannot be matched.
Therefore, fail-safe usually has the lowest Priority in a chatbot. As a bot designer, you only want the fail-safe to be triggered when all the other nodes cannot be matched with user's input.
In general, you can apply Fail-safe in 3 ways:
Expected Outcome
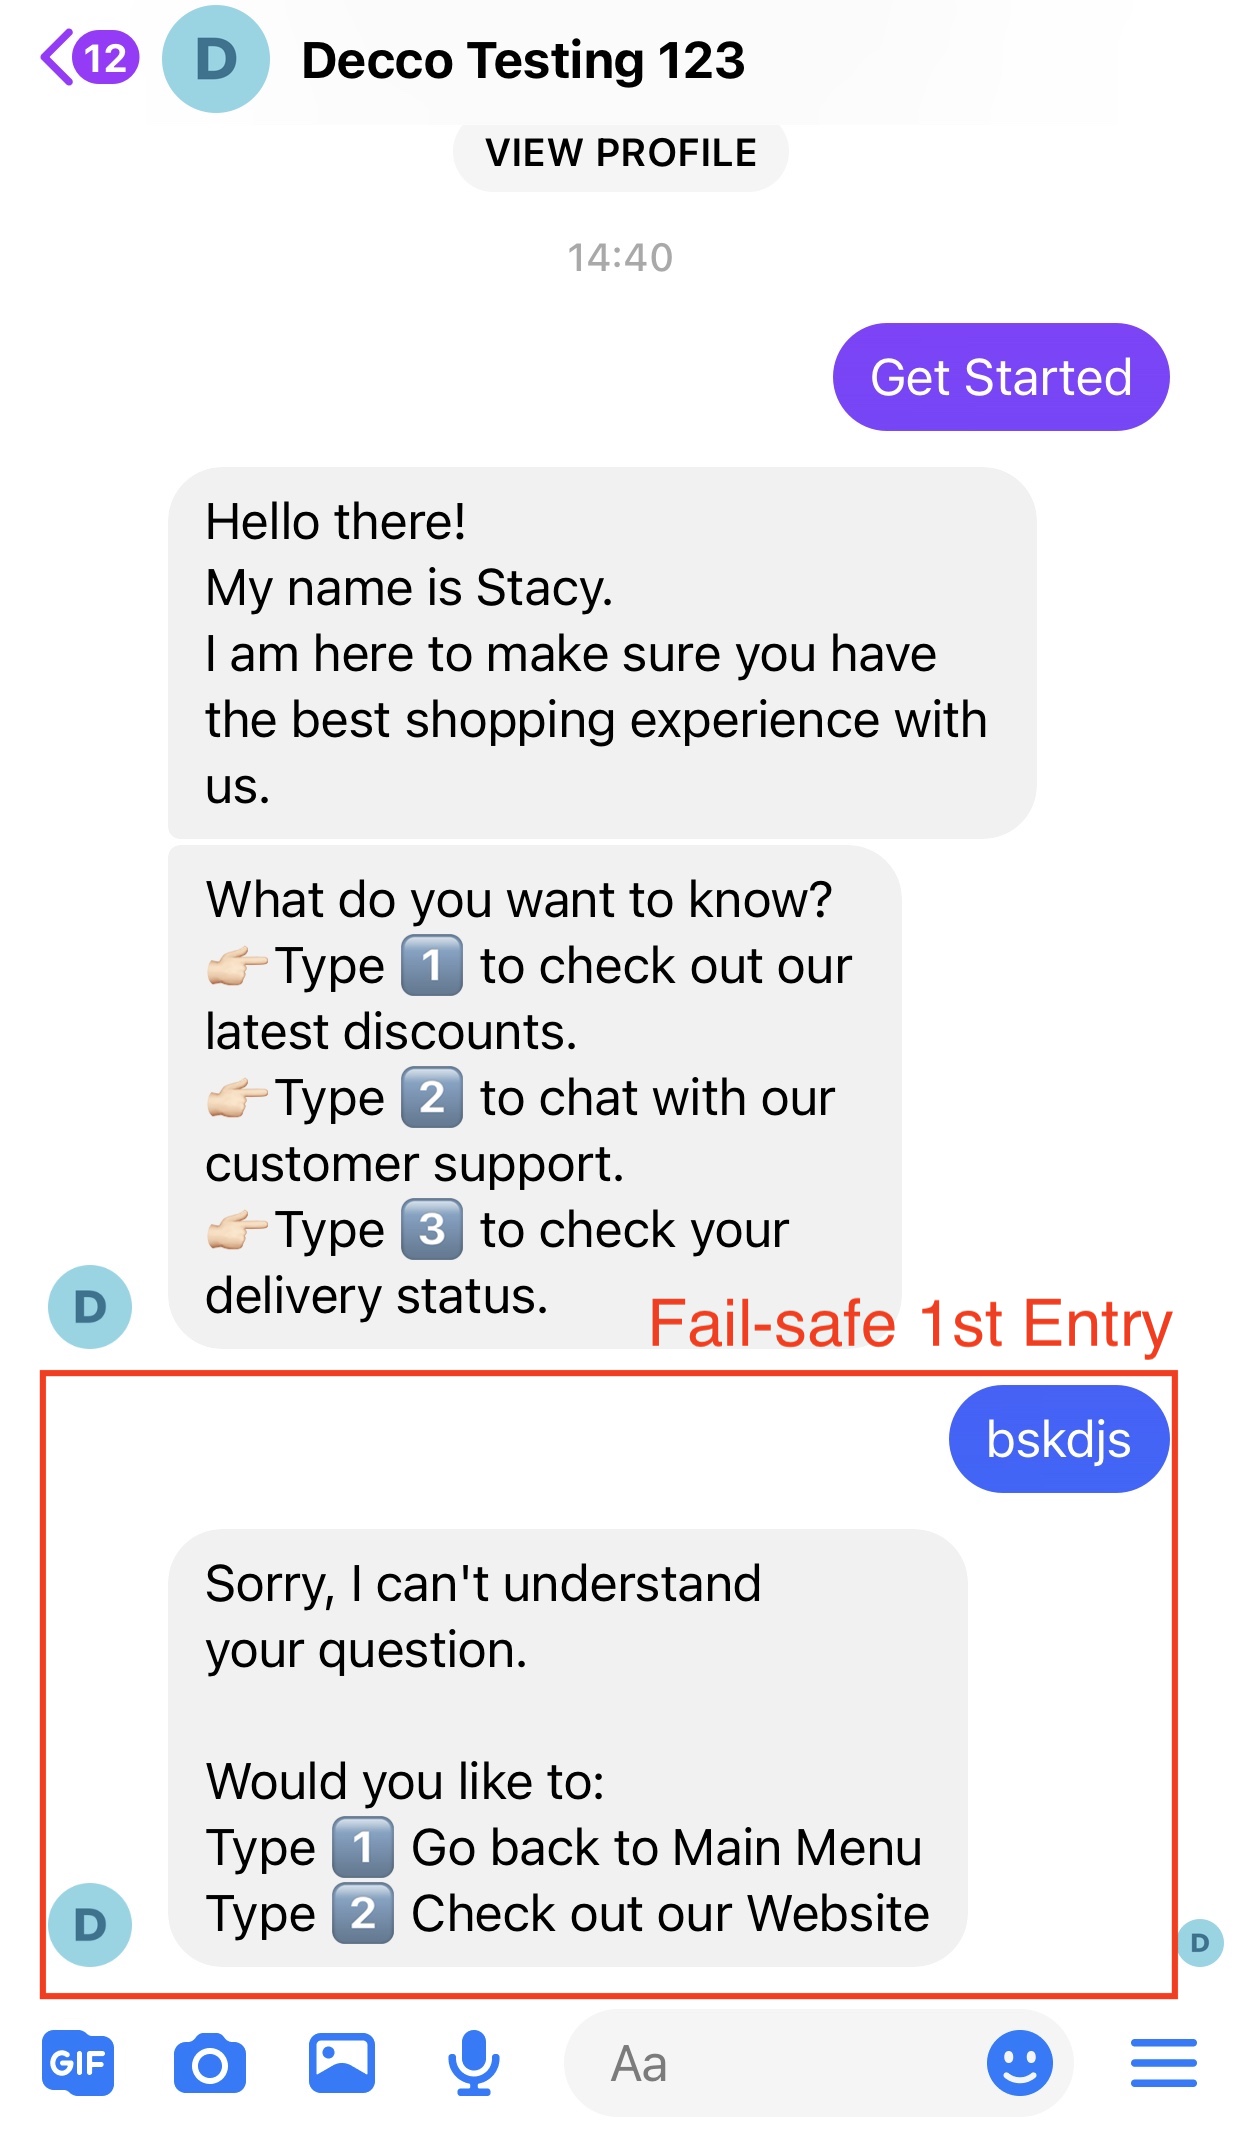
#1 : Fail-safe in Chatbot Flow
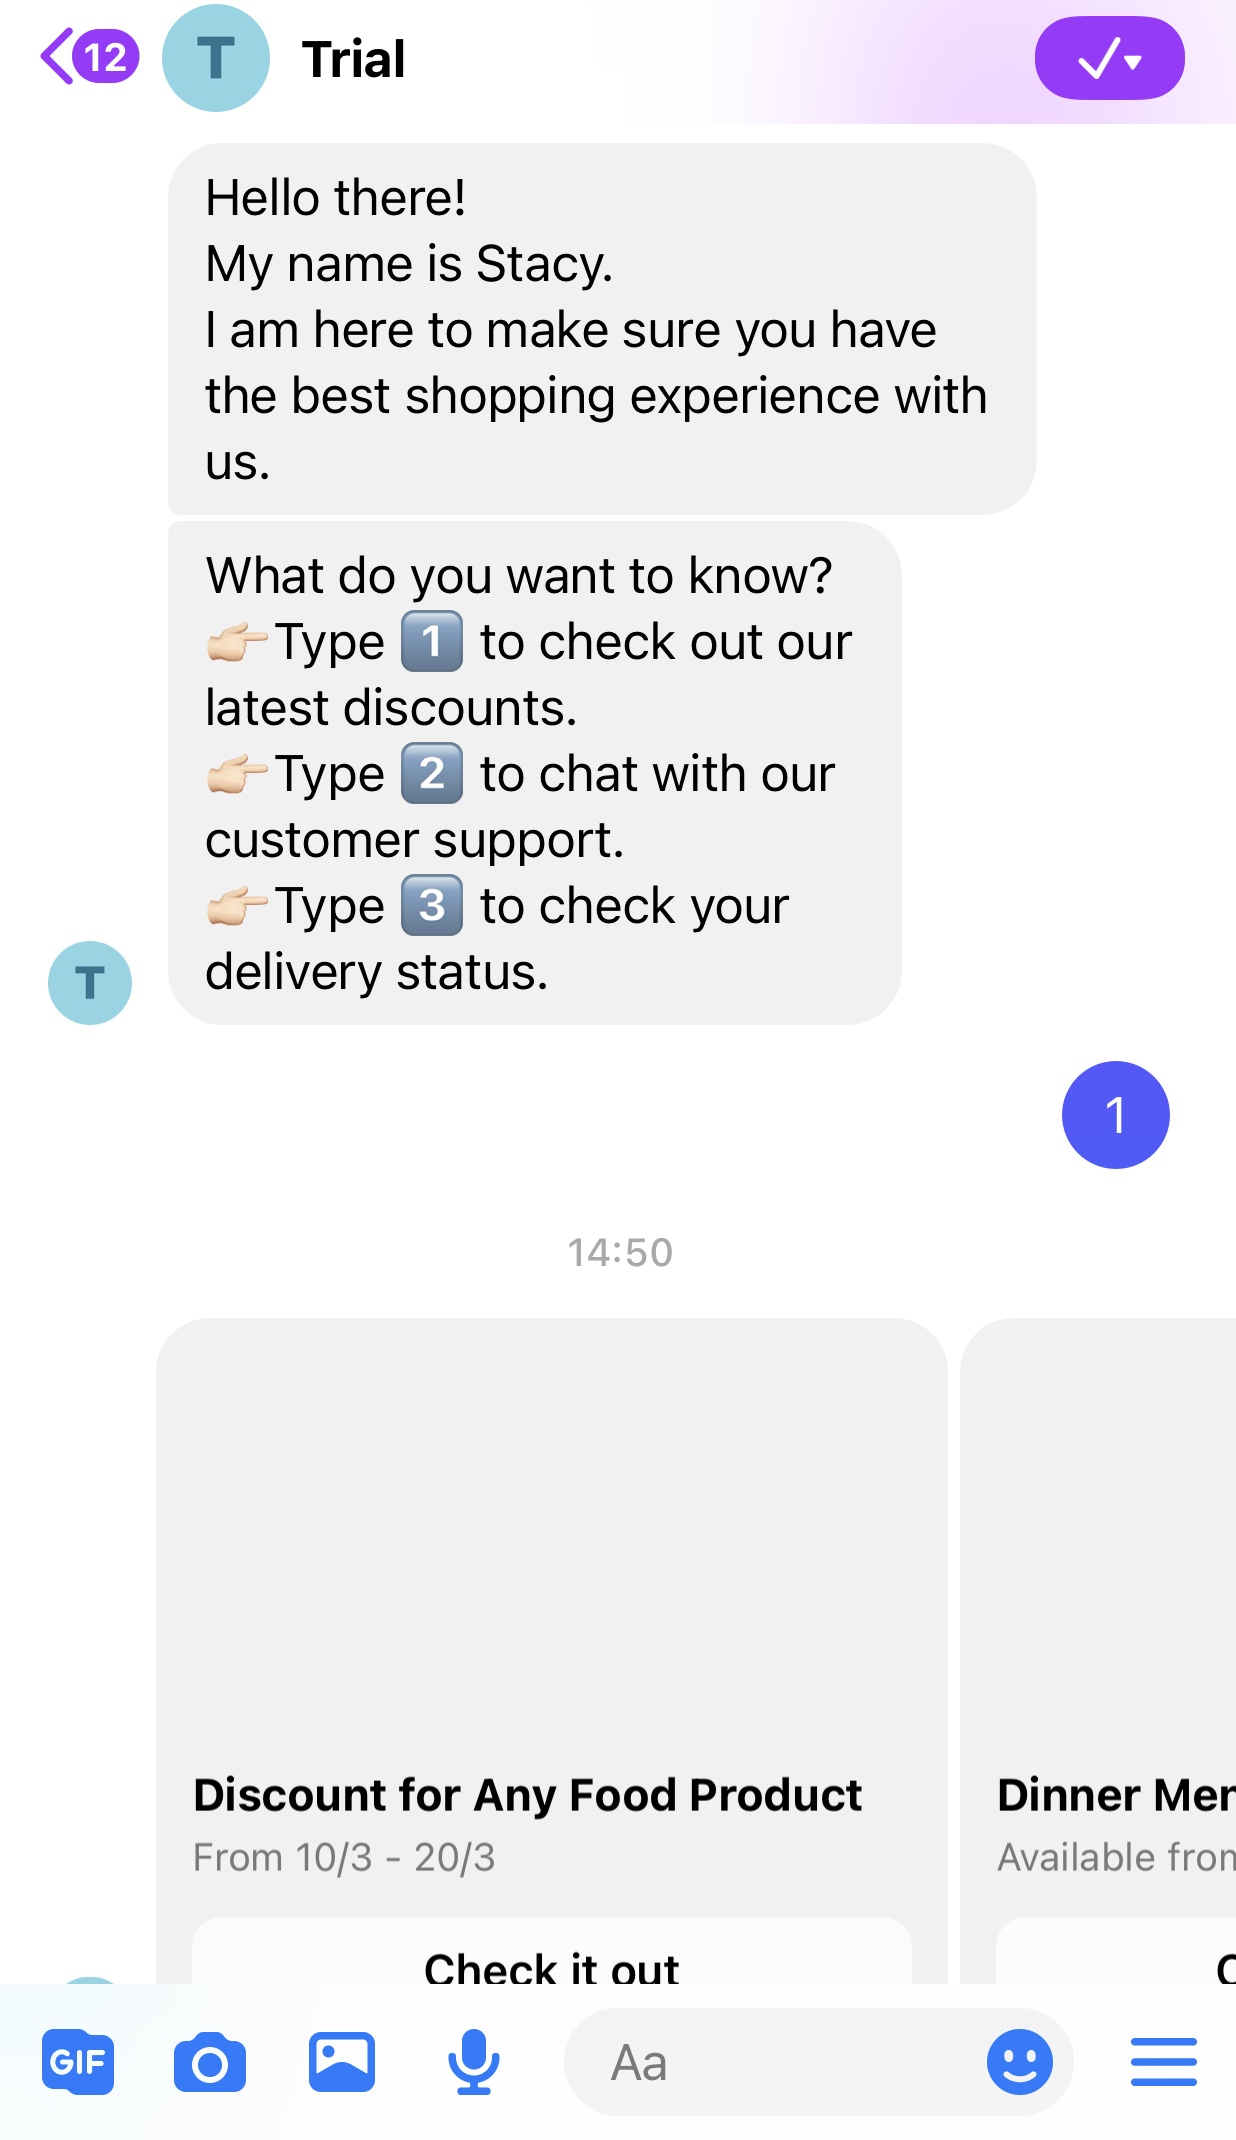
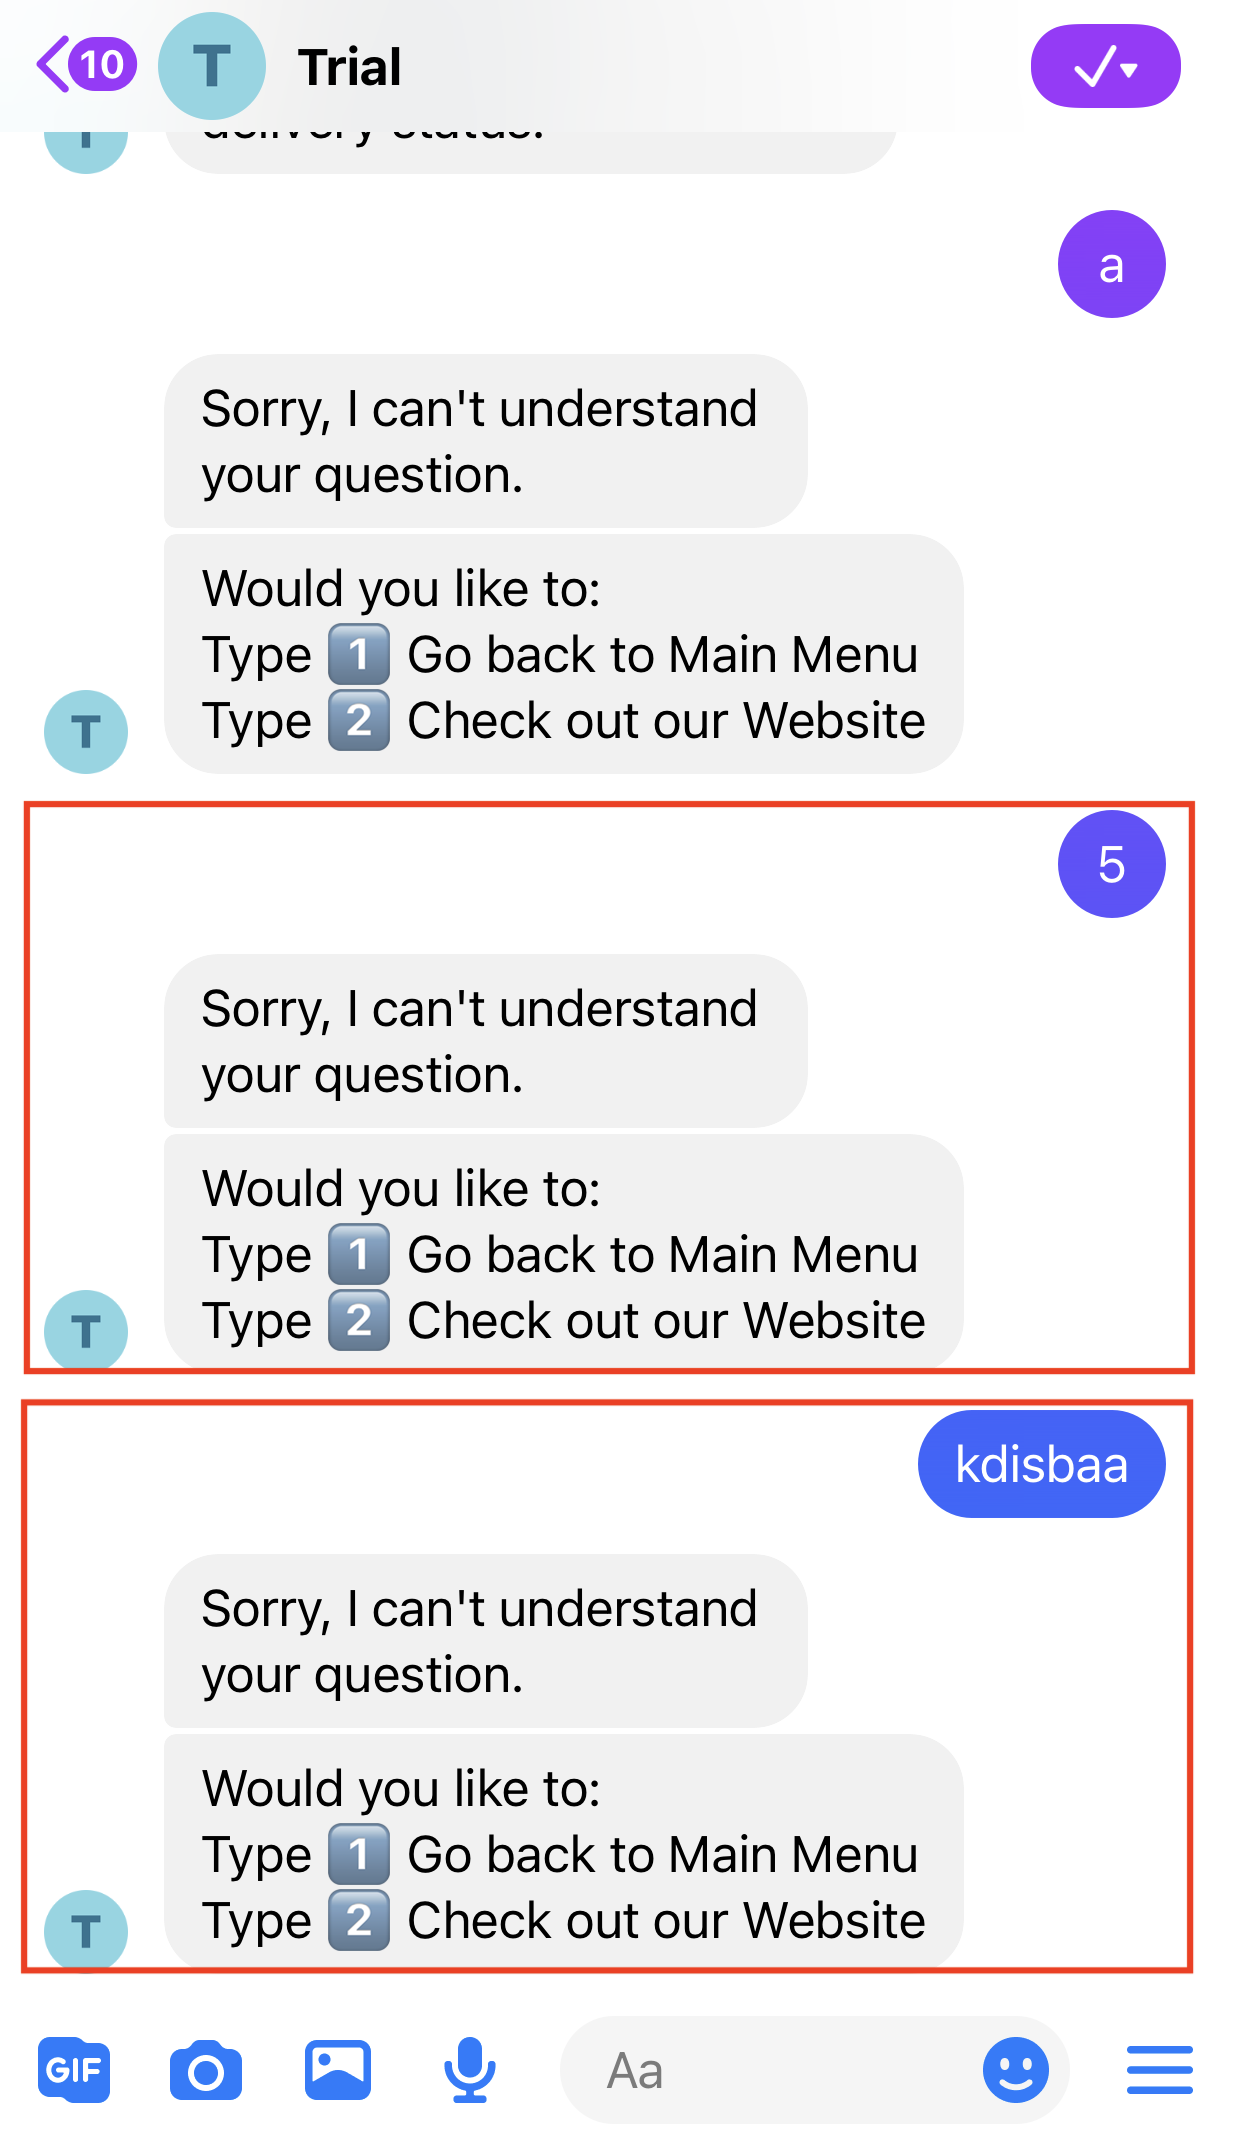
In this part of the chatbot flow, the chatbot asks the customer to input "1", "2" or "3". The Fail-safe chatbot node is able to recognize the wrong answers, and offers redirecting options for customer.

#2 : Global Fail-safe
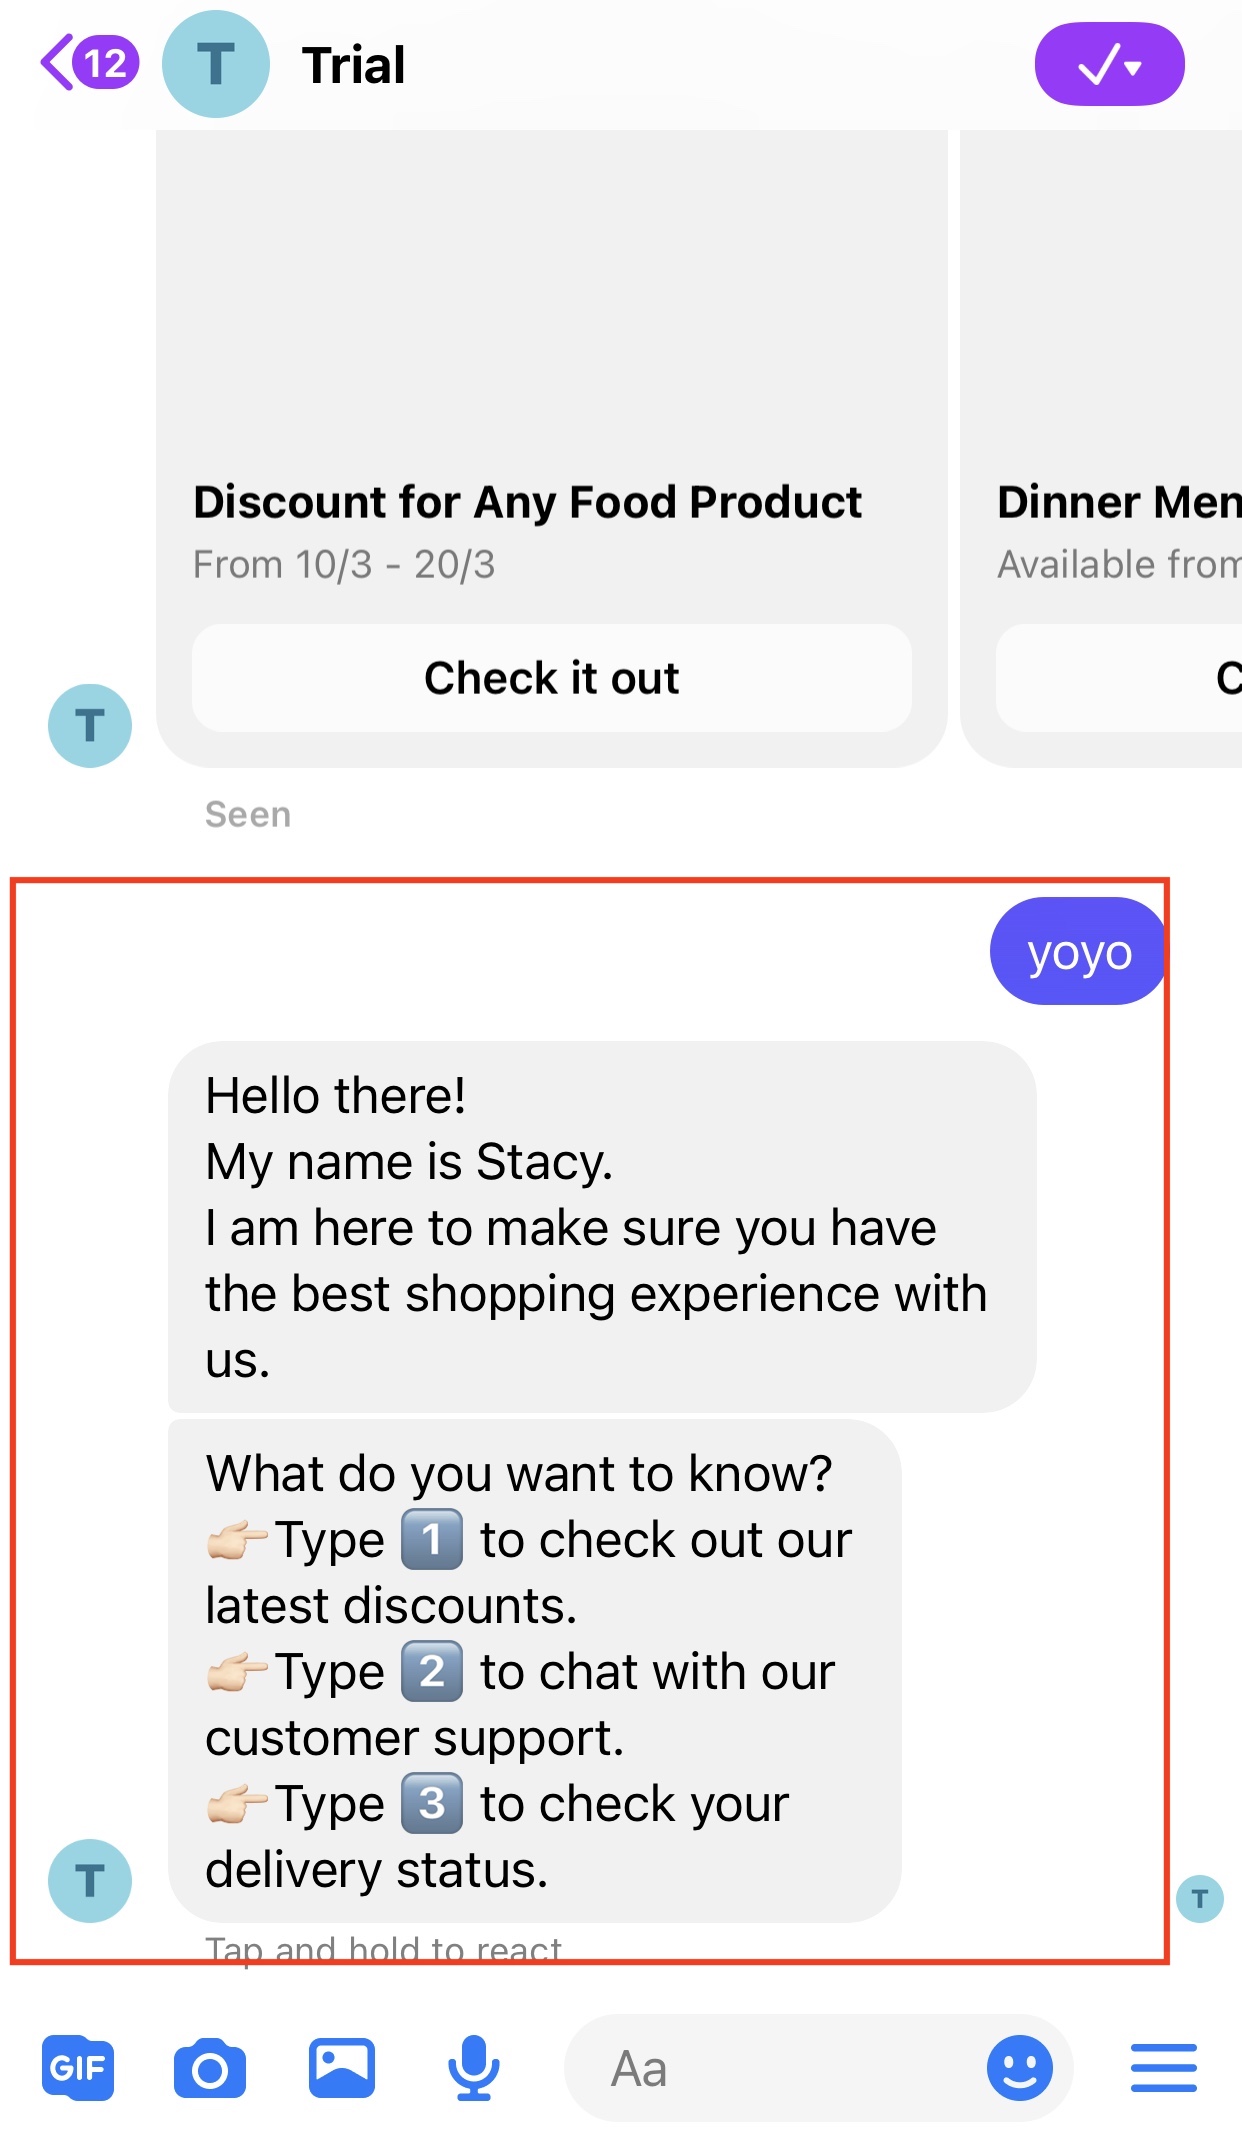
The global fail-safe can be triggered at any point of the conversation flow. Even there is no fail-safe chatbot node following the "Check Discount" node, the customer is still redirected to the main menu when he inputs unrelated words.
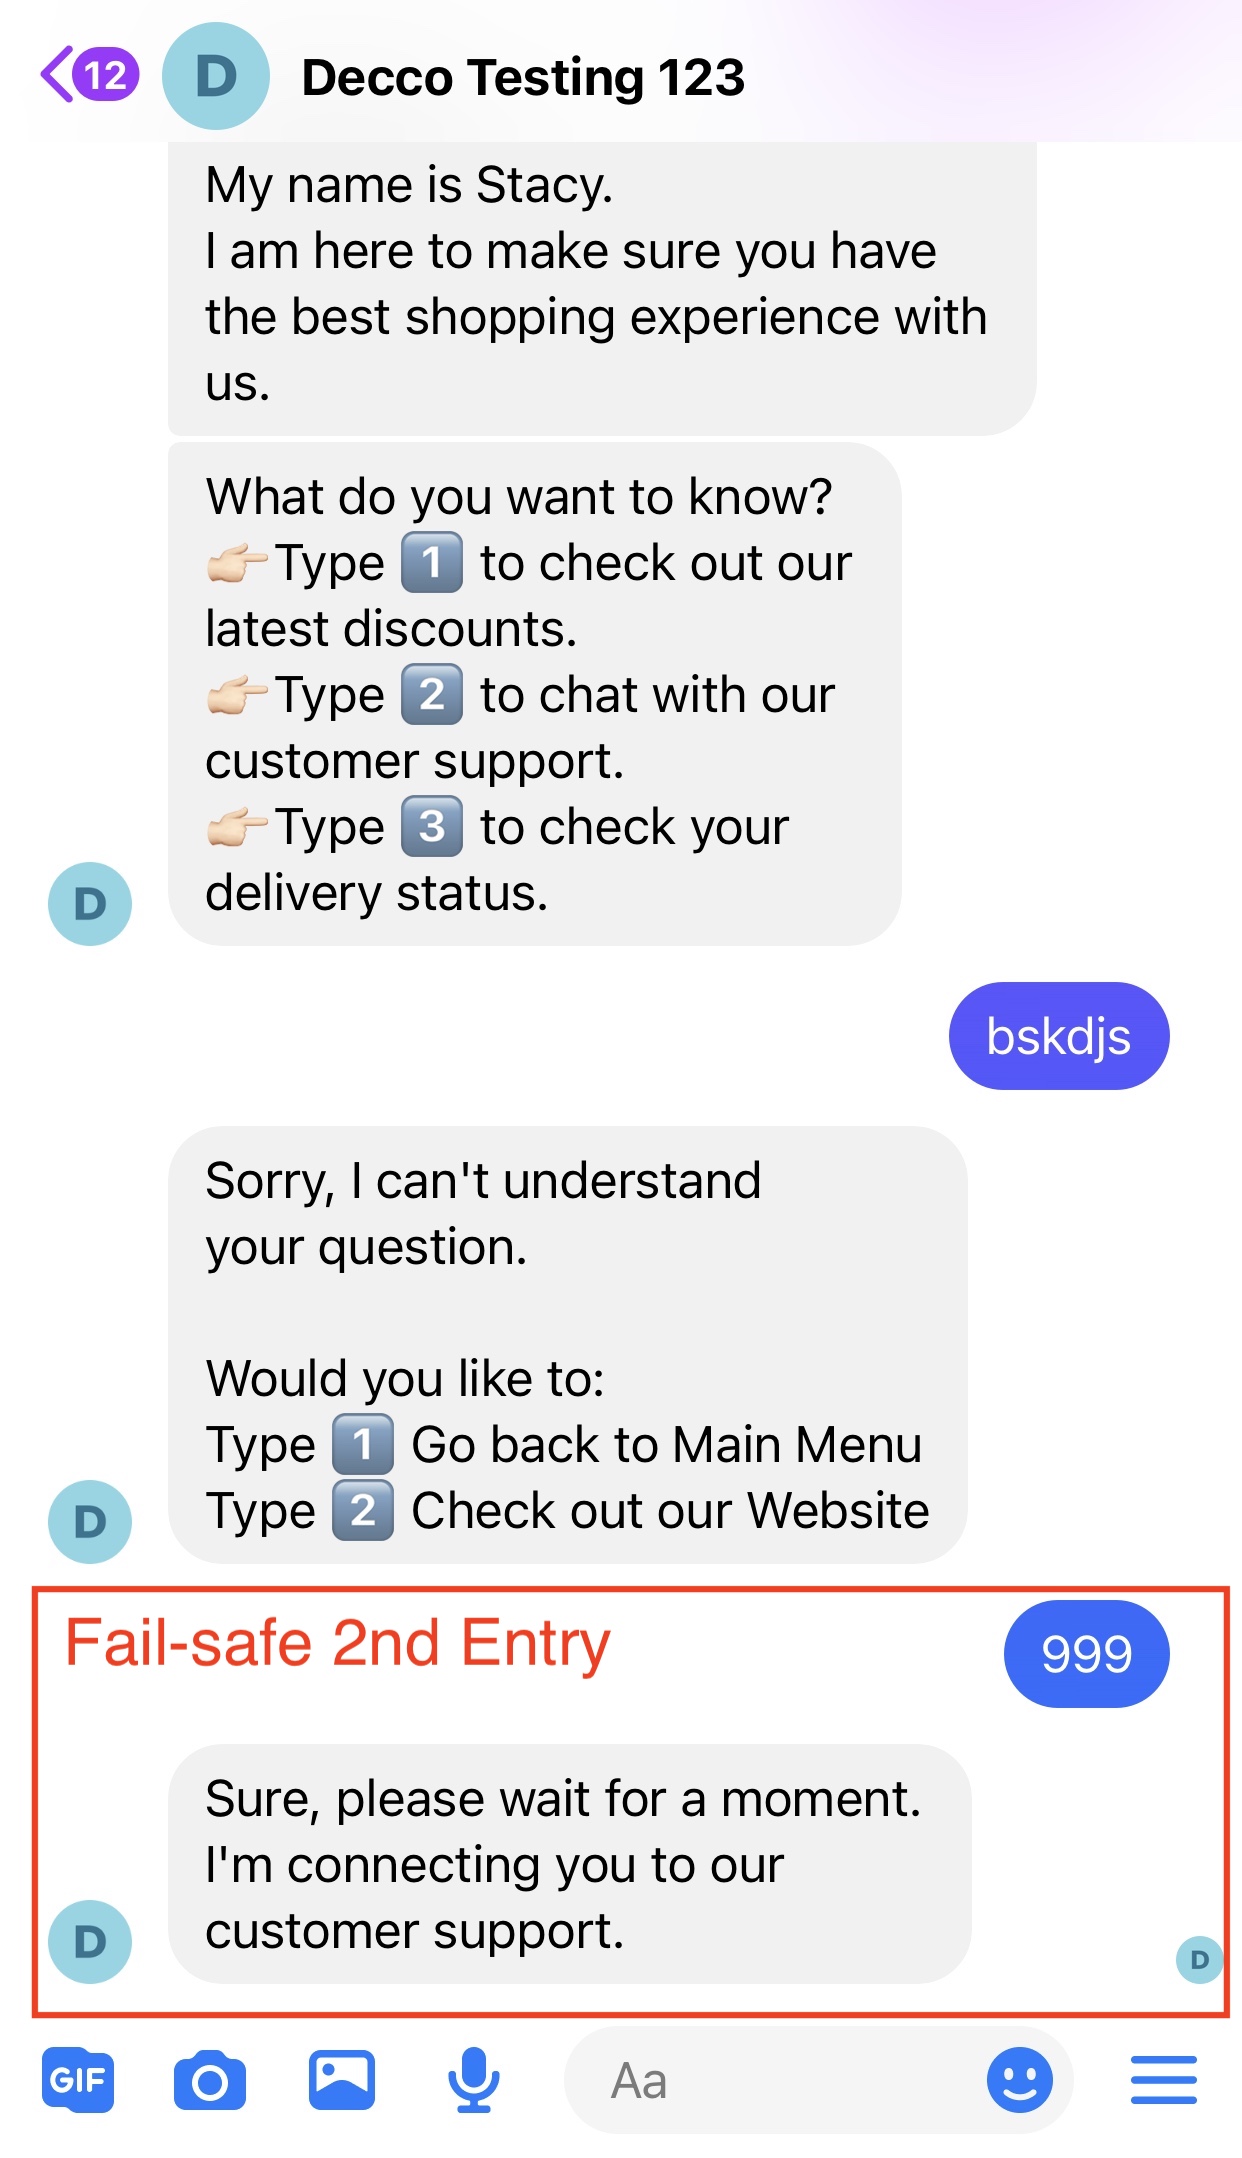
#3 : Fail-safe Loop
What if the customer keeps typing the wrong answers? The fail-safe loop can keep asking the customer for redirection options until they input the correct answer.
Apply Fail-safe in a Chatbot Flow
In this example, a customer can type 1, 2 or 3 to select a service, they can continue with the expected flow if they type the correct answer. The fail-safe chatbot node will be designed to catch the wrong input from the customer, and tell them to follow the instructions.
Sample Chatbot Structure
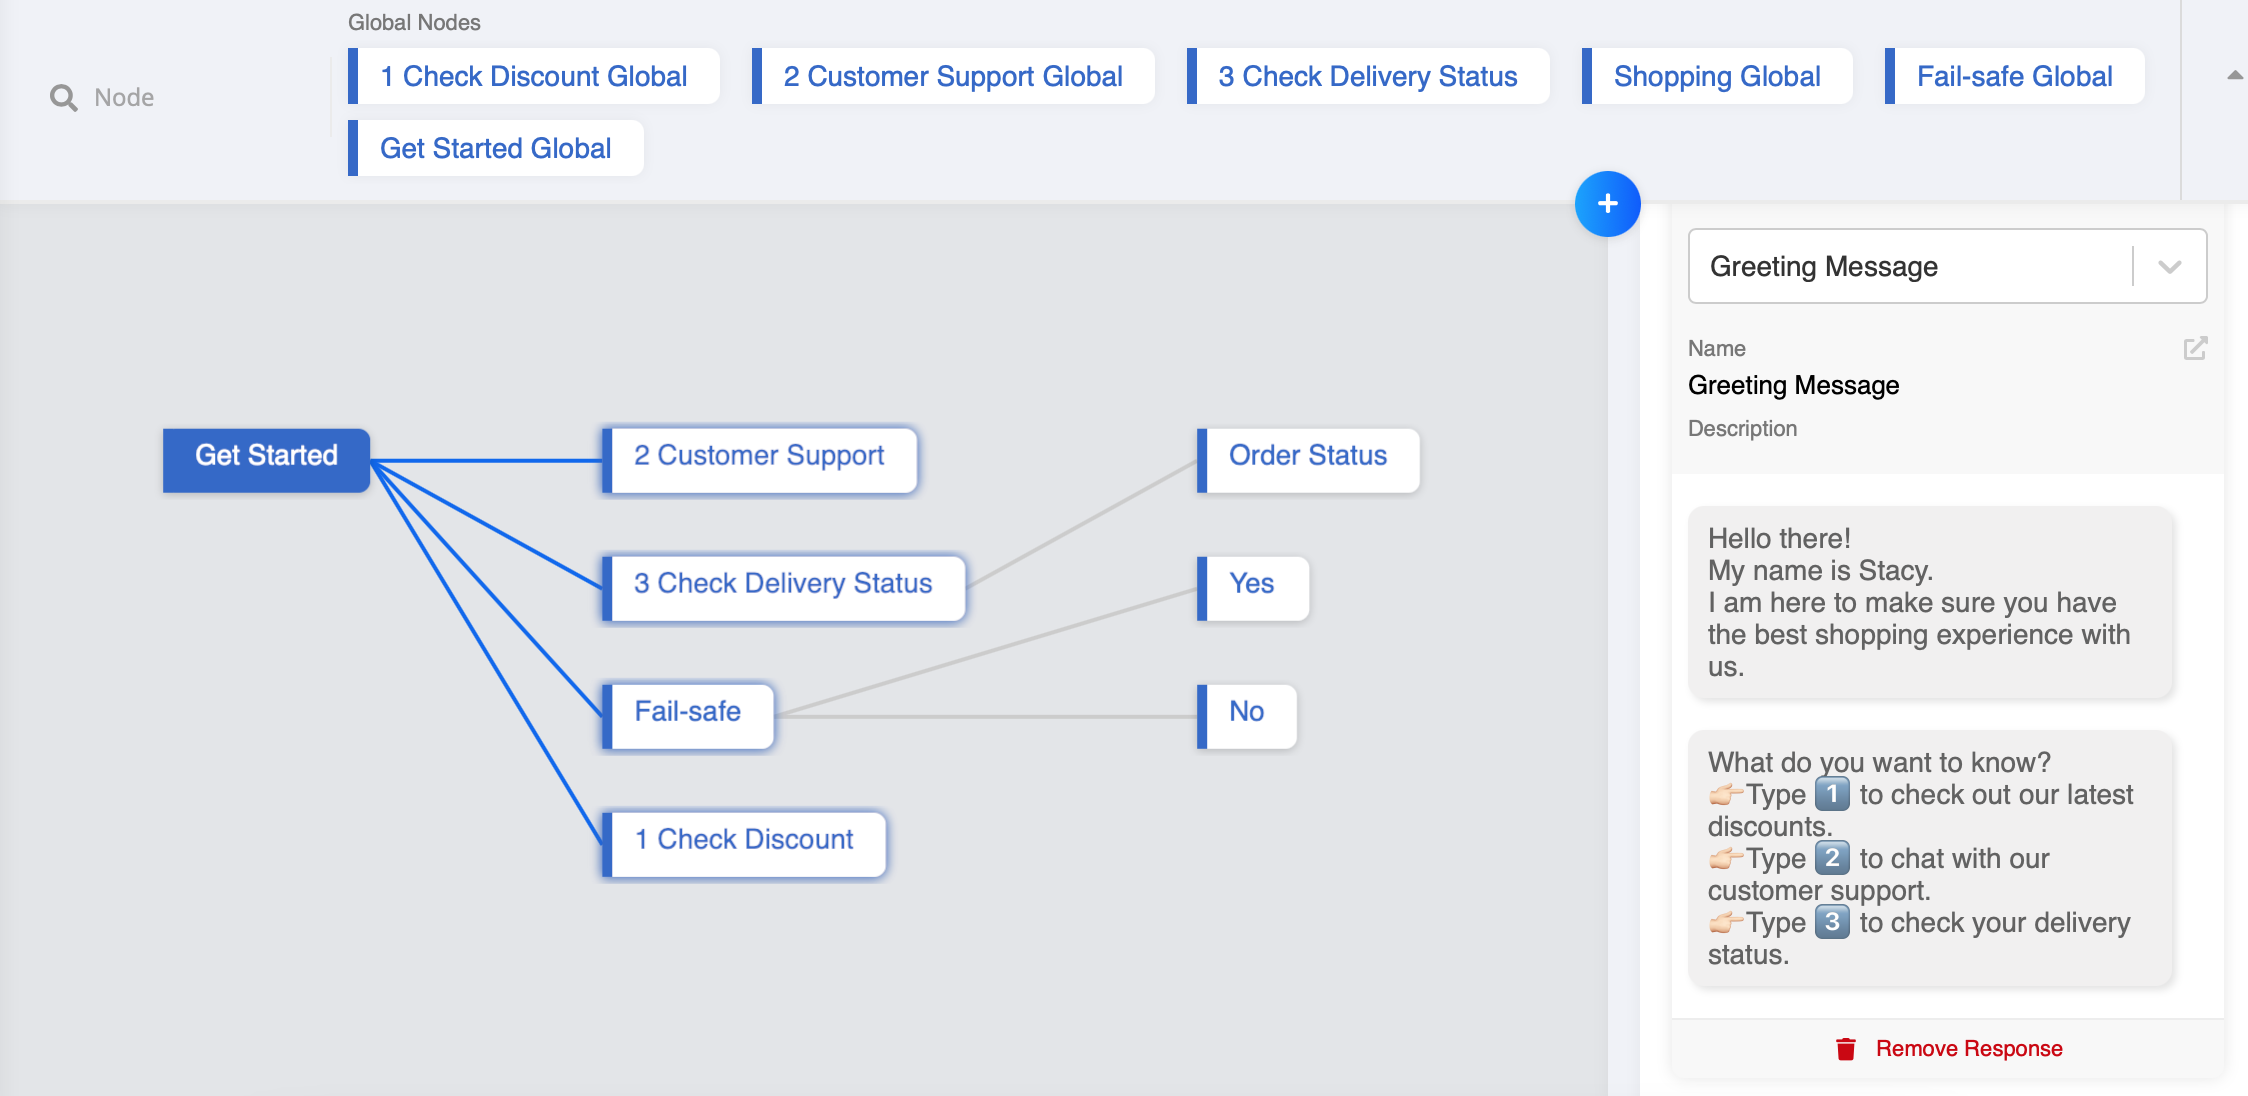
- Create a new general node under "Get Started", and name it as "fail-safe".
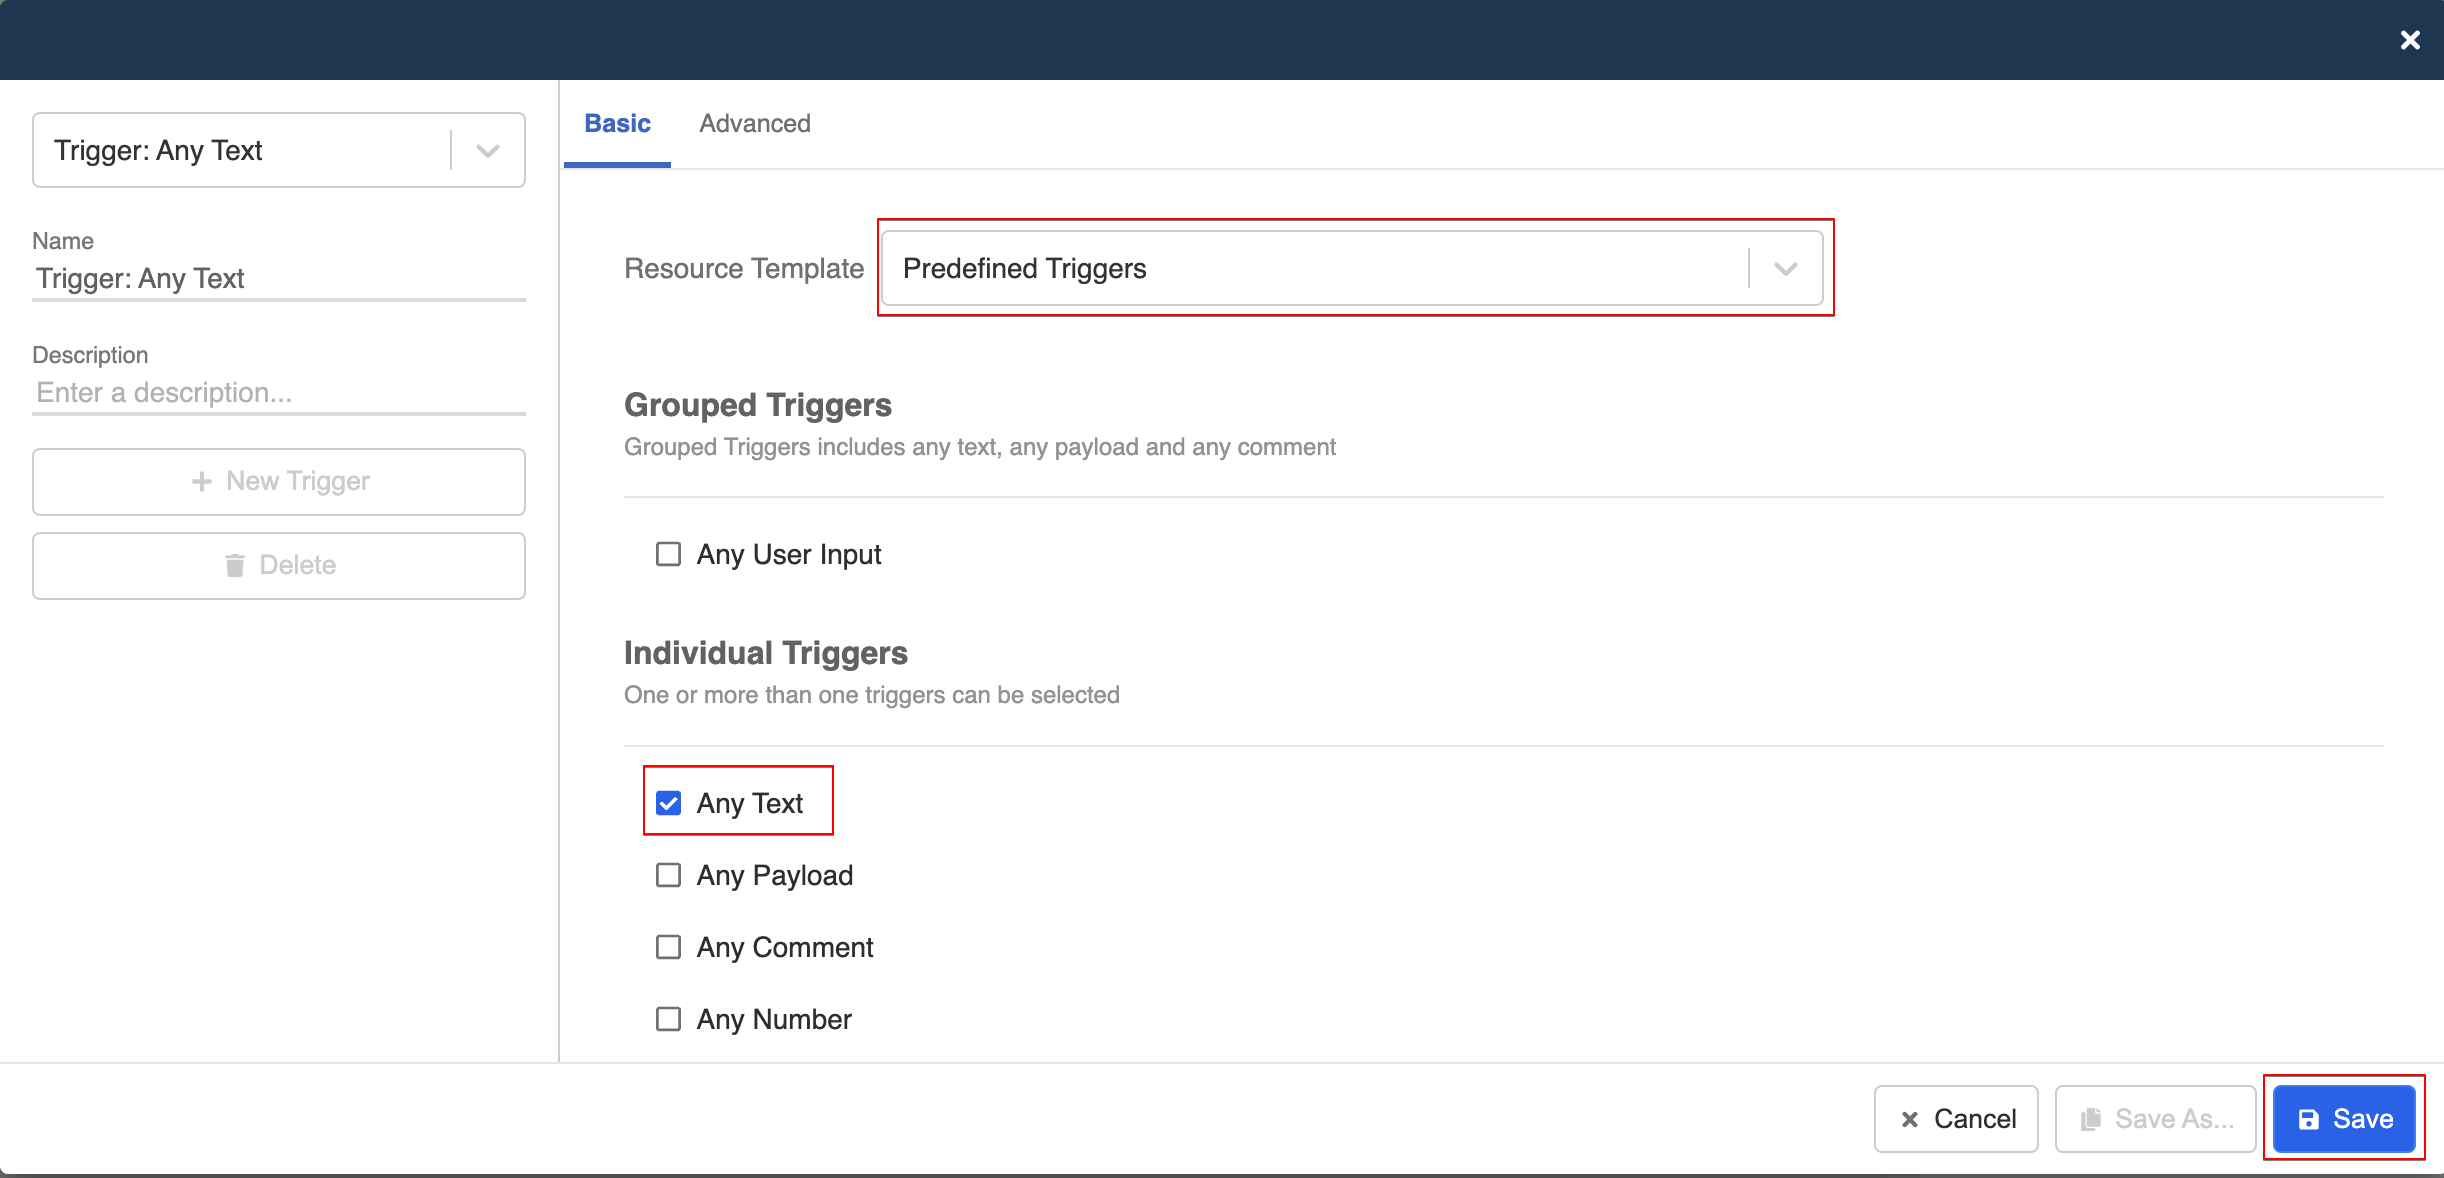
Create Any Text Trigger
- Create a new trigger. Select "Predefined Trigger", then select "Any Text". Then this node will be triggered by any text input by the customer.
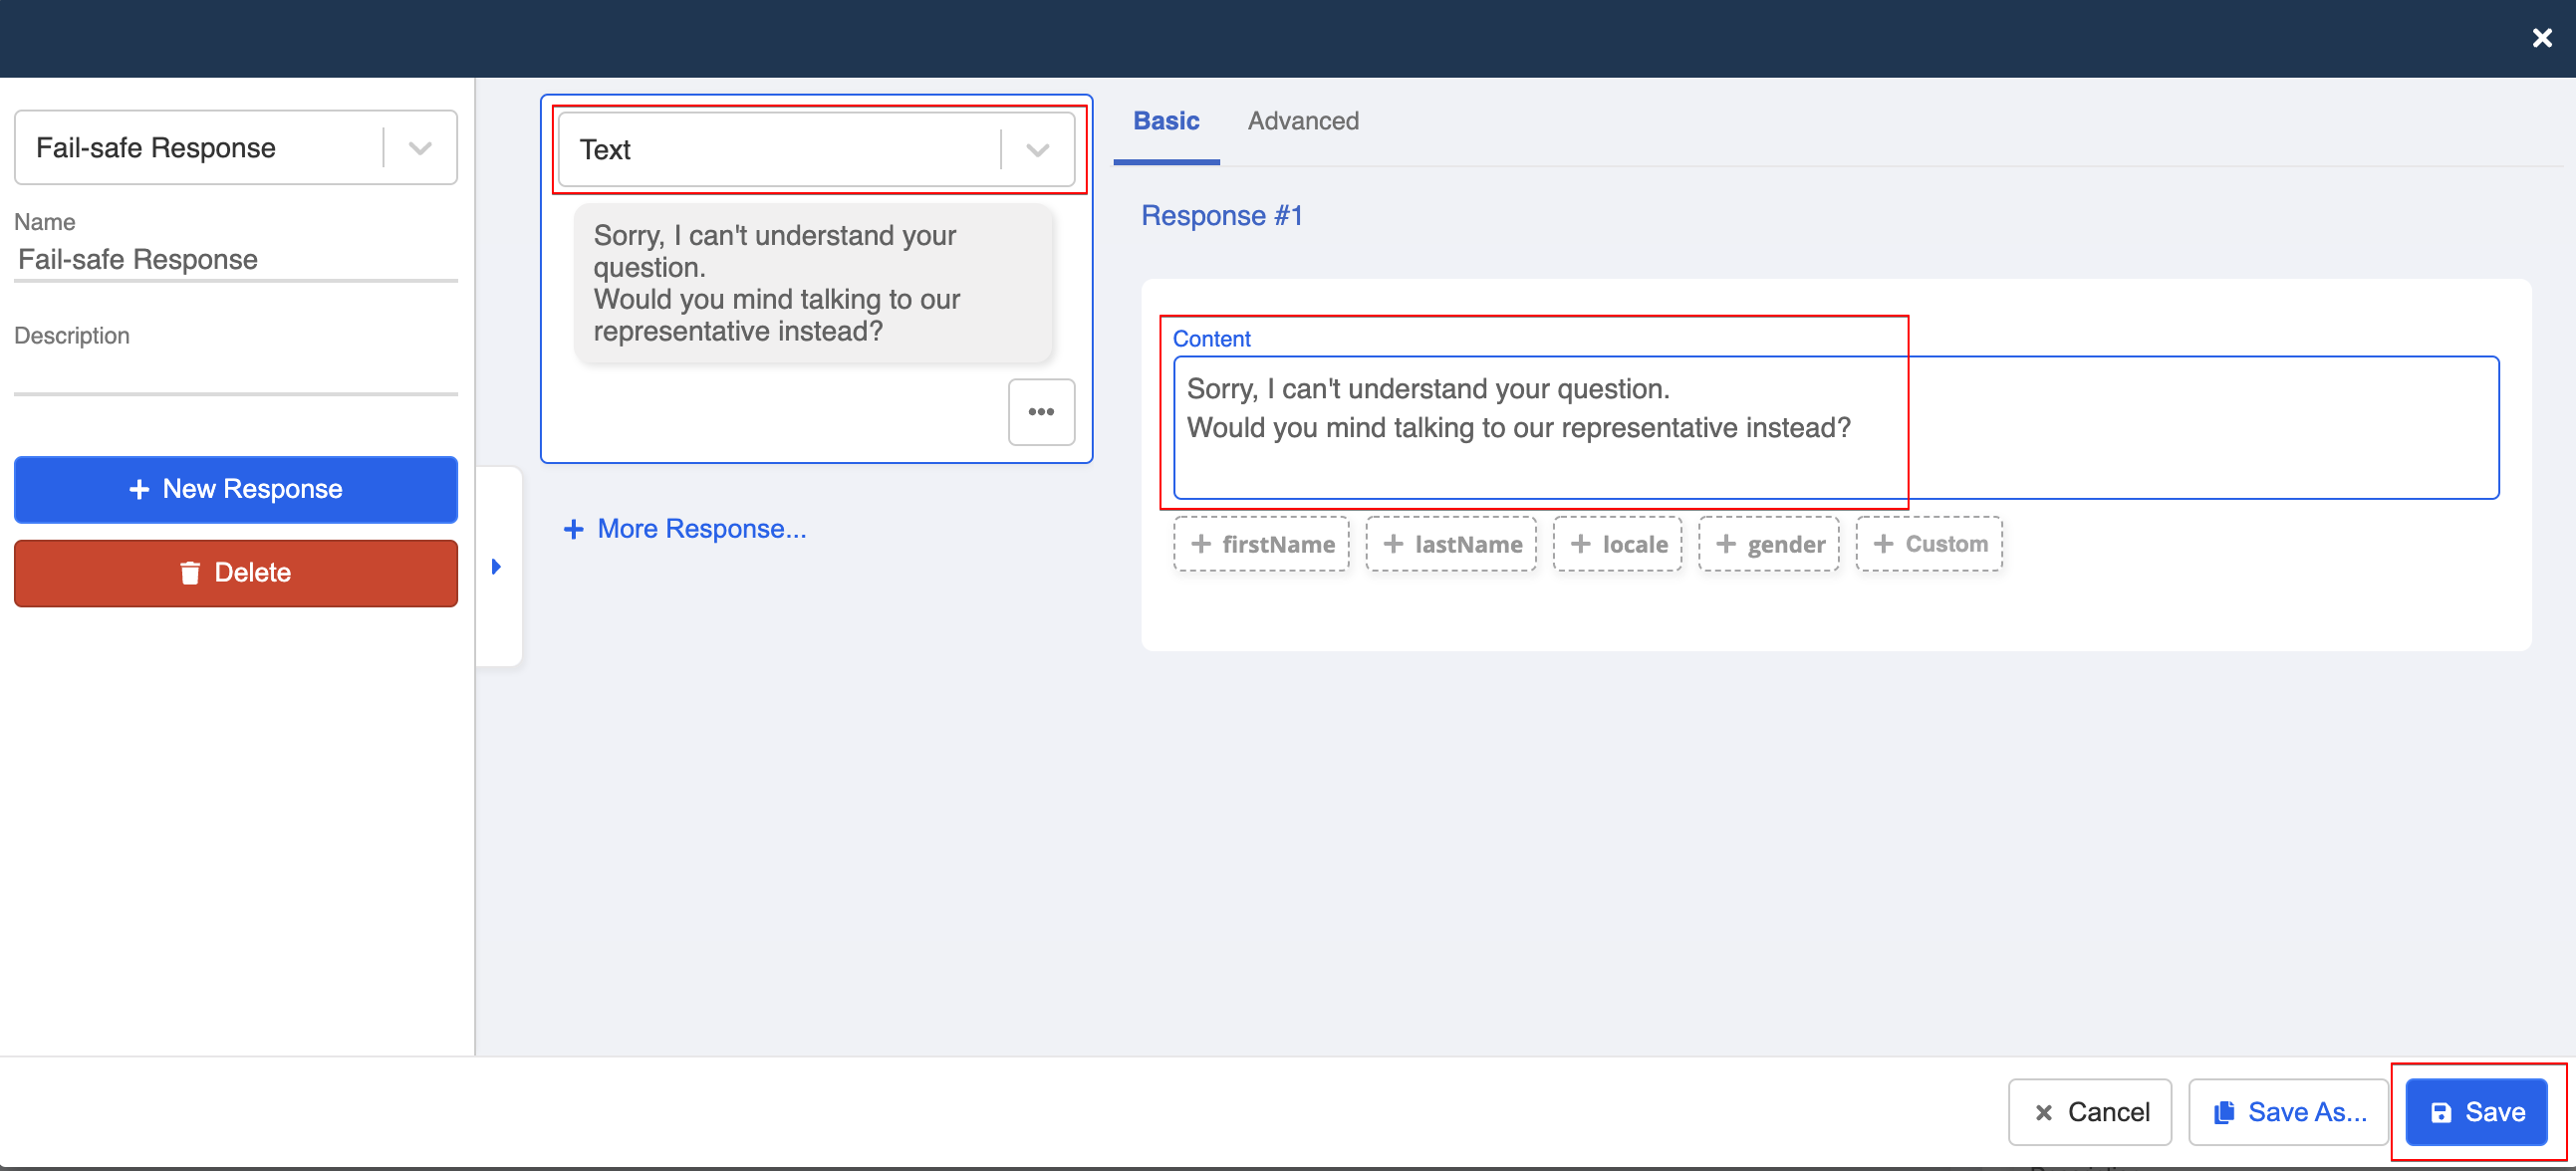
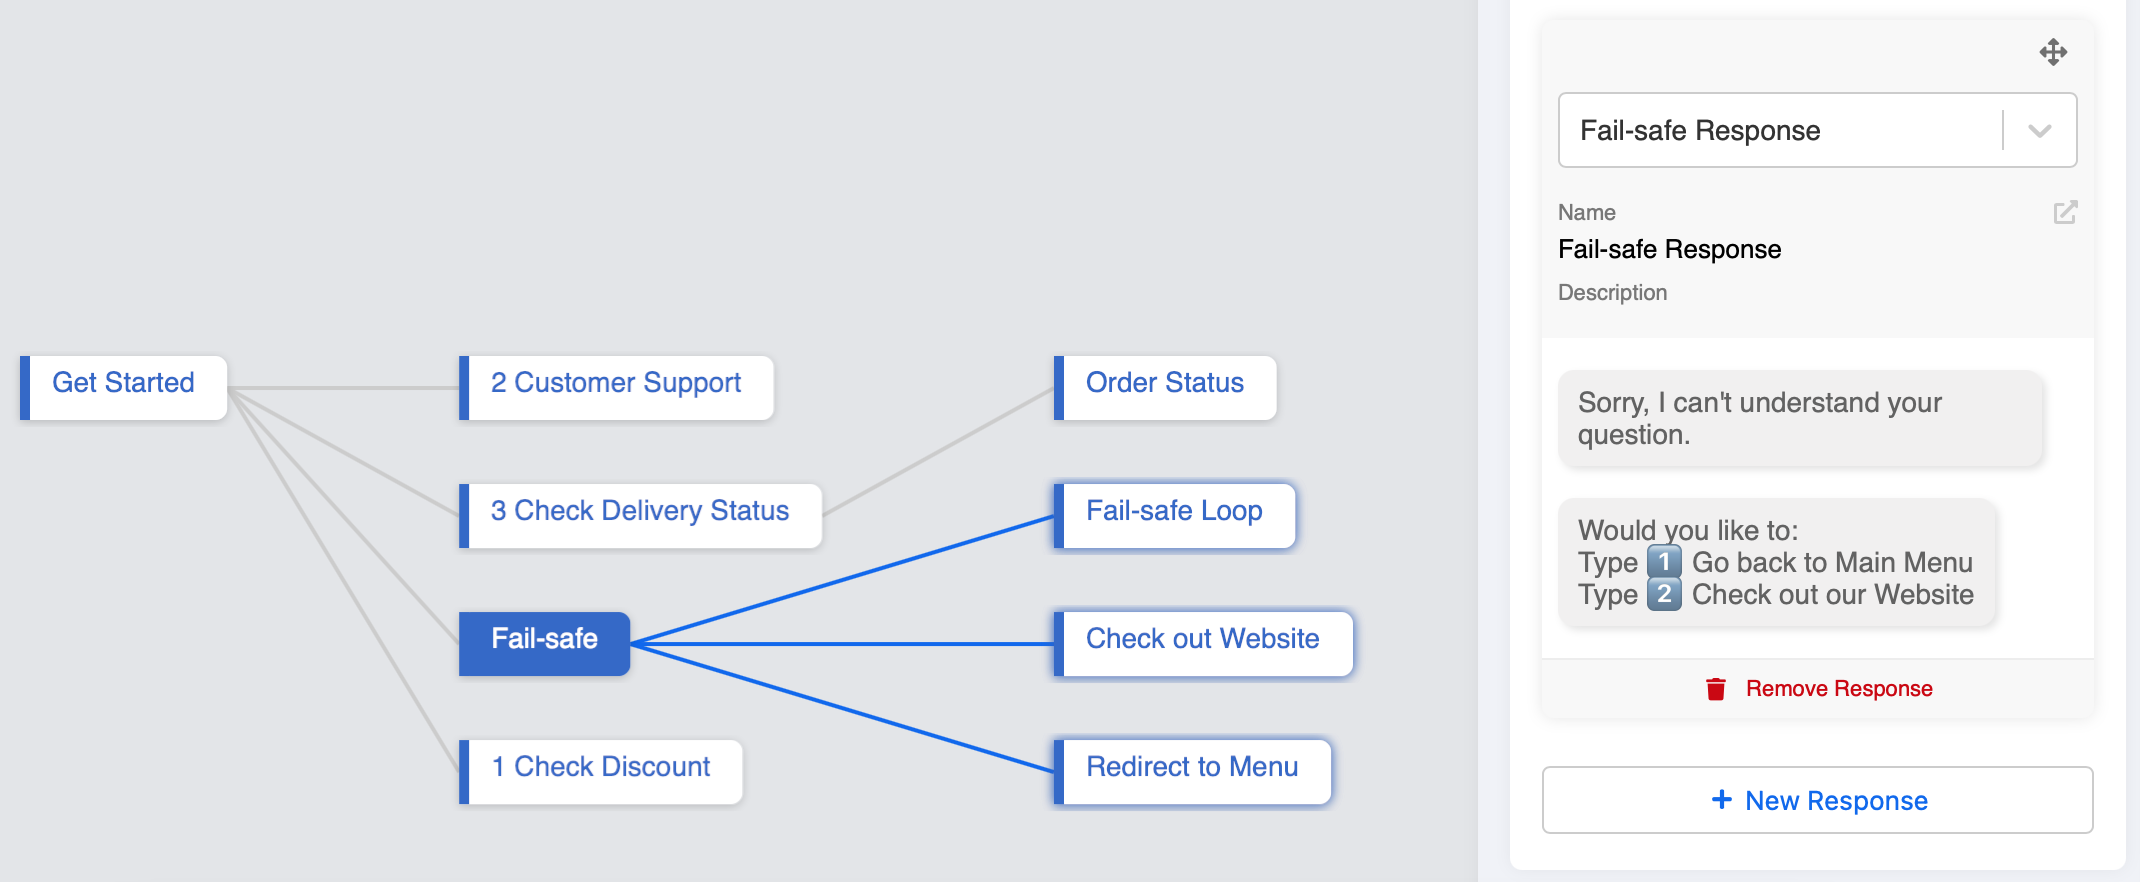
Create Fail-safe Response
- Create a new response for customers who input irrelevant texts. In this example, we invite the customers to talk to our customer support.
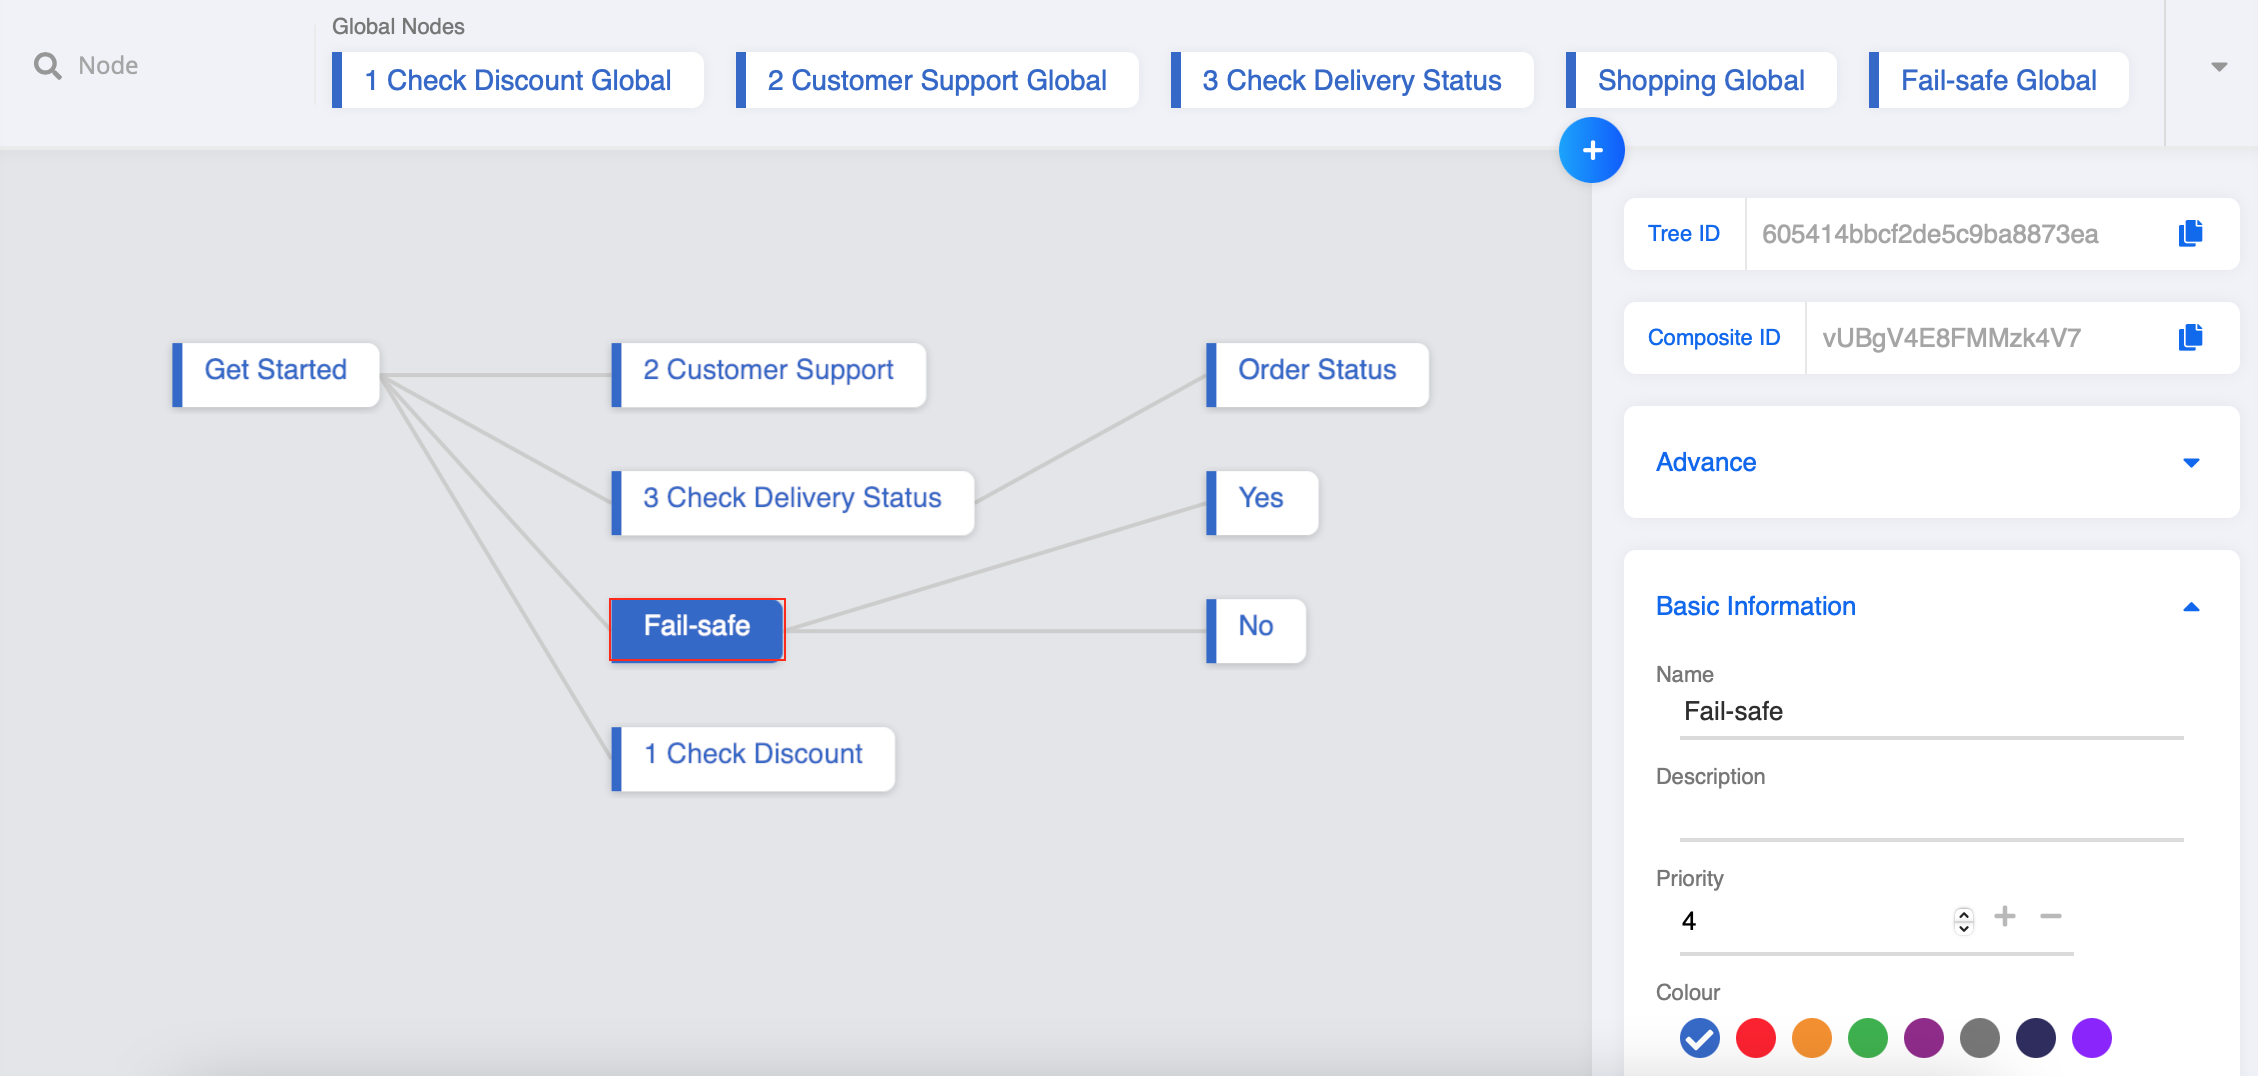
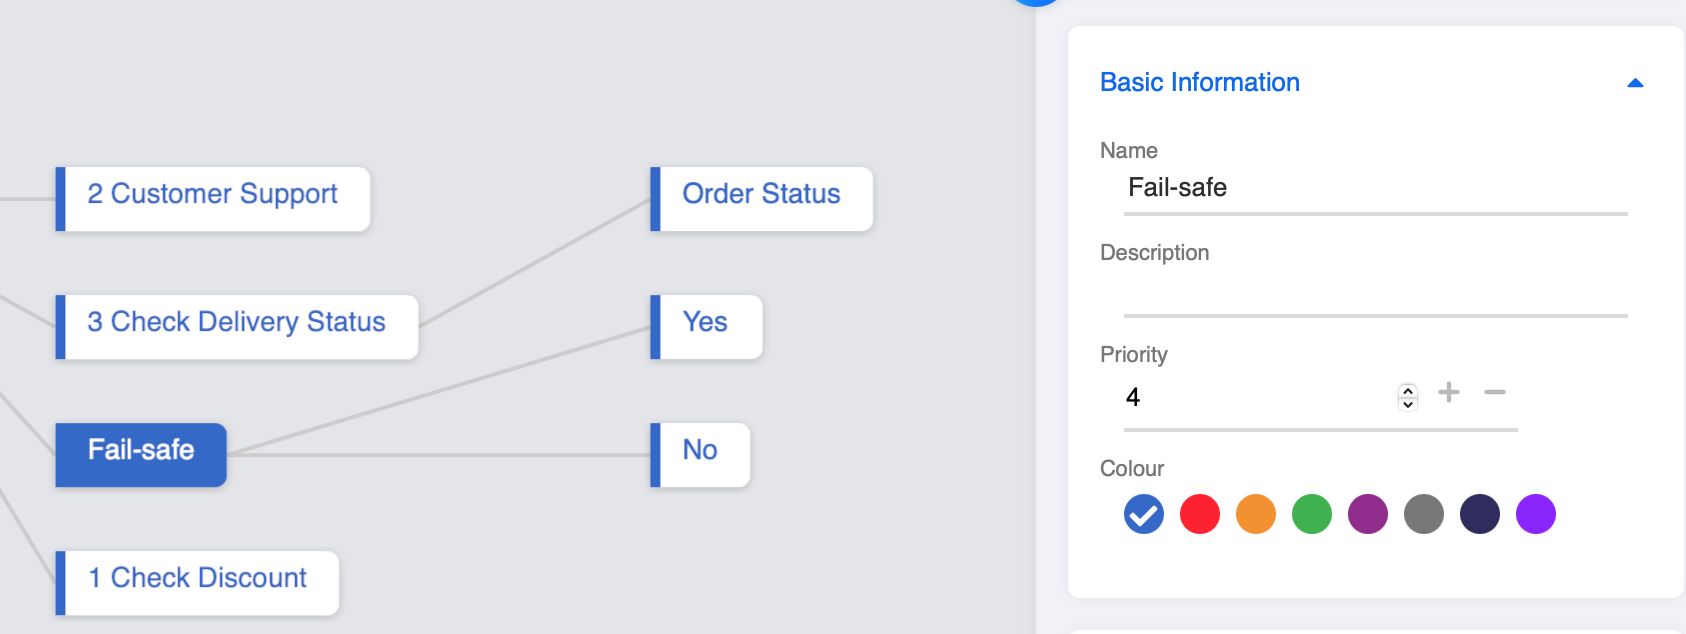
Change Priority
- Inside the chatbot, there are 4 nodes at this level, so you can change the Priority of Fail-safe node to "4", while other three remains as "0". By applying this, the chatbot will first match the text with the other three nodes. If the answer does not match with any of their triggers, it will enter the fail-safe node. Then, save this node.
tip
Remember that higher priority value stands for lower priority. Usually, a fail-safe node should have the lowest priority in a chatbot. It will be matched last when all the other text trigger cannot be matched.
Redirect to Another Node
In a fail-safe node, the best practice is to include a follow-up question. Besides, you can also redirect the customer back to the previous step in the conversation flow.
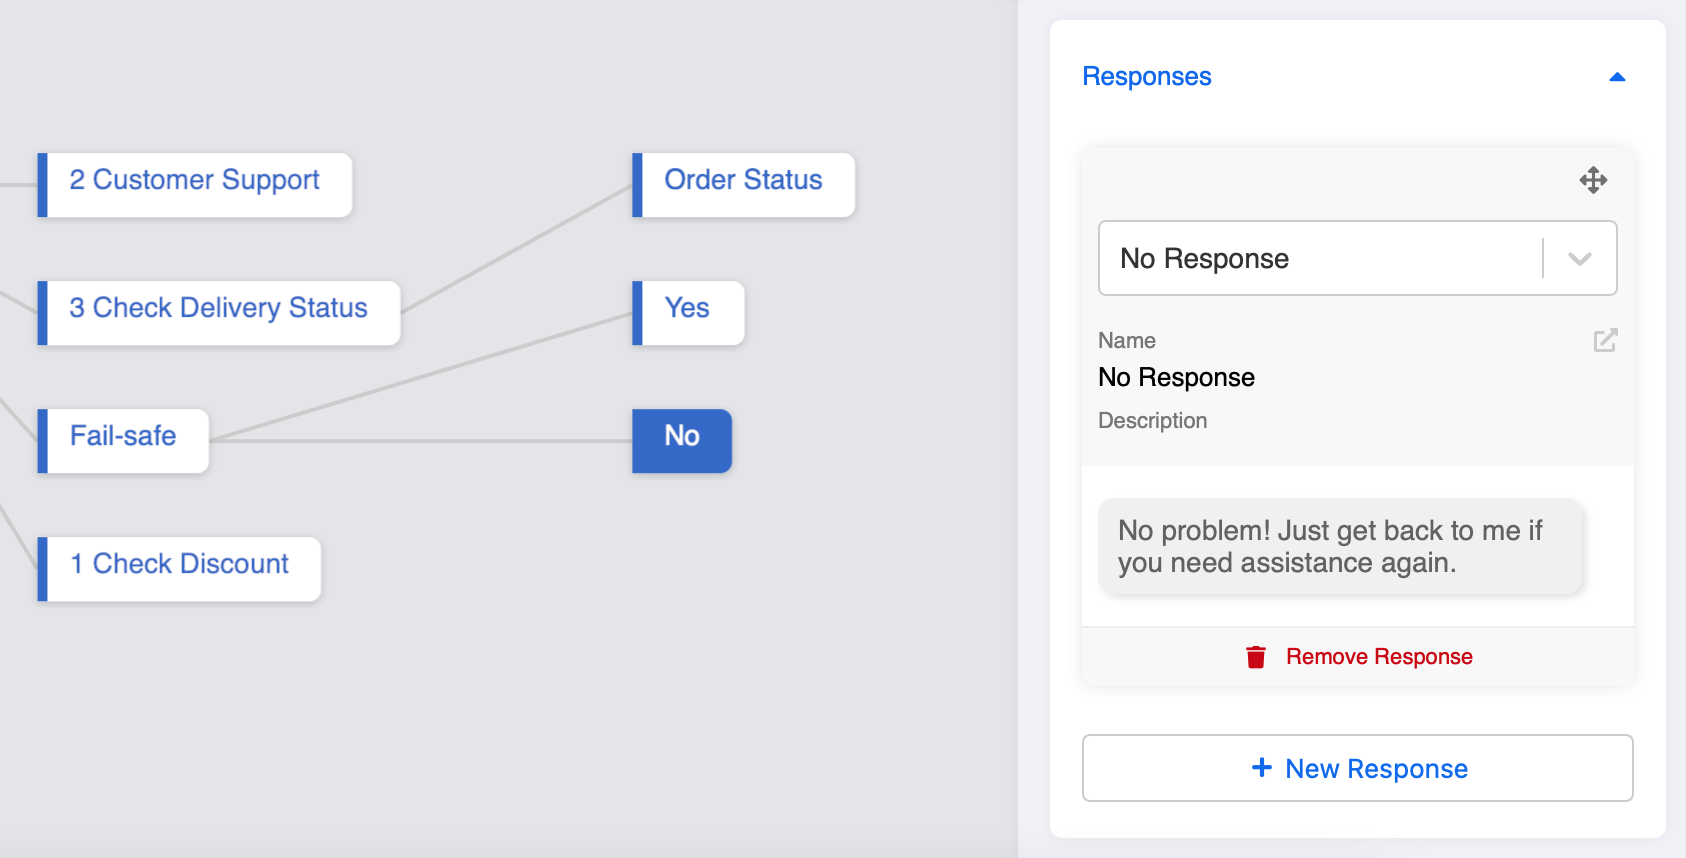
In the Fail-safe node, you have a follow-up question. So create 2 general nodes called "Yes" and "No" under your Fail-safe node.
In the "No" node, create a trigger and response if the customers do not want to talk to the customer support.
- In the "Yes" node, create a trigger and response if the customers want to talk to the customer support. Then Redirect the customers to the node for customer support.
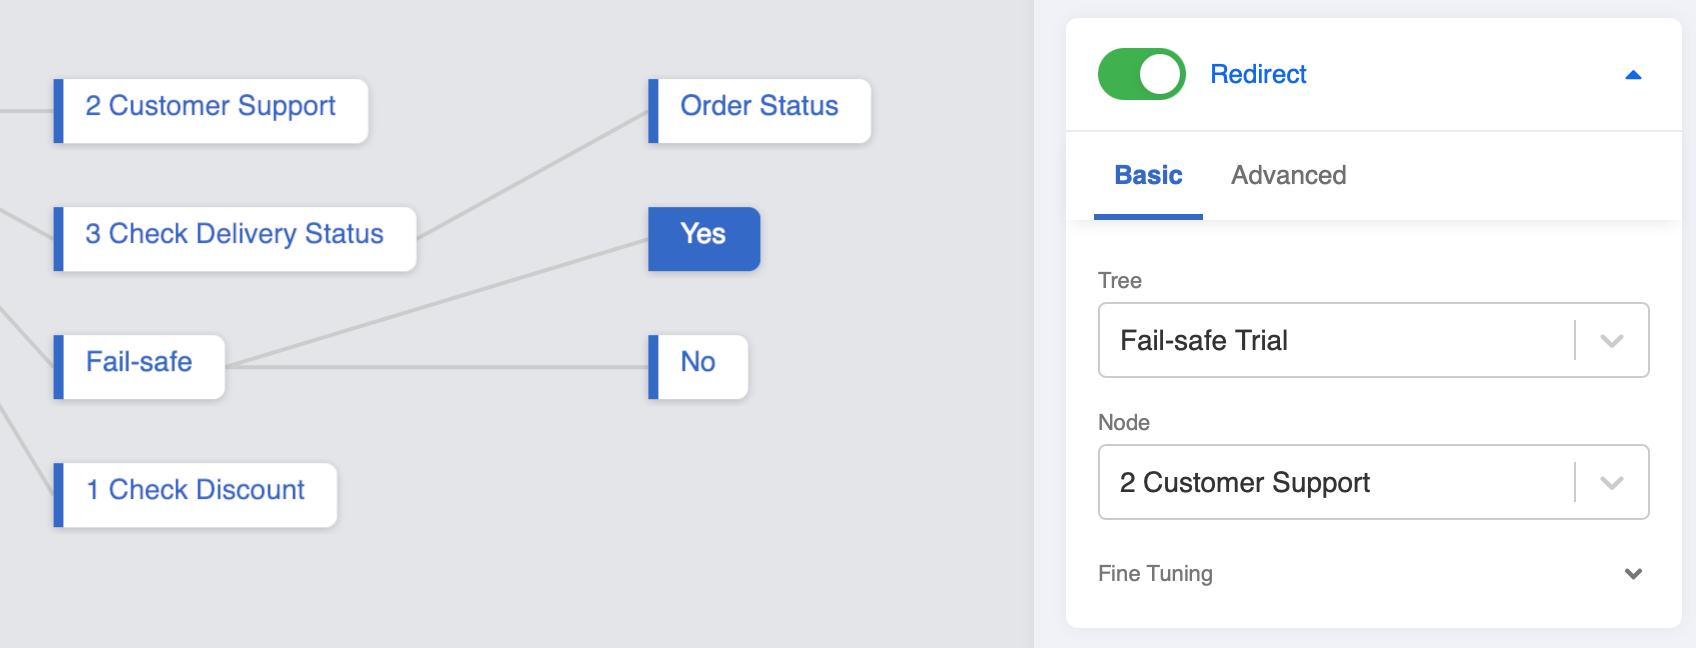
- Check and see if you can produce the expected outcome #1.
Apply Fail-safe Globally
Instead of applying Fail-safe to a particular session of your chatbot, you can create a Global Fail-safe and redirect the customers to a node, for example the main menu of your service.
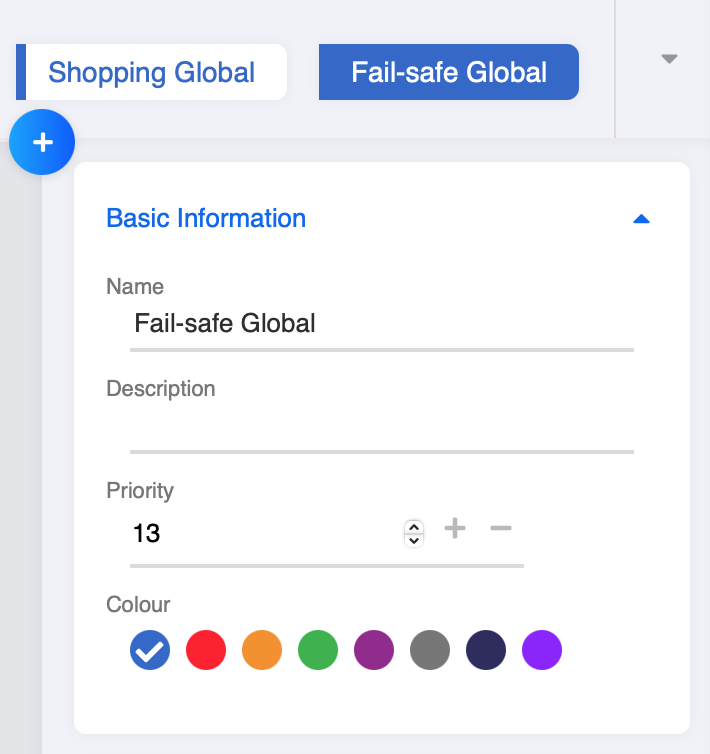
Create a global node, name it as "Fail-safe Global".
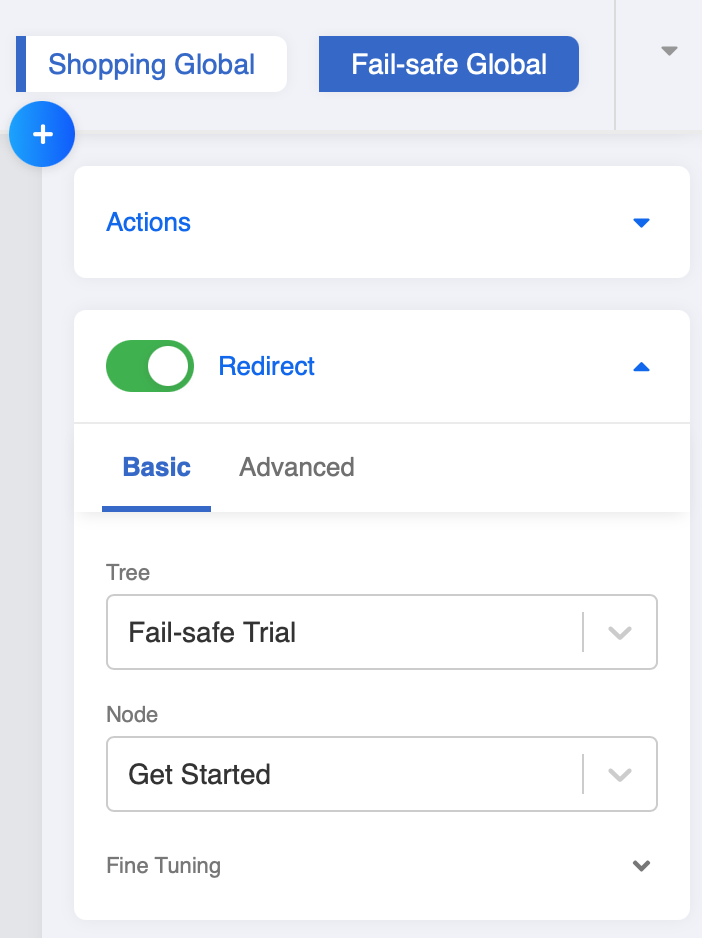
Create a new trigger. Select "Predefined Trigger", then select "Any Text". Then this node will be triggered by any text input by the customer.
- If the customers provide wrong answers at any node, it will redirect the customer back to the "Get Started" node, where the main menu of service is located at.
tip
It is not necessary to redirect to the first node of your chatbot. Your fail-safe node can redirect to any other point of the conversation flow which you deem reasonable, for example, the main menu or the previous step.
- As you only want the Fail-safe Global to be triggered when the chatbot is unable to match the answer with any of the triggers in the whole chatbot, you need to set up a larger Priority number for it. Let's set it to "13" since there are 13 nodes in this chatbot.
tip
Remember that higher priority value stands for lower priority. Usually, a fail-safe node should have the lowest priority in a chatbot. It will be matched last when all the other text trigger cannot be matched.
- Check and see if you can produce the expected outcome #2.
Fail-safe Loop
If your Fail-safe has a follow-up question, you can set up a Fail-safe Loop, which is a fail-safe for the previous fail-safe. By setting up an additional Fail-safe on top of the previous one, this Fail-safe Loop will keep telling the customer to retry until they input the correct answer.
- Follow Step 1 to 4 to create a new Fail-safe node if you don't have any.
- Create new nodes under the Fail-safe node as redirecting options. You can take reference from step 5 to 7.
- Create another new node under Fail-safe node, name it "Fail-safe Loop".
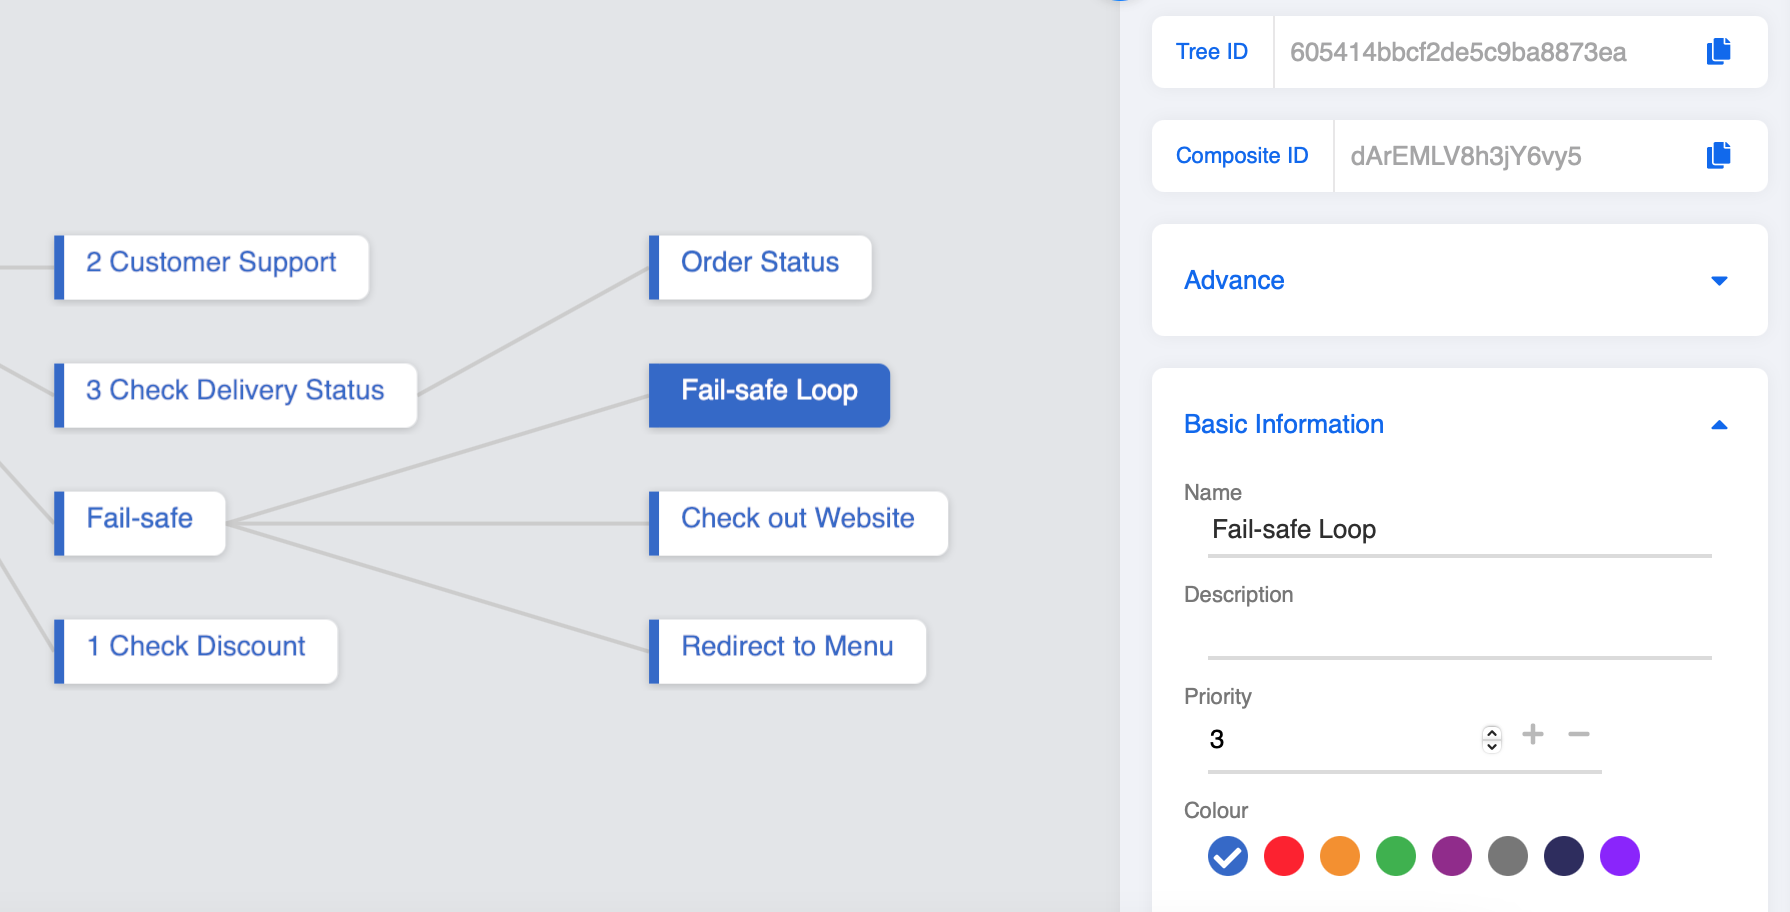
- Create any text trigger just like step 2. And change the Priority to "3" as there are 3 nodes at this level.

- Then redirect this node back to the previous Fail-safe node to form a Fail-safe Loop.
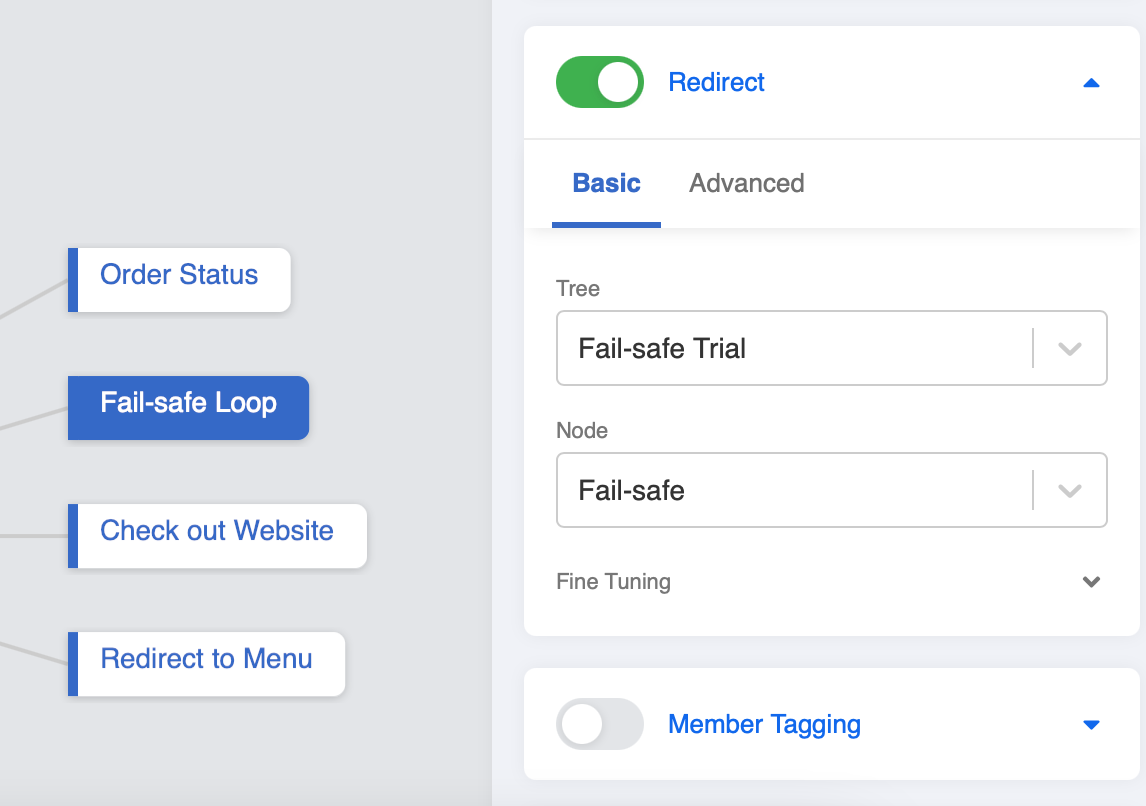
- Check and see if you can produce the expected outcome #3.
Advanced Fail-safe
To refine the conversation flow and improve the user experience, you can also apply an advanced version of fail-safe.
We have introduced Fail-safe Global and Fail-safe Loop in the previous session. However, trapping a user in a fail-safe loop might not be the best practice for a fail-safe design. Instead, you can decide a condition to stop the loop, and redirect the user to another node, e.g. live chat support.
You can design a fail-safe flow to count how many times a user has entered the fail-safe node, when the count reaches a particular limit, the fail-safe node can automatically redirect the user to the customer support.
Expected Outcome
The user will go through the standard fail-safe flow when he first enters tha fail-safe node. However, the user will be redirected to the customer support when he enters the fail-safe node two times in a row.
Fail-safe node and Global
Sample Chatbot Structure
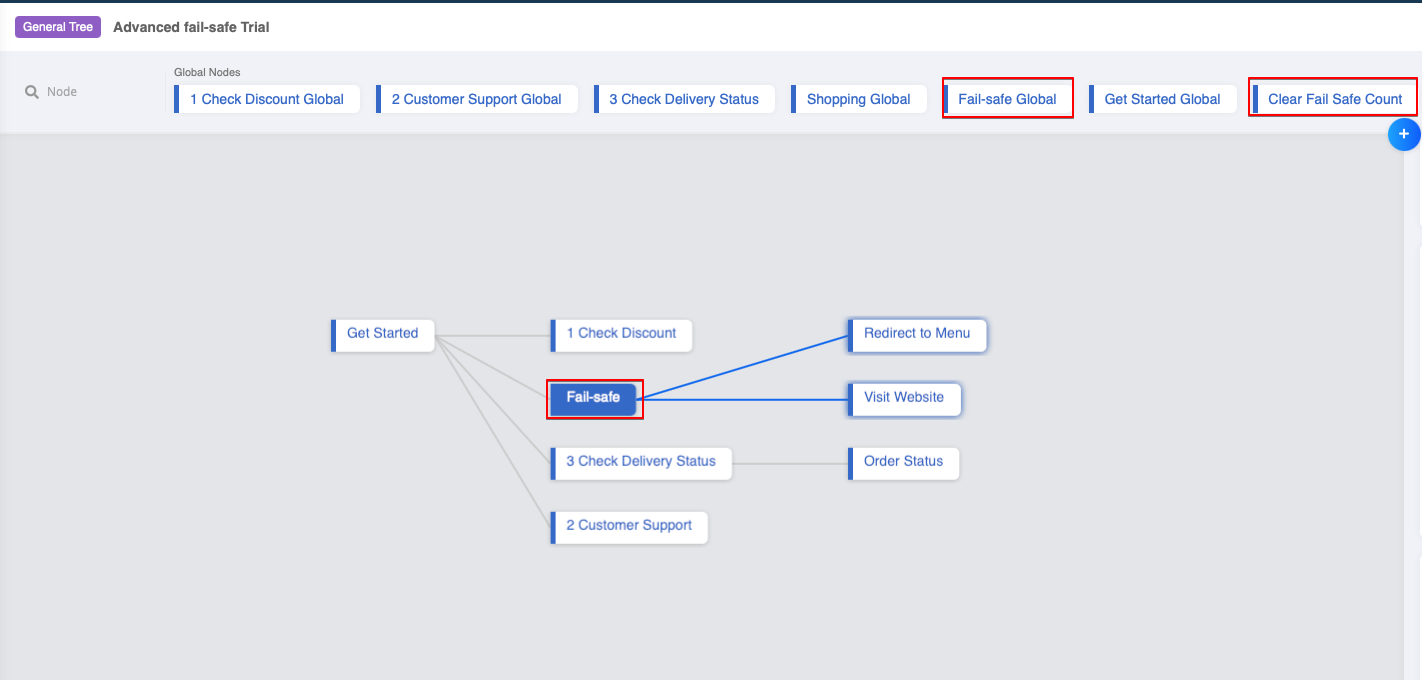
- First, create a fail-safe chatbot node under "Get Started". Create an "Any text" trigger and lower the priority. When the user inputs the incorrect answer, redirection options will be given to him.
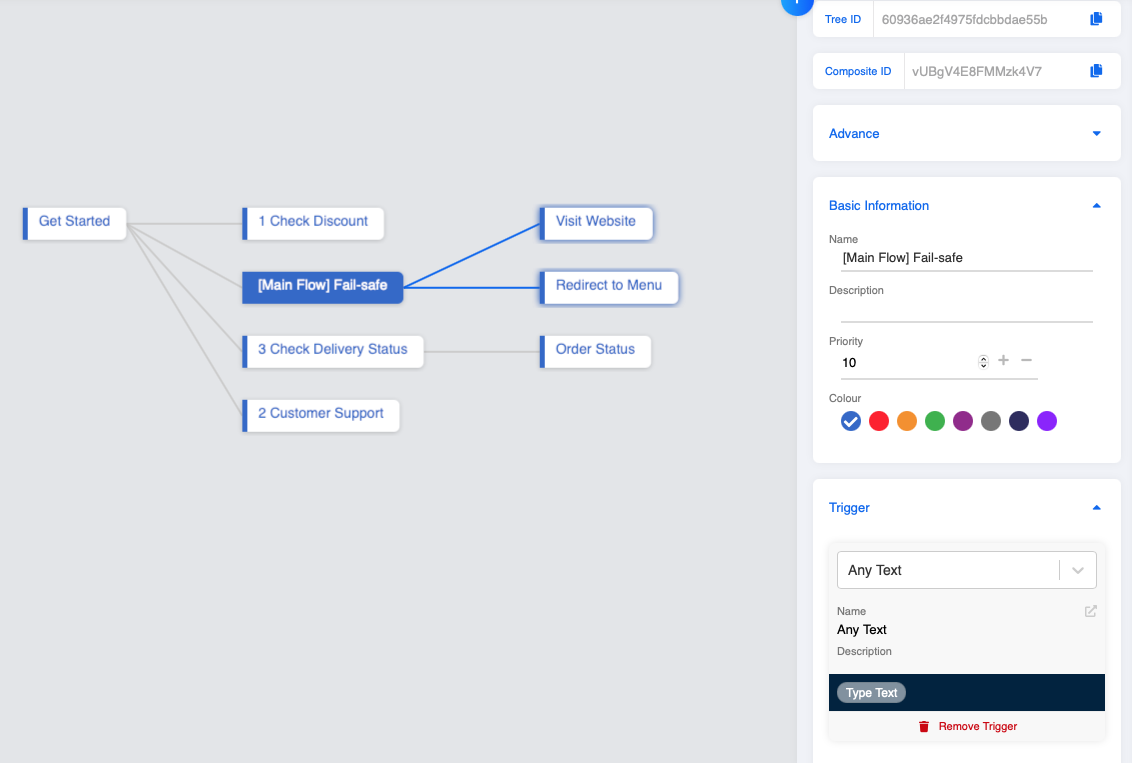
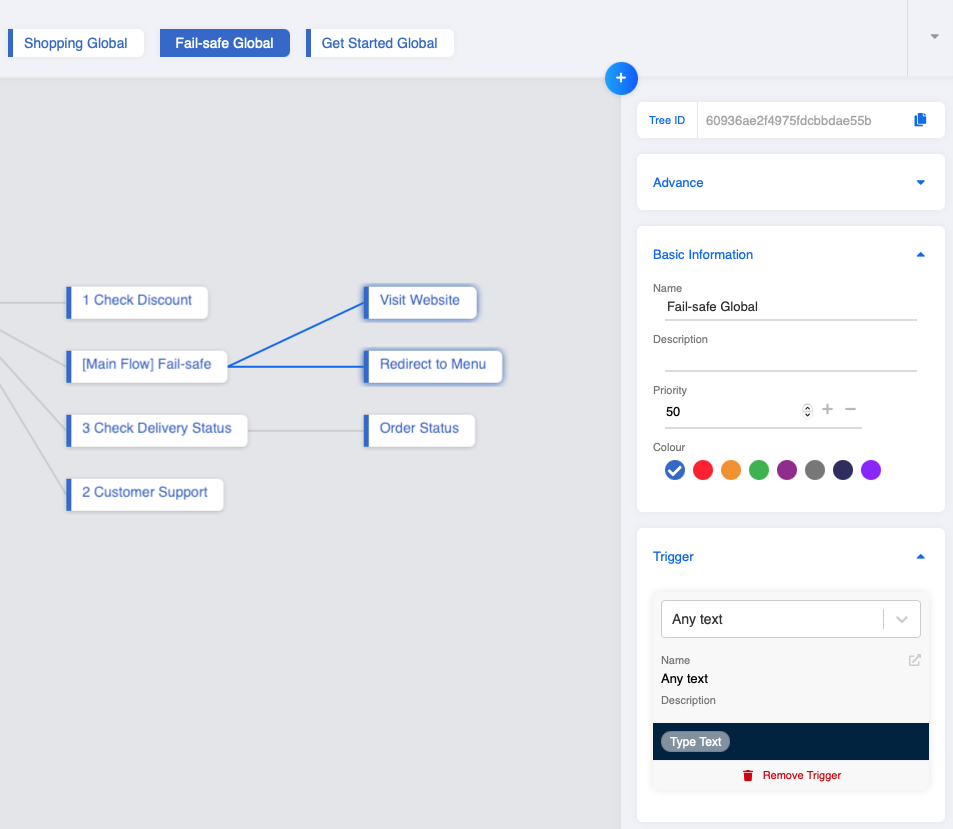
- Create a fail-safe global node, set the priority to be the lowest and set up an "Any text" trigger. In the sample chatbot, the priority of this node is 50, it will cover all the unmatched input and redirect the users to the fail-safe node.
Fail-safe Count
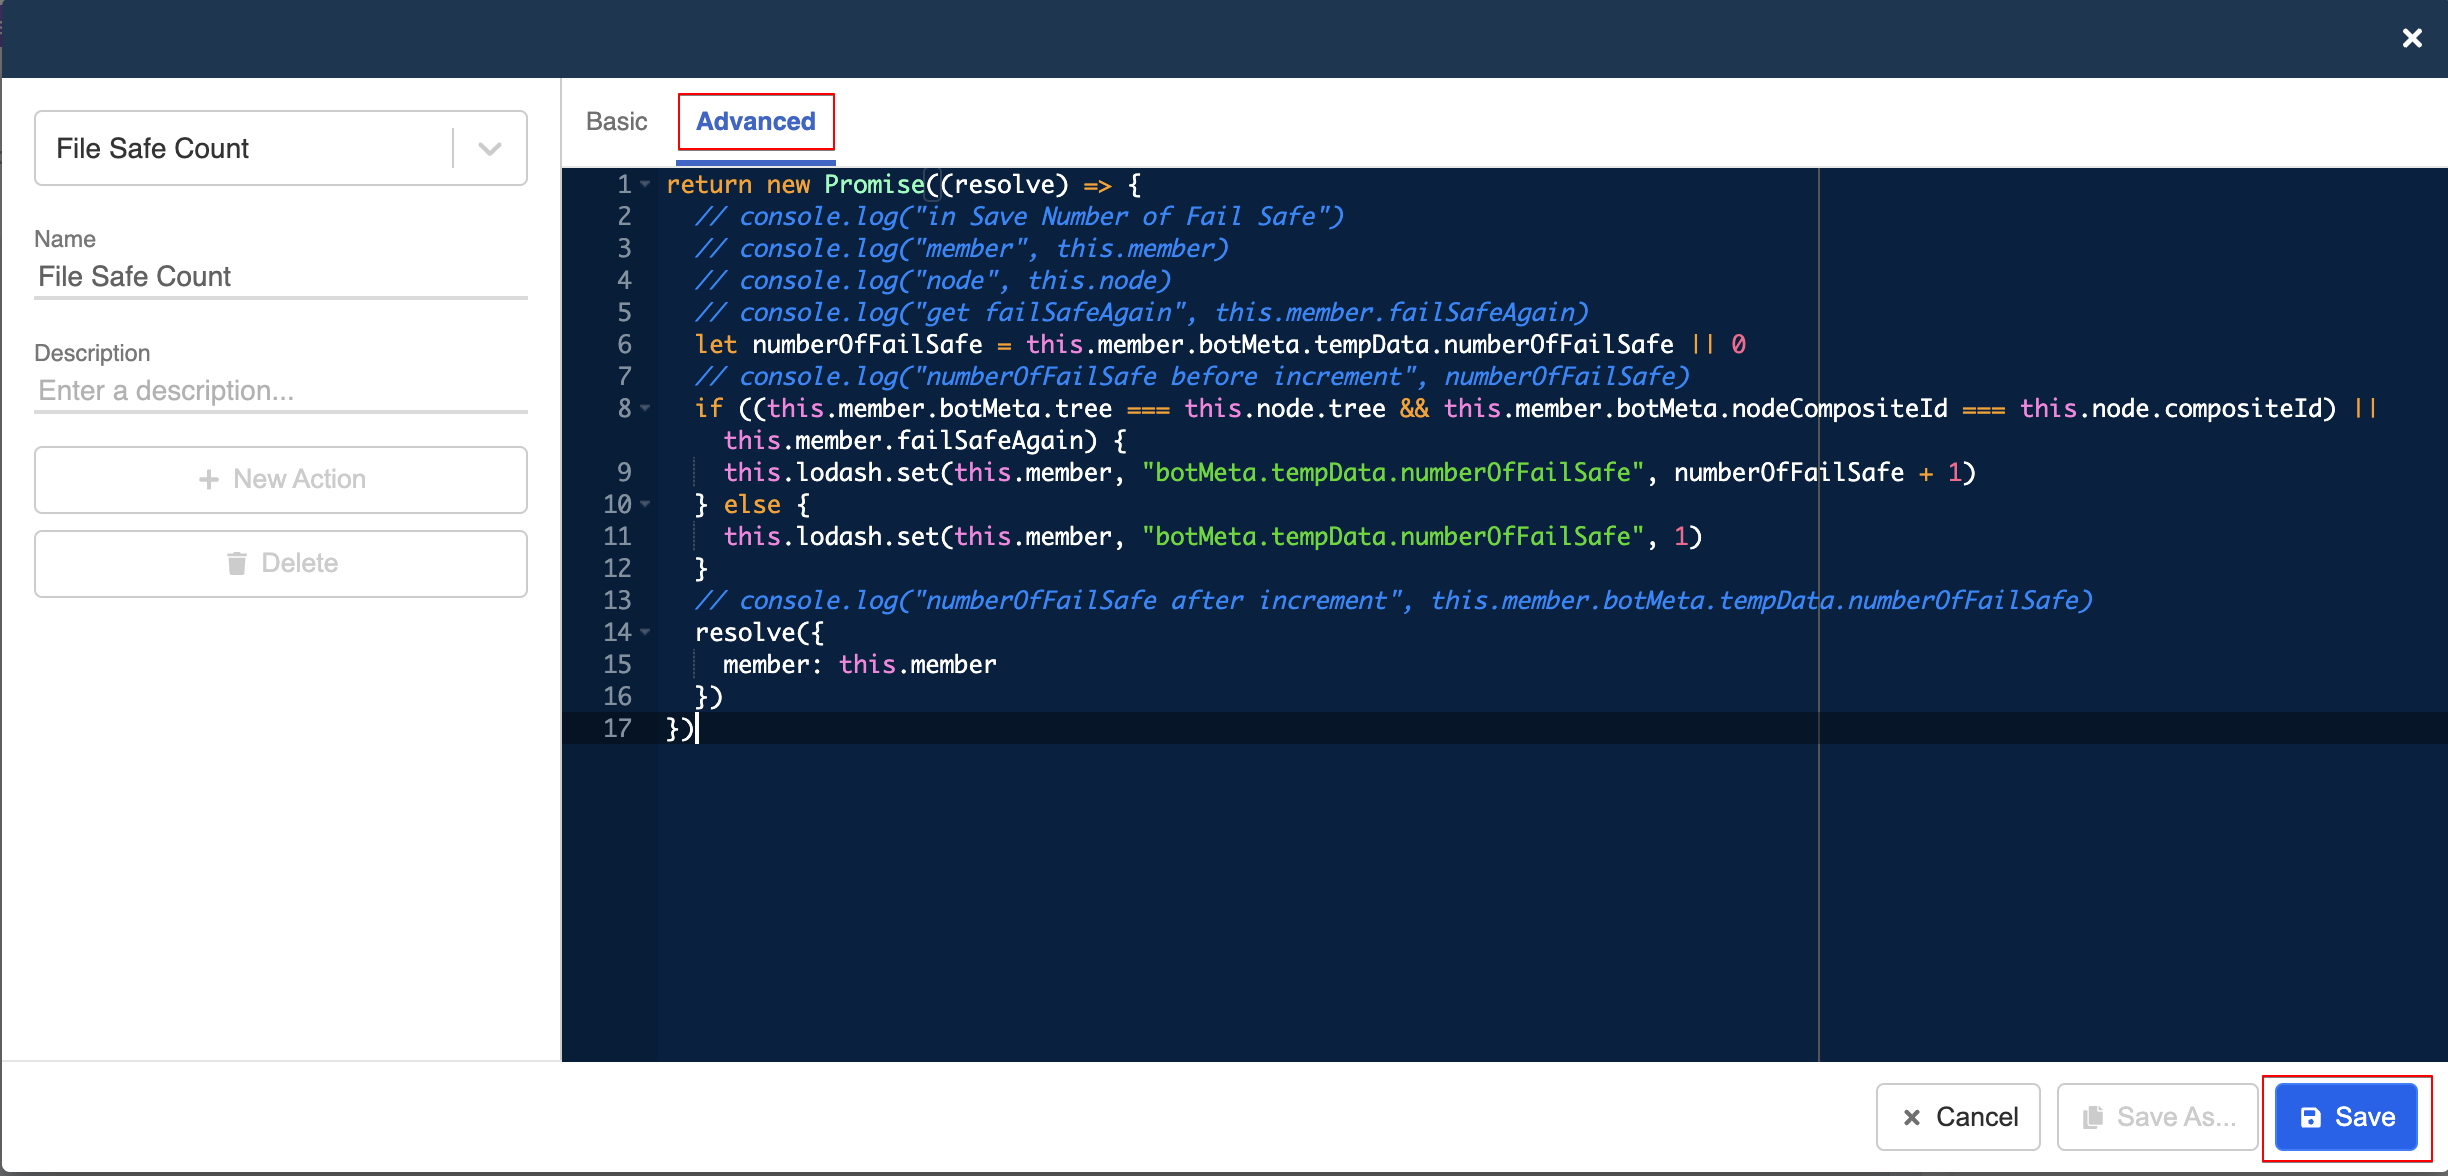
In "[Main Flow] Fail-safe", create a pre-action.
Enter the following code. This pre-action will count how many times a user has entered this node. The count will be saved in member's tempData.
return new Promise((resolve) => {
  // console.log("in Save Number of Fail Safe")
  // console.log("member", this.member)
  // console.log("node", this.node)
  // console.log("get failSafeAgain", this.member.failSafeAgain)
  let numberOfFailSafe = this.member.botMeta.tempData.numberOfFailSafe || 0
  // console.log("numberOfFailSafe before increment", numberOfFailSafe)
  if ((this.member.botMeta.tree === this.node.tree && this.member.botMeta.nodeCompositeId === this.node.compositeId) || this.member.failSafeAgain) {
    this.lodash.set(this.member, "botMeta.tempData.numberOfFailSafe", numberOfFailSafe + 1)
  } else {
    this.lodash.set(this.member, "botMeta.tempData.numberOfFailSafe", 1)
  }
  // console.log("numberOfFailSafe after increment", this.member.botMeta.tempData.numberOfFailSafe)
  resolve({
    member: this.member
  })
})
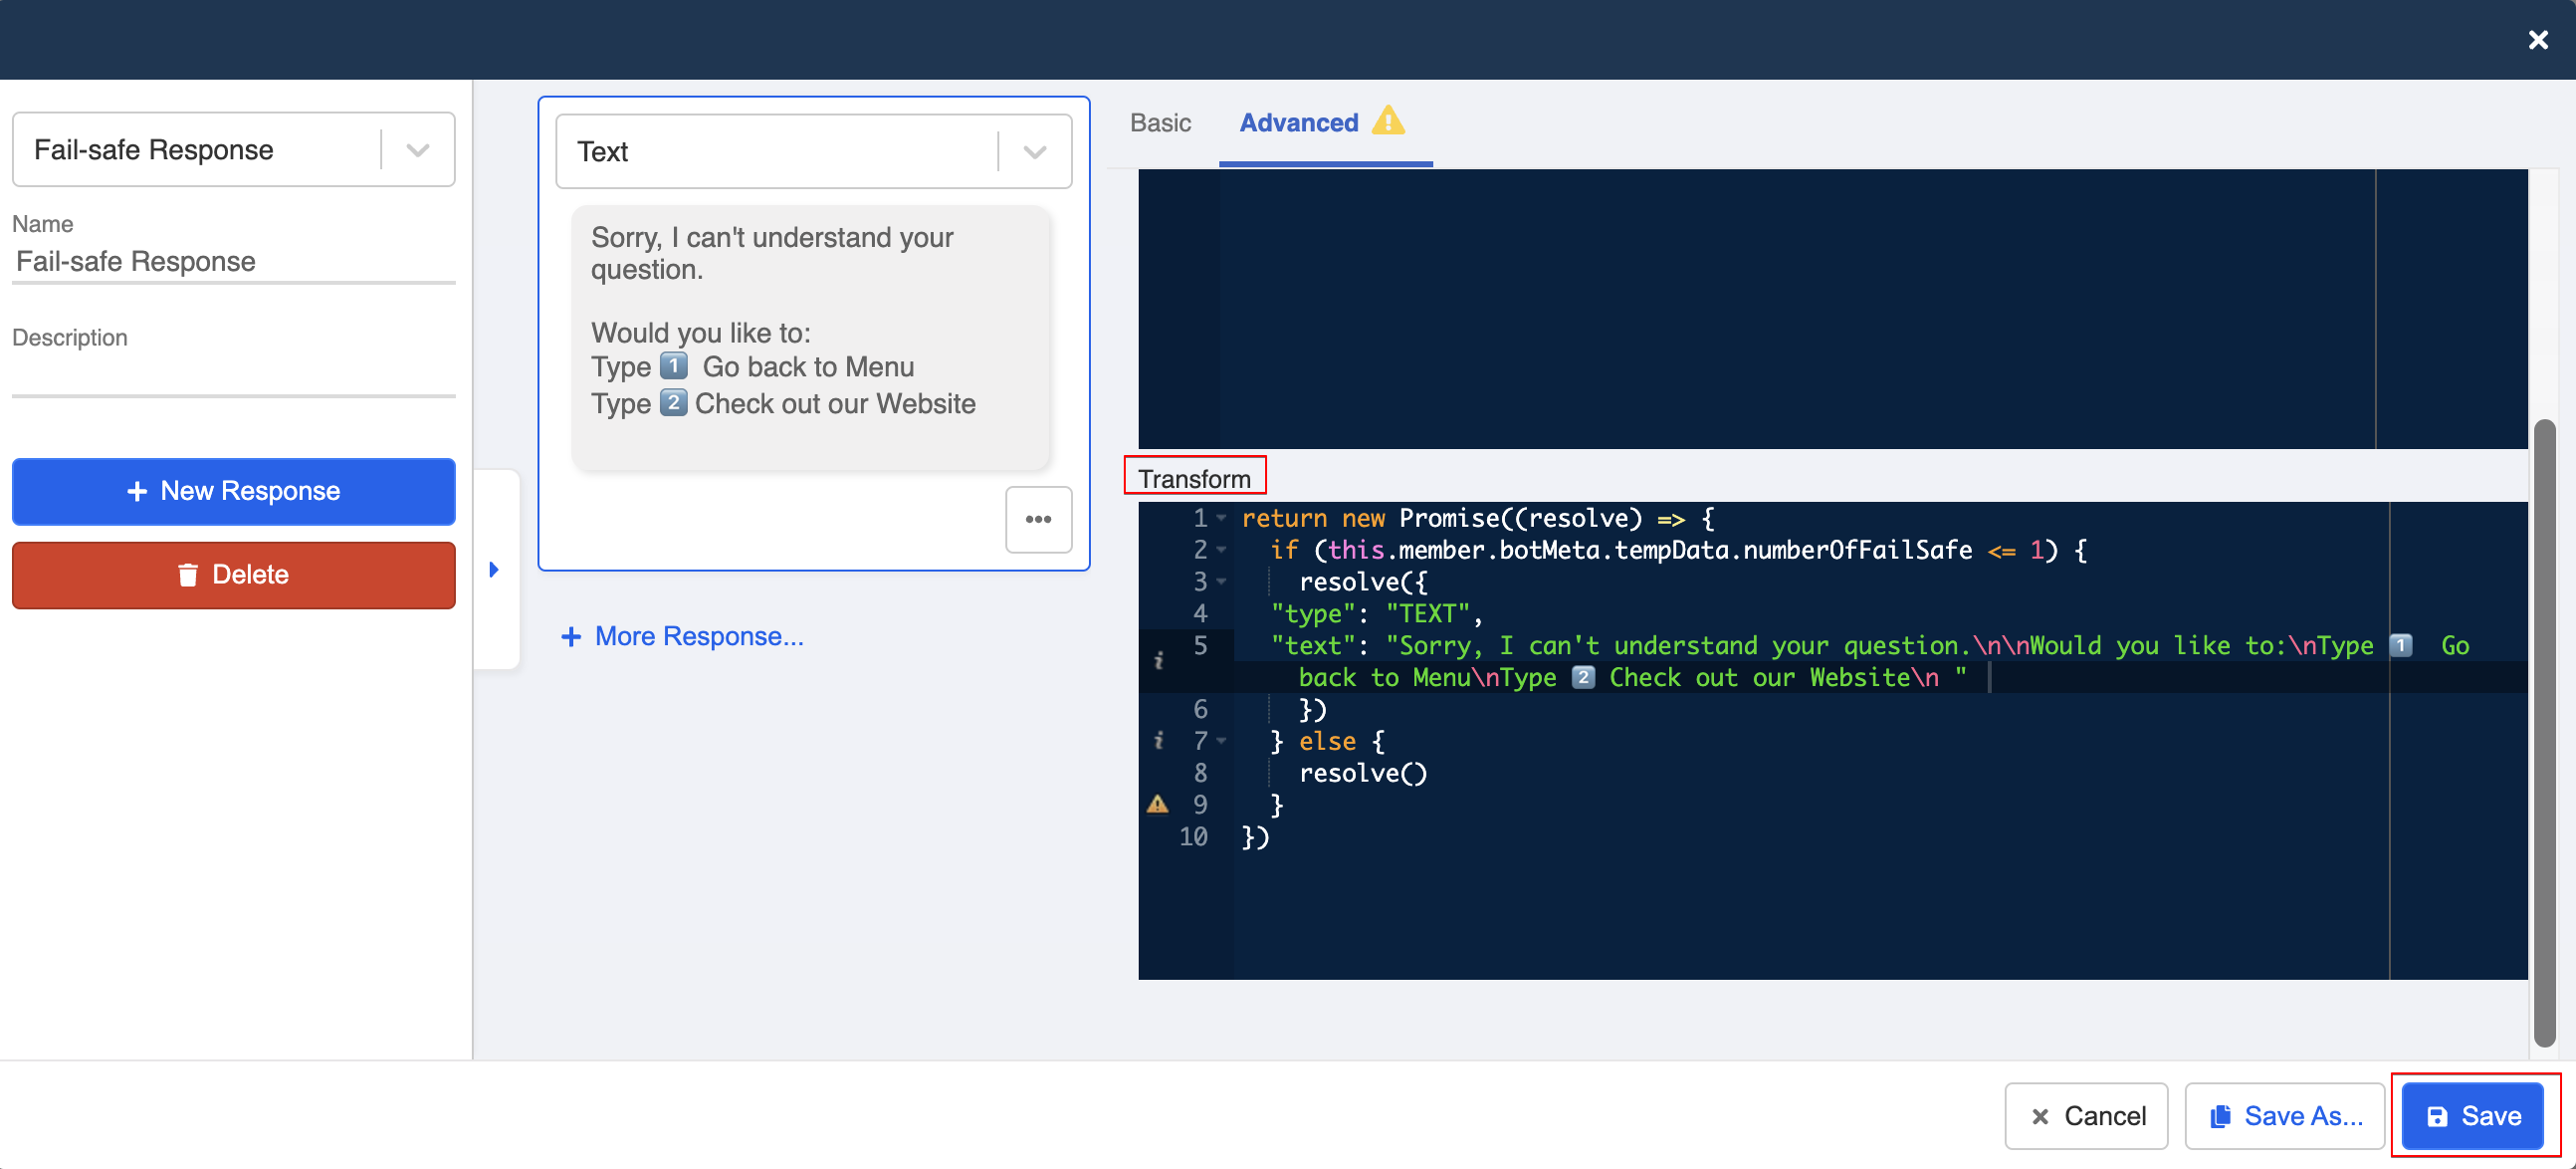
Transformed Response
- When the user has entered the fail-safe node multiple times in a row, we don't want to display the original response.
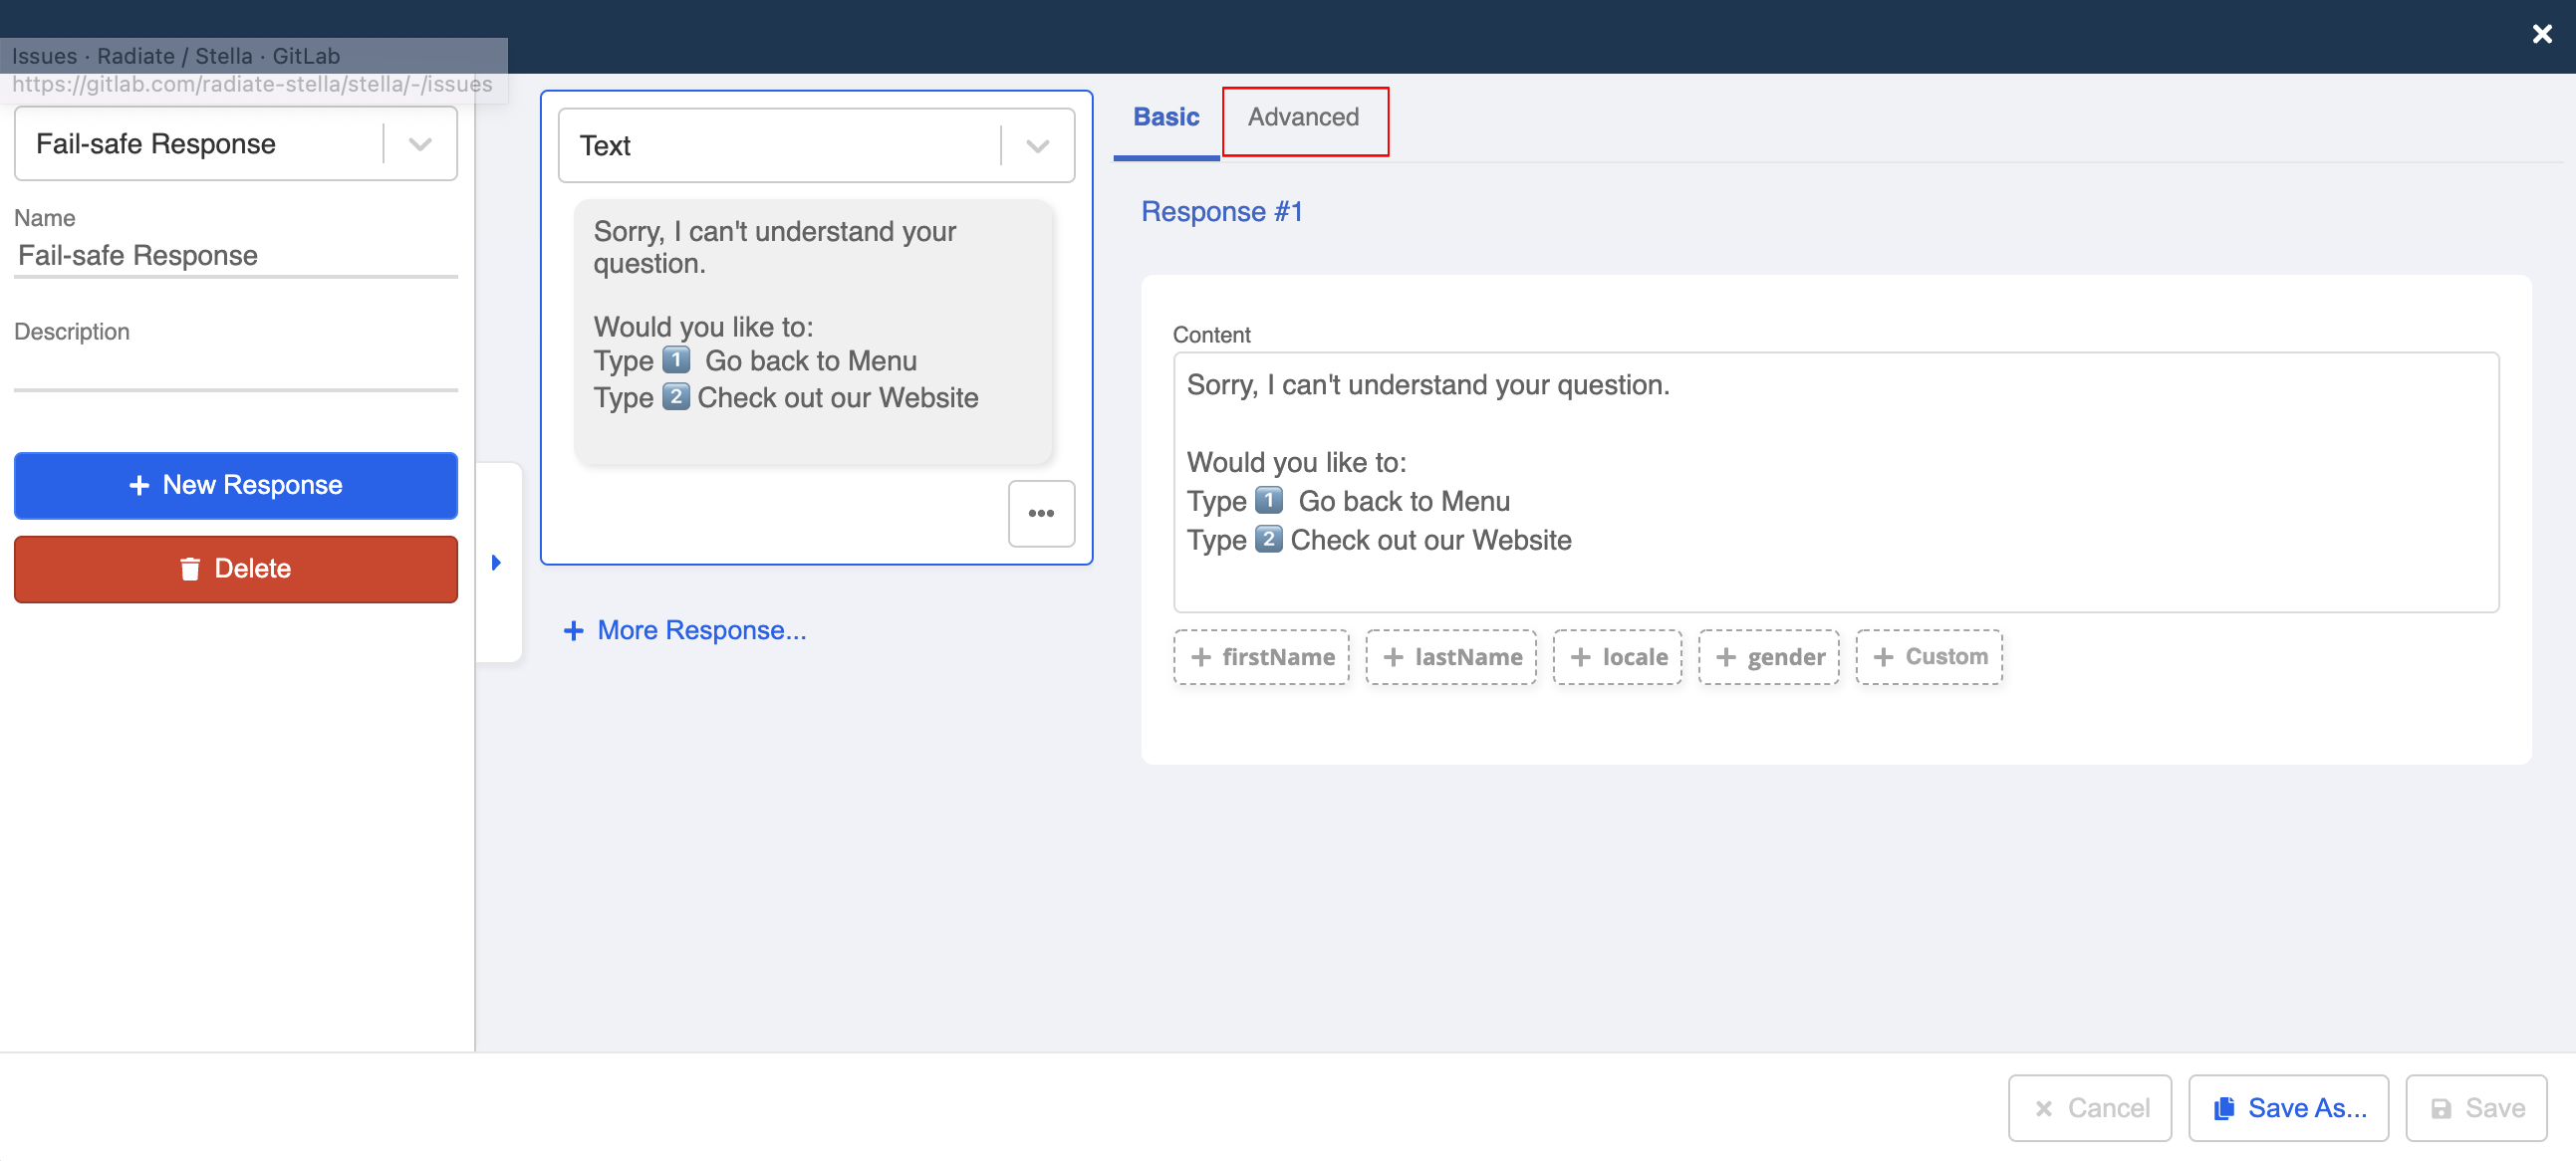
- Click on "Advanced", enter the following code.
this.member.botMeta.tempData.numberOfFailSafeis the count of how many times has a user entered the fail-safe node. If the count is less or equal to 1, the original response will be displayed. If the count is greater than 1, this response will be displayed.
return new Promise((resolve) => {
  if (this.member.botMeta.tempData.numberOfFailSafe <= 1) {
    resolve({
     <RESPONSE>
    })
  } else {
    resolve()
  }
})
tip
You can copy the original response from "Response Object" and paste it into the code.
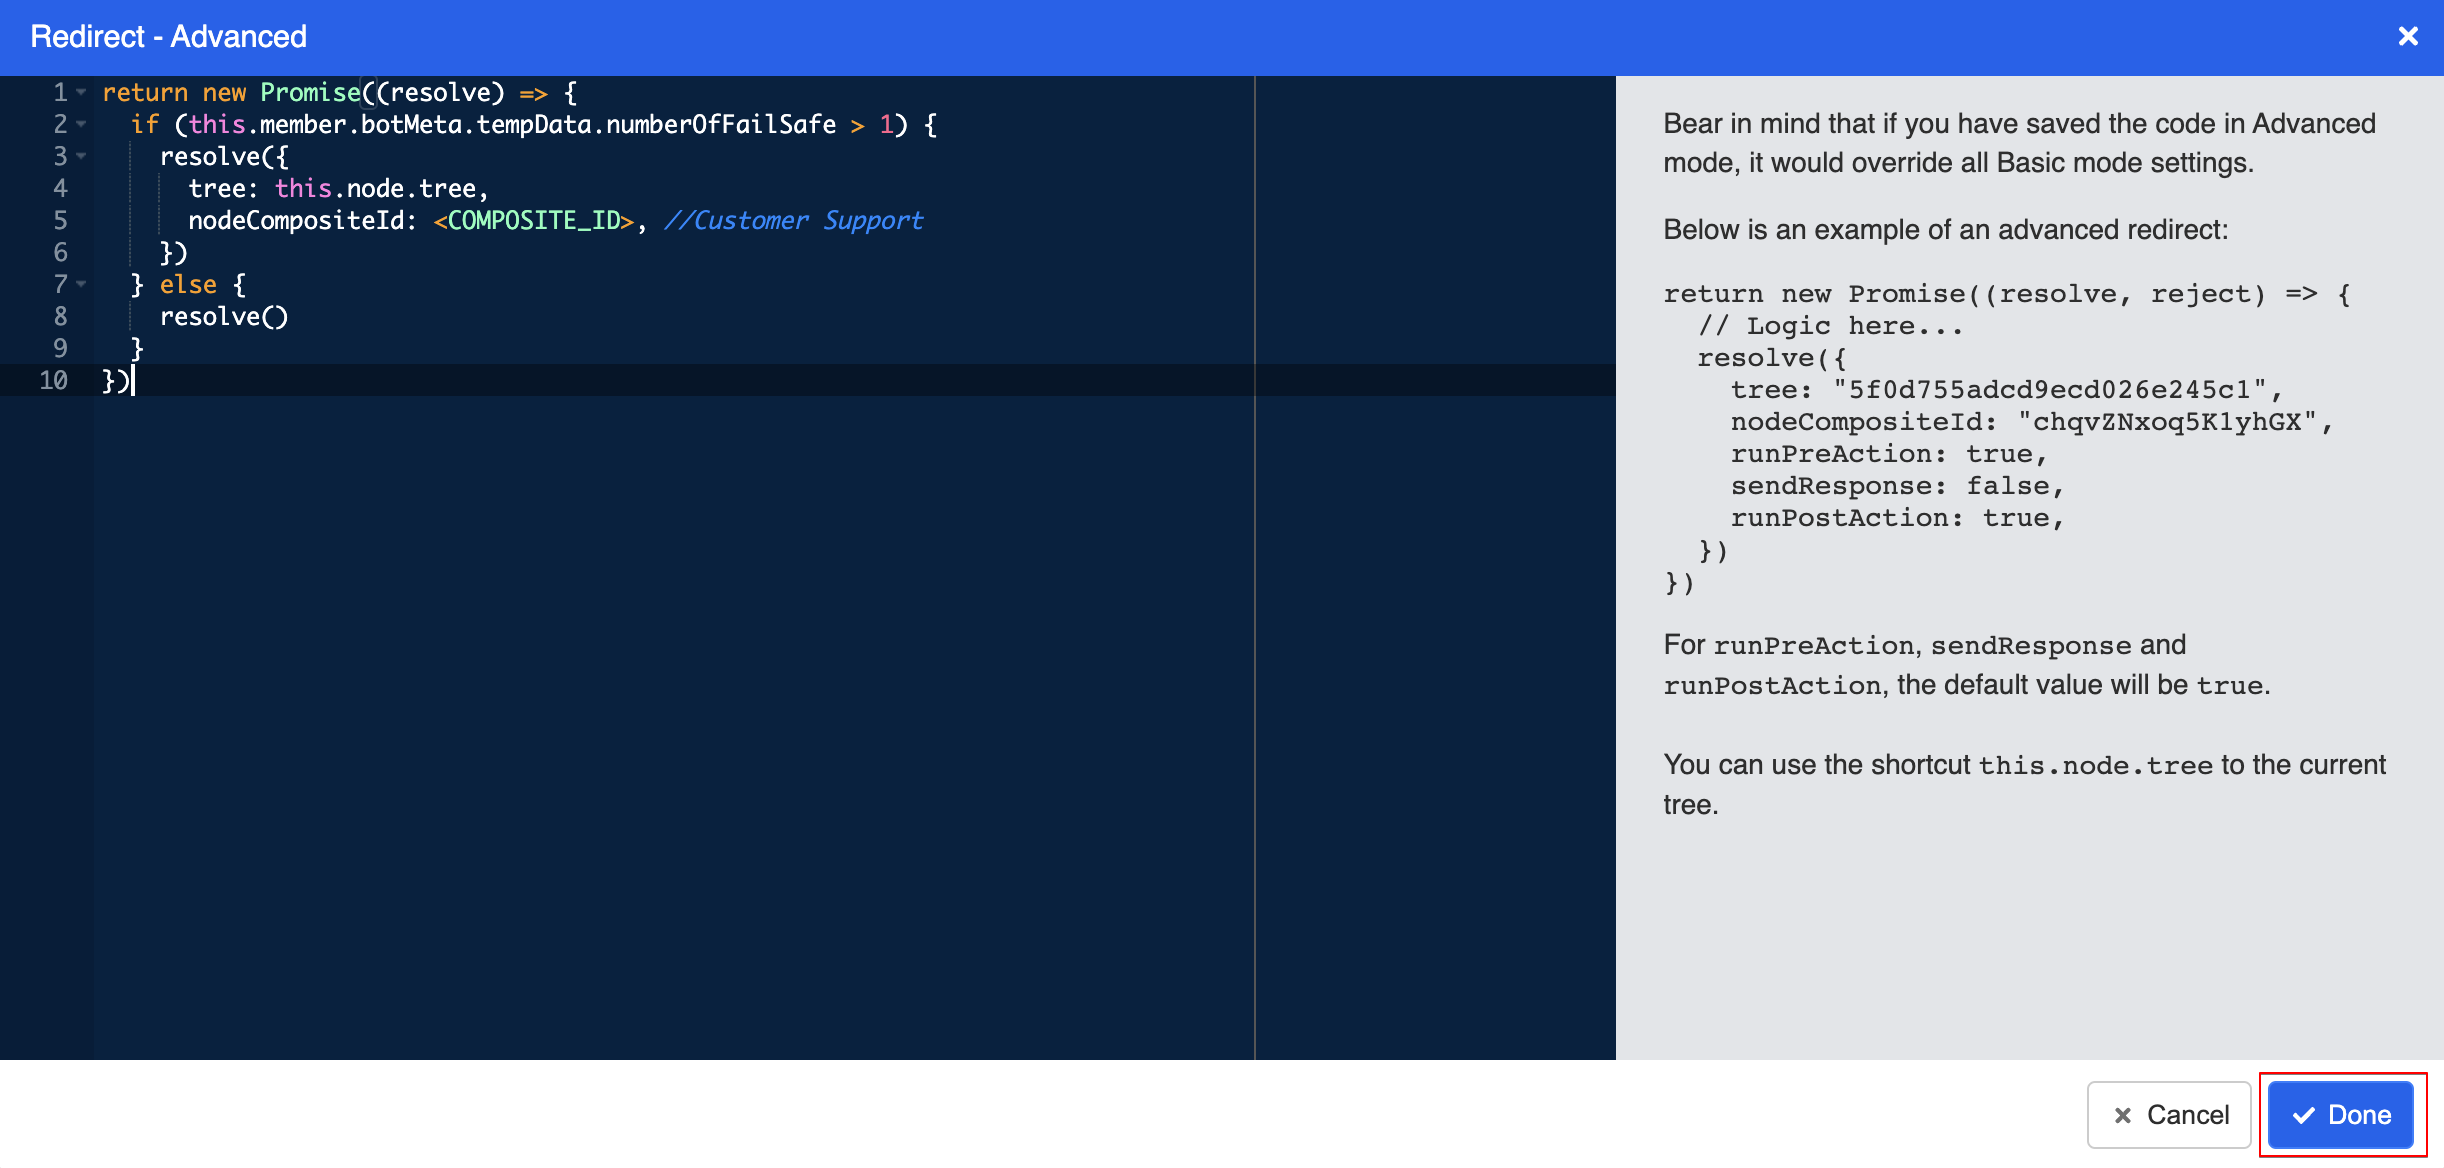
Advanced Redirect
You need to decide where the user should be redirected to when the fail-safe count is larger than 1.
In "[Main Flow] Fail-safe", create "Advanced Redirect". Enter the following code, and the user will be redirected to a specific node when the count is larger than 1. You can also adjust the count requirement by changing the count number in
this.member.botMeta.tempData.numberOfFailSafe > 1.
return new Promise((resolve) => {
  if (this.member.botMeta.tempData.numberOfFailSafe > 1) {
    resolve({
      tree: this.node.tree,
      nodeCompositeId: <COMPOSITE_ID>, //Customer Support
    })
  } else {
    resolve()
  }
})
tip
Please remember to input the Composite ID of the node being redirected to.
Reset Fail-safe Count
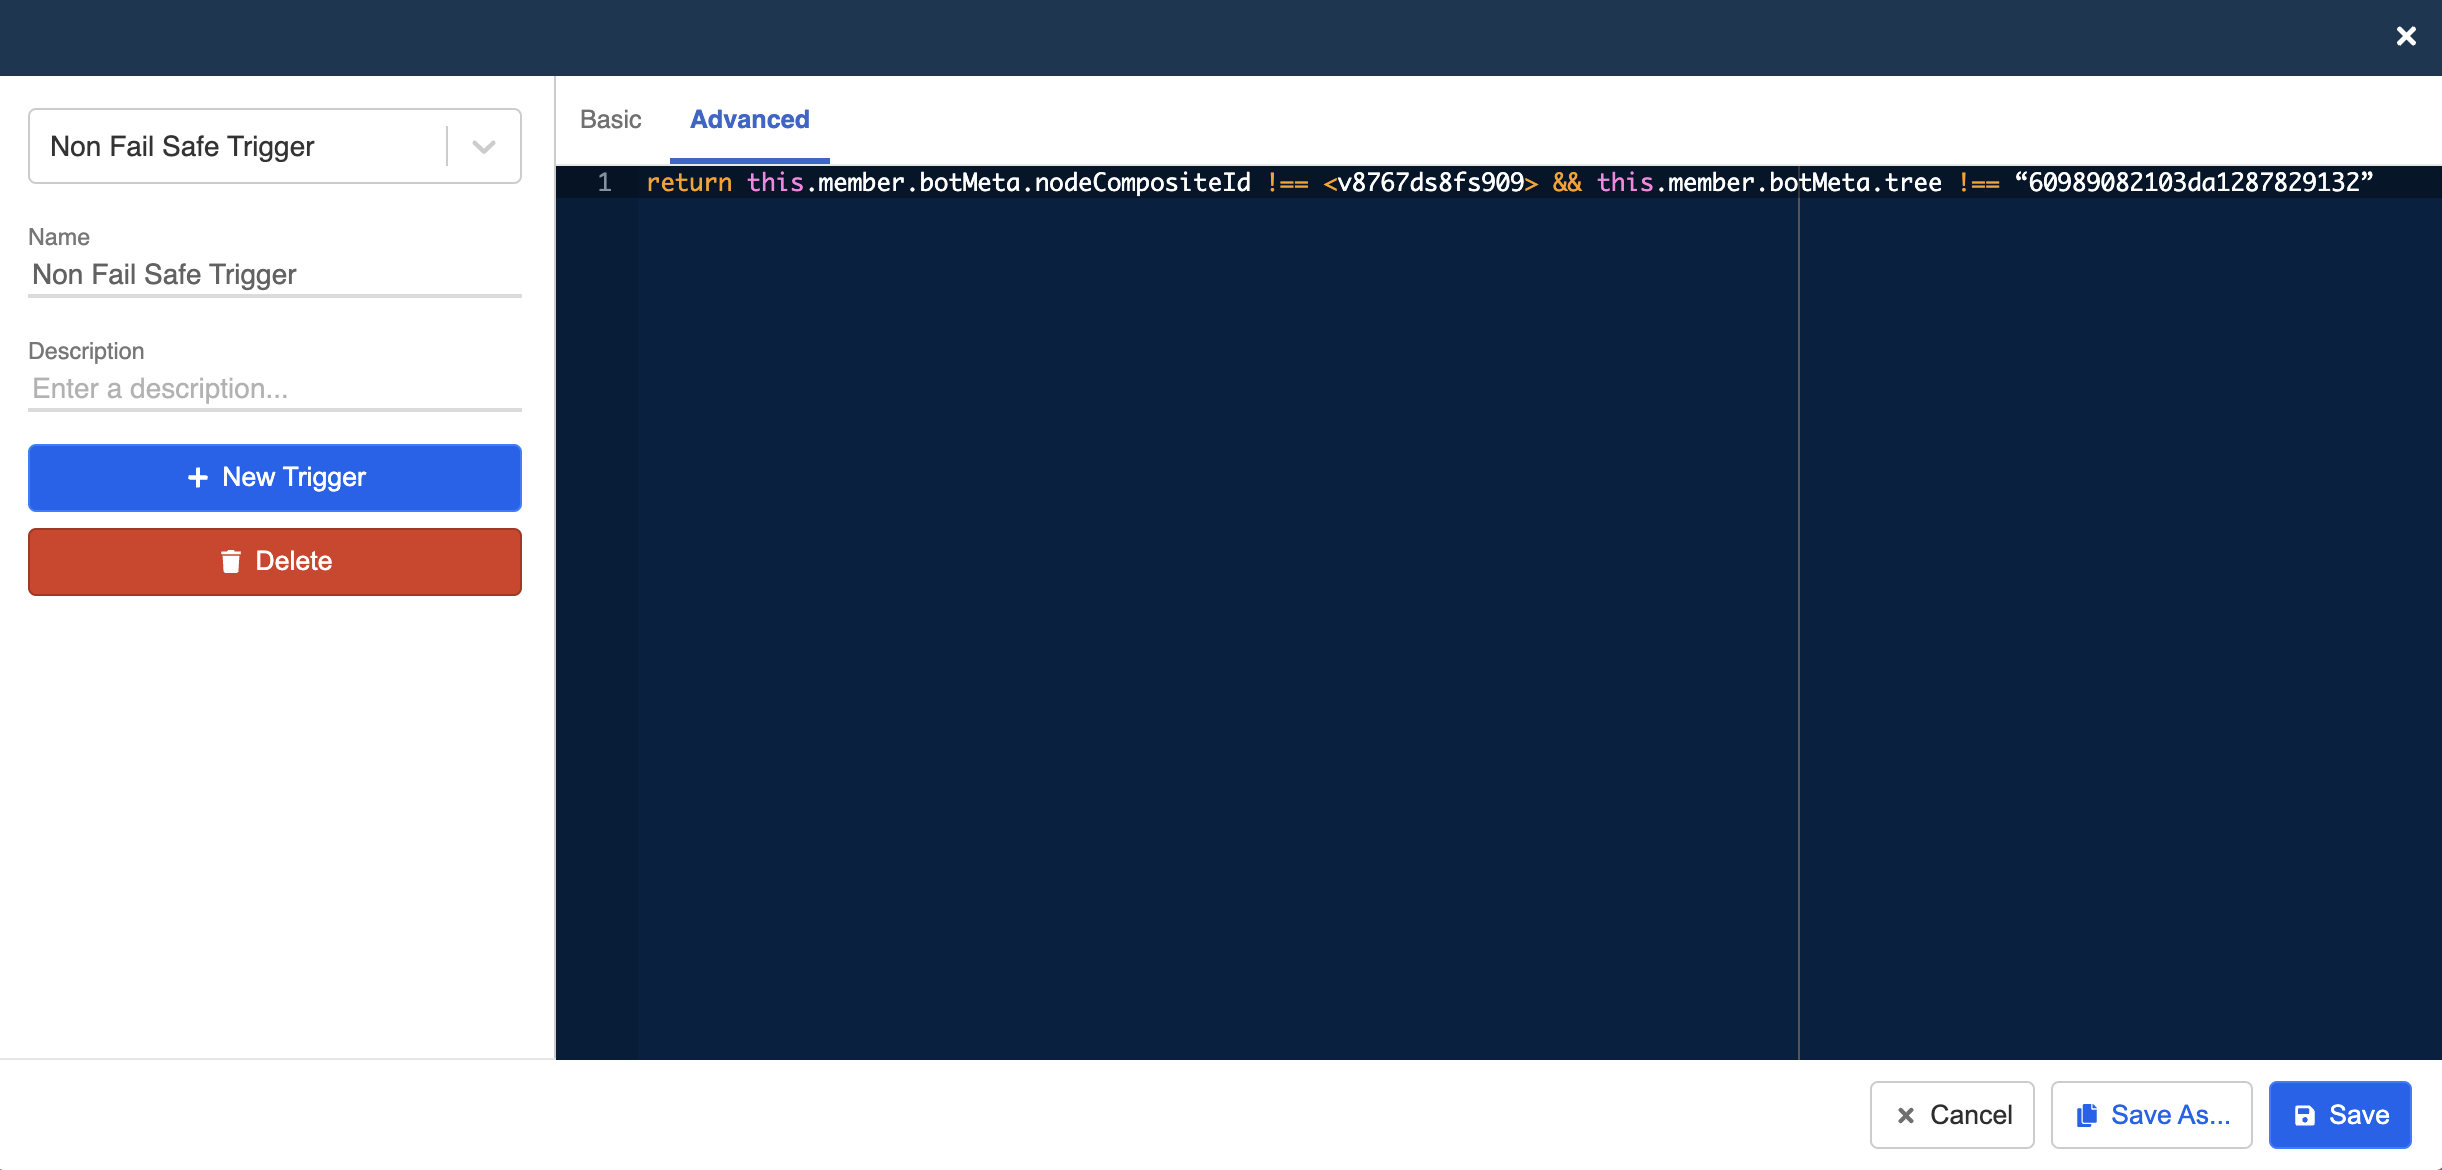
- Apart from those, you also need a global node to reset the fail-safe count when the user enters another general node except the fail-safe node. So the count only works with the fail-safe node.

- Create a "Advanced Trigger" using the following code. This node will be triggered when a user enters any other node except for "[Main Flow] Fail-safe". As a result, the count will only accumulate when the user keeps re-entering the same fail-safe node.
return this.member.botMeta.nodeCompositeId !== <FAIL_SAFE_COMPOSITE_ID> && this.member.botMeta.tree !== “TREE_ID”
tip
Please remember to enter the Composite ID of the Fail-safe general node and the Node ID.
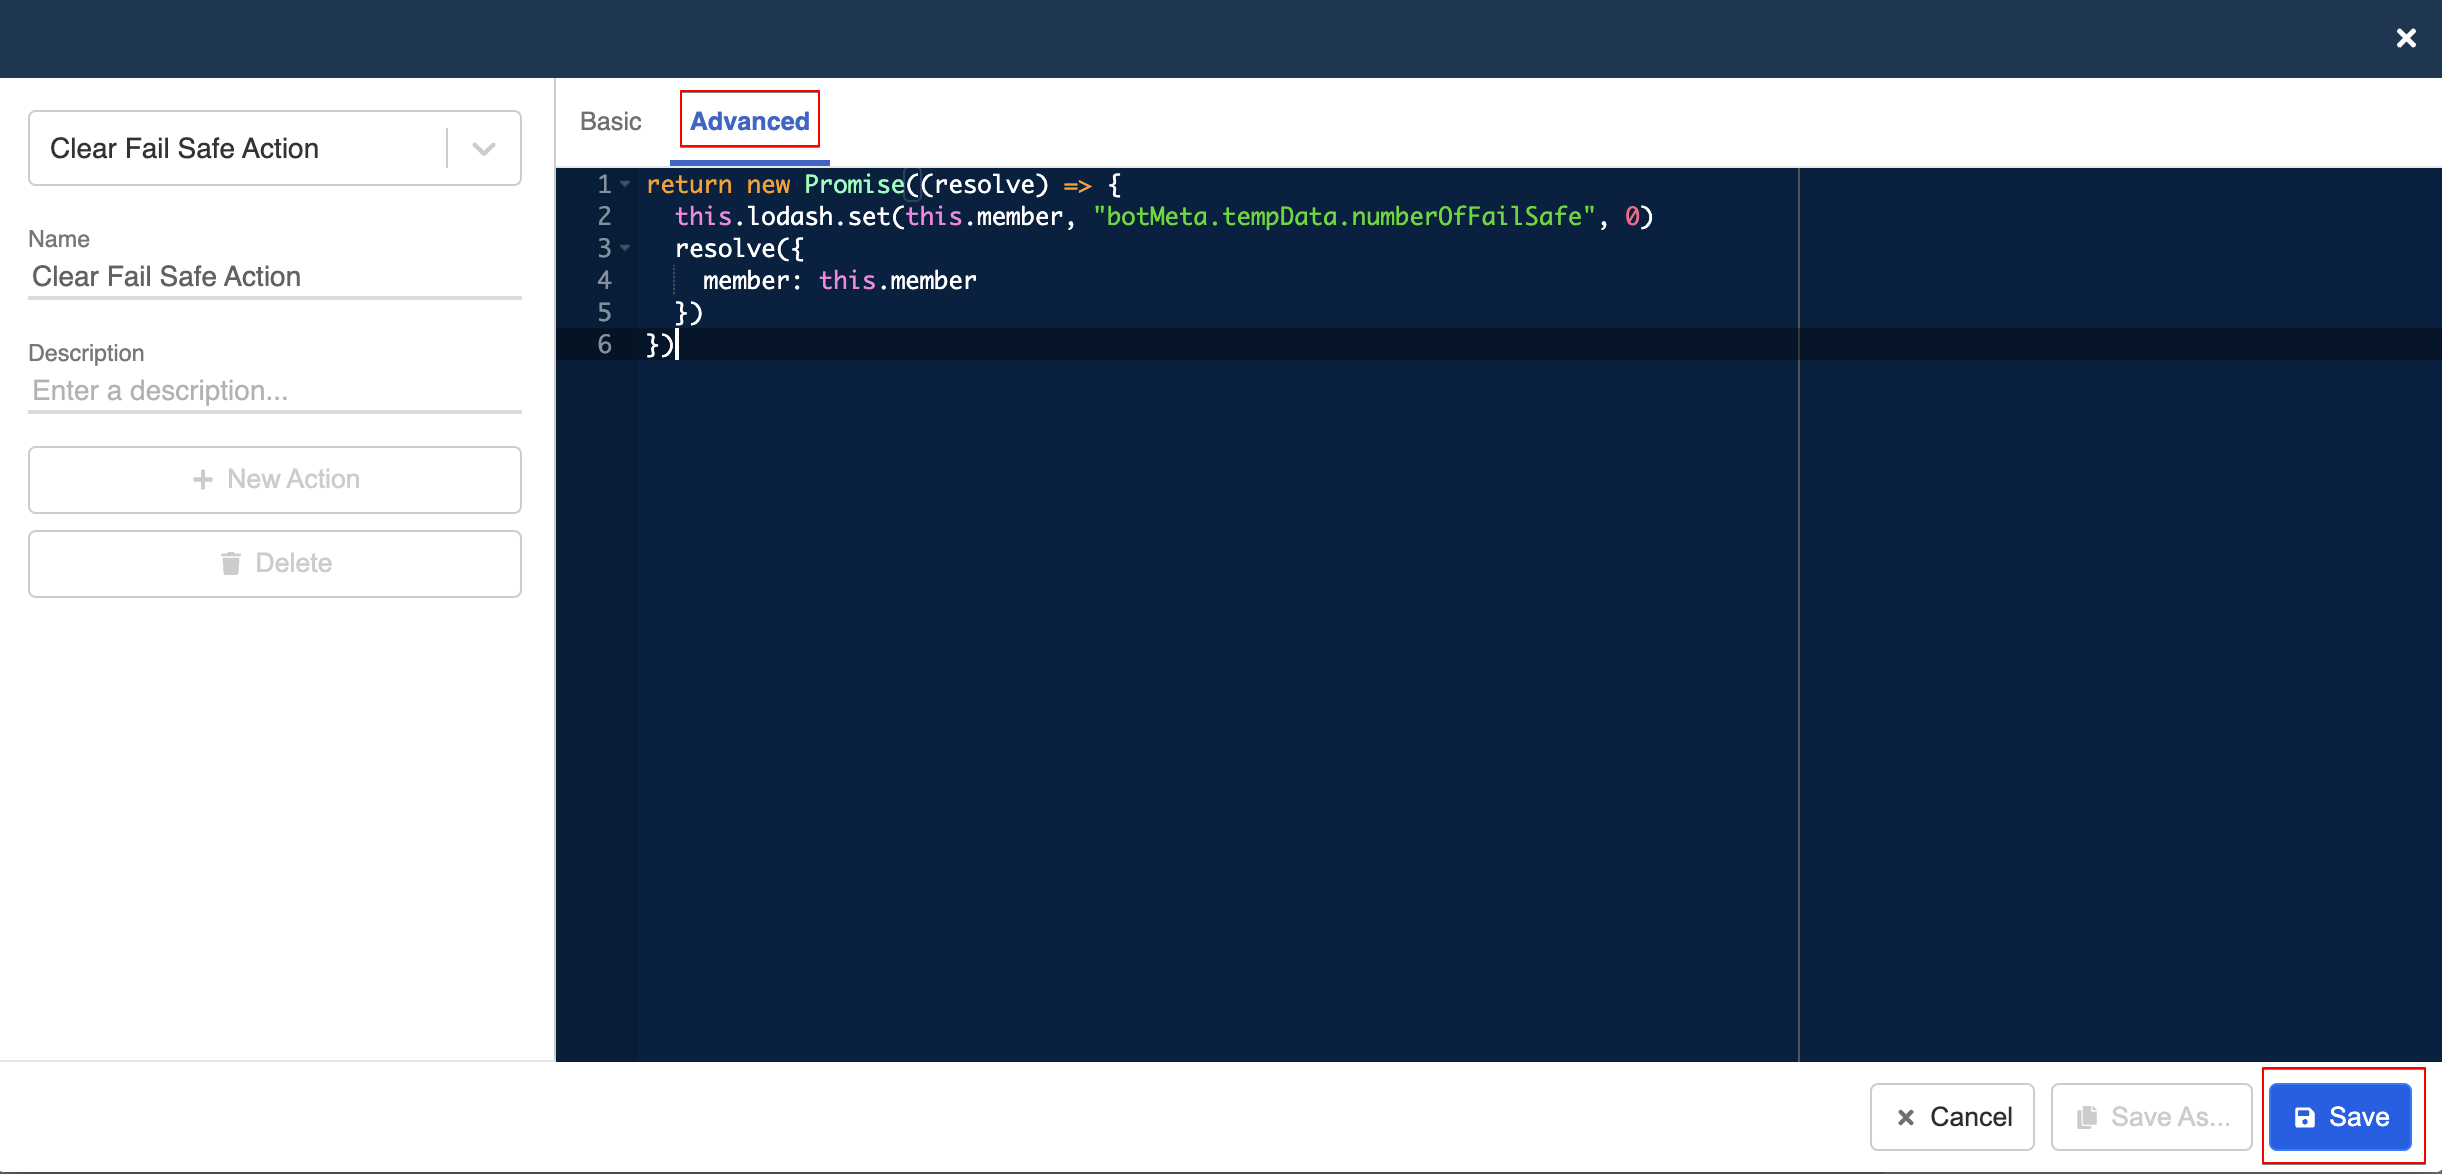
- Enter the following code to create a new "Action". It will clear any existing fail-safe count for a user.
return new Promise((resolve) => {
  this.lodash.set(this.member, "botMeta.tempData.numberOfFailSafe", 0)
  resolve({
    member: this.member
  })
})
- Check and see if you can produce the expected result.