Apply BotAPI to Chatbot
Introduction
BotAPI is built around REST. You can call our APIs through standard HTTP request with your api key placed in the query parameter. In turn, WOZTELL will return JSON-encoded response, with corresponding data that can determine wether related operations are completed.
WOZTELL BotAPI allows an external application to trigger the following types of bot actions in WOZTELL:
- Send Responses: Send a message in a specific response type to a chatbot user.
- Redirect Member To Node: Redirect to a specific node and execute the node for a chatbot user.
The common use case is when you want to activate WOZTELL to send a message to a user based on the action of your external application. For example, you want to send a purchase confirmation message to a WhatsApp user after that person has completed a purchase on your online store and provided the WhatsApp number.
This procedure will teach you how to test the WOZTELL API (i.e. POST) on Postman.
Send Response
- Create a new request on Postman and add
https://bot.api.woztell.com/sendResponsesto the request URL.
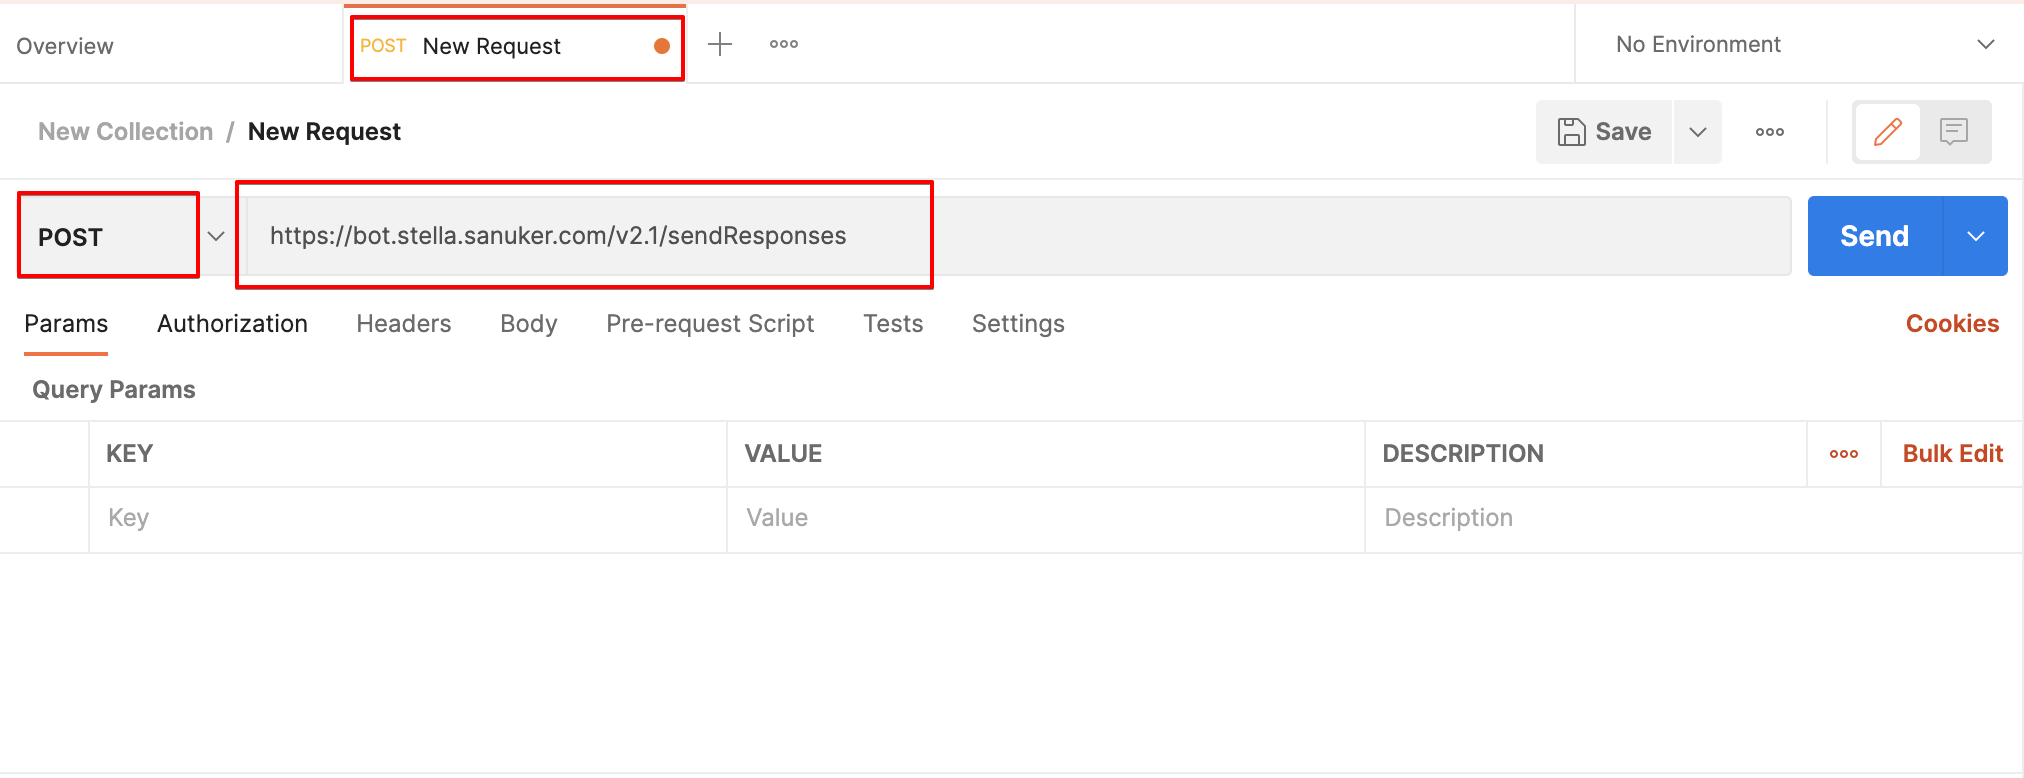
Change the request type to
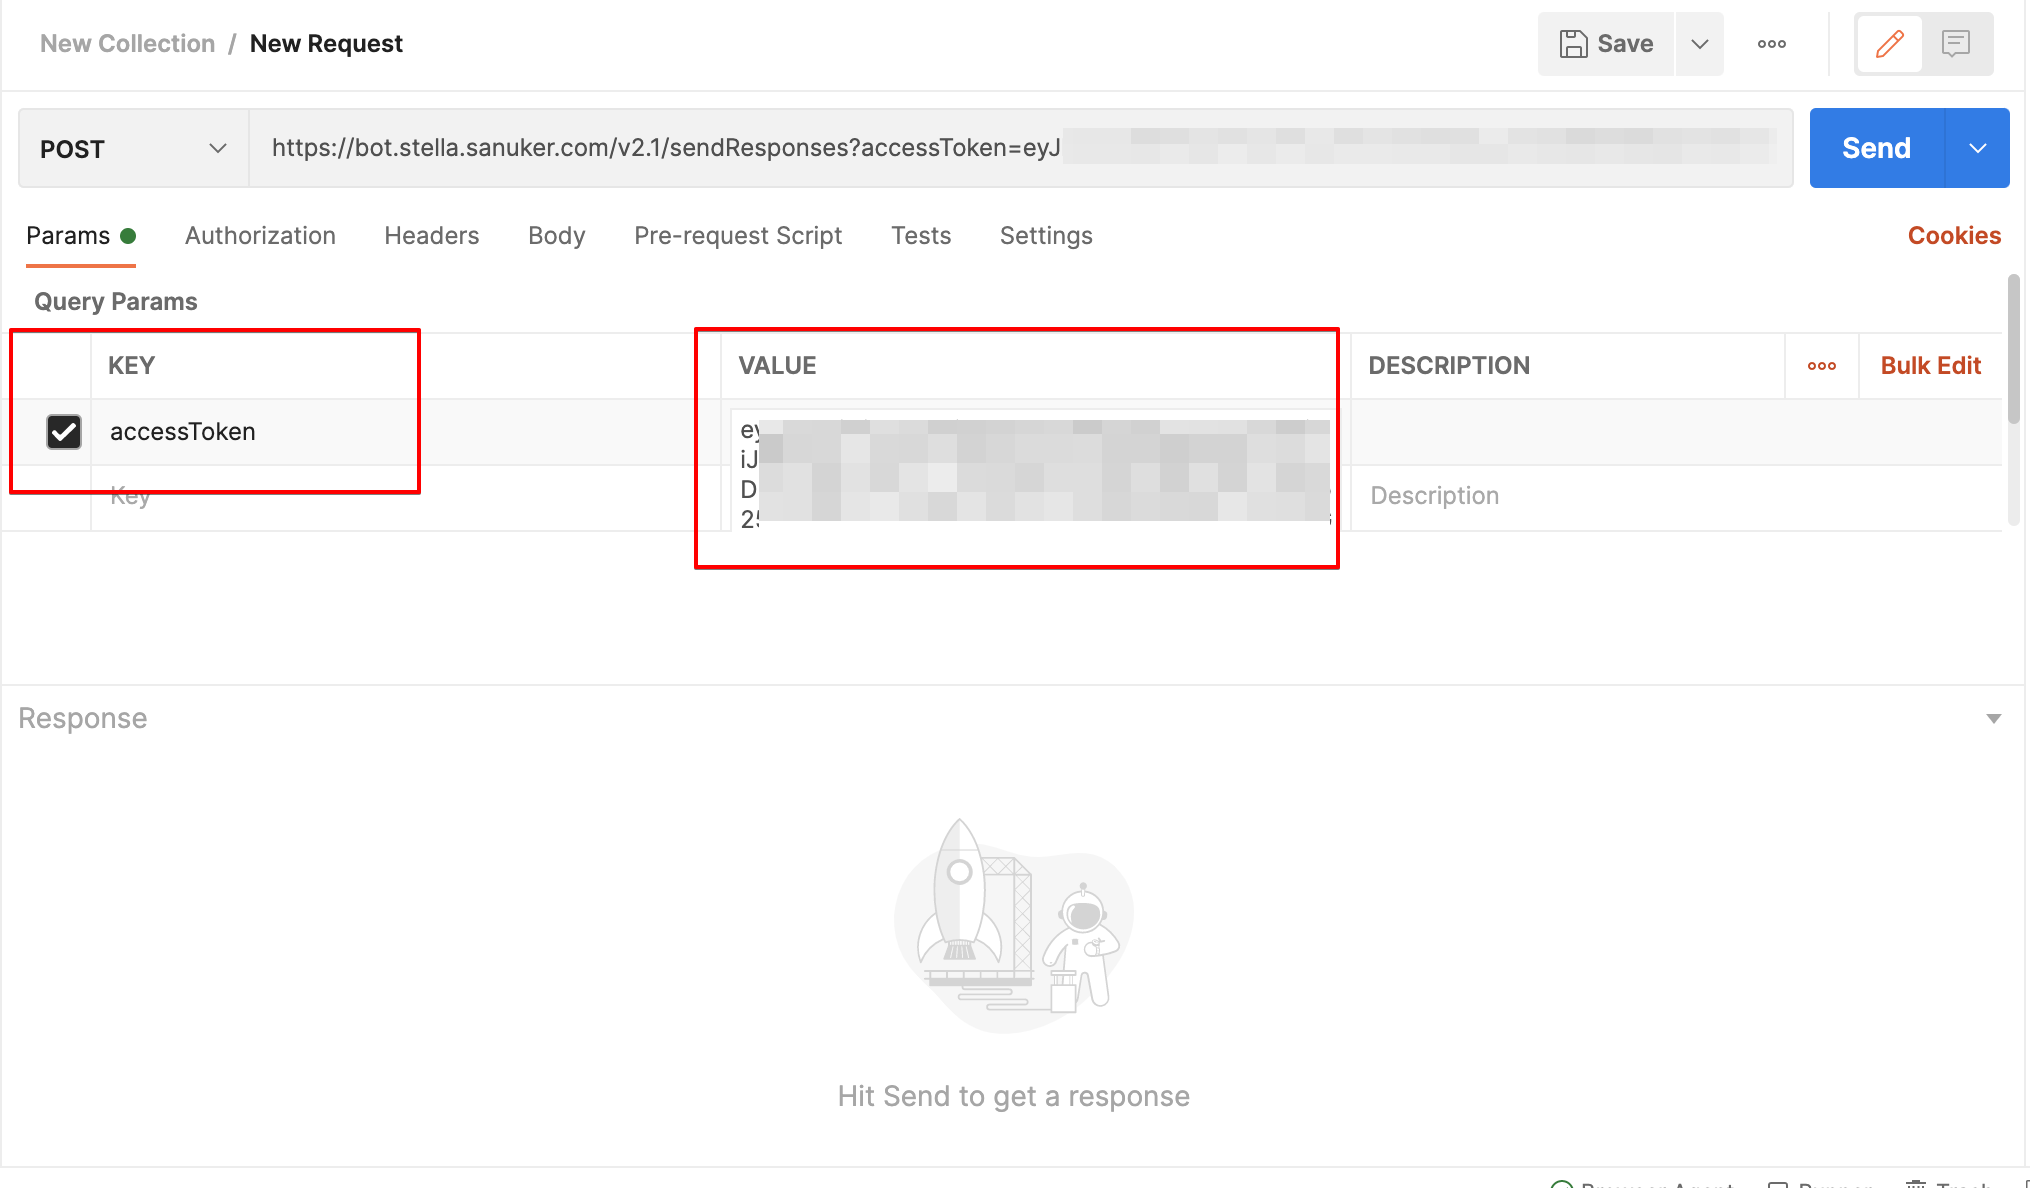
POST.Generate an Access Token with
bot:sendResponsespermission and put it to "VALUE" under "Params". MarkaccessTokenunder "KEY".
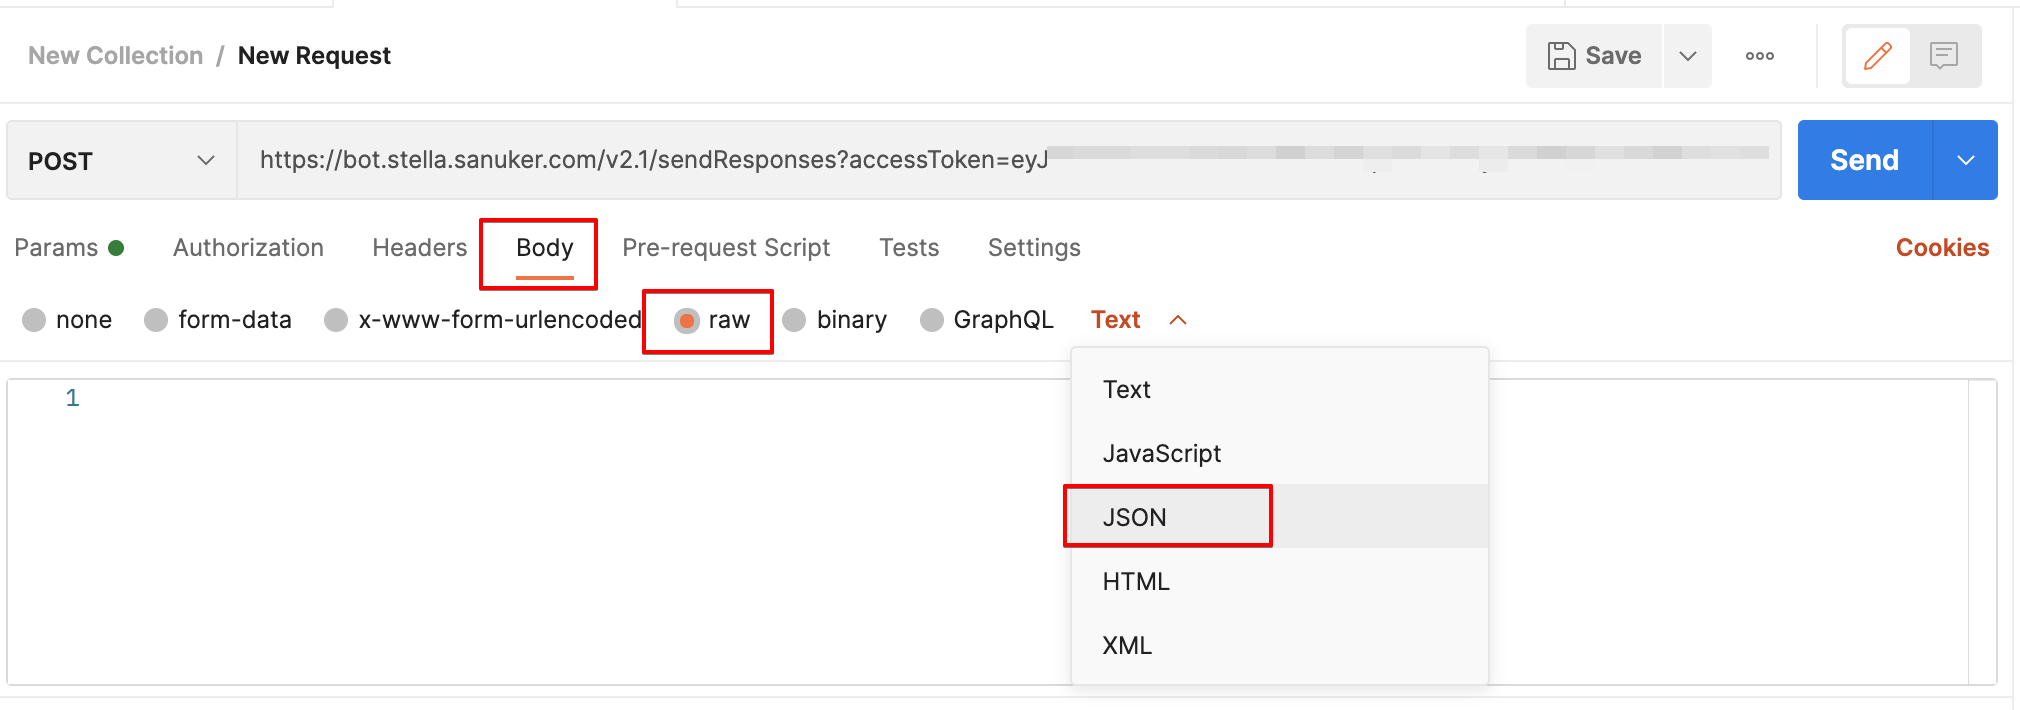
- Head to "Body" and choose "raw" and "JSON".
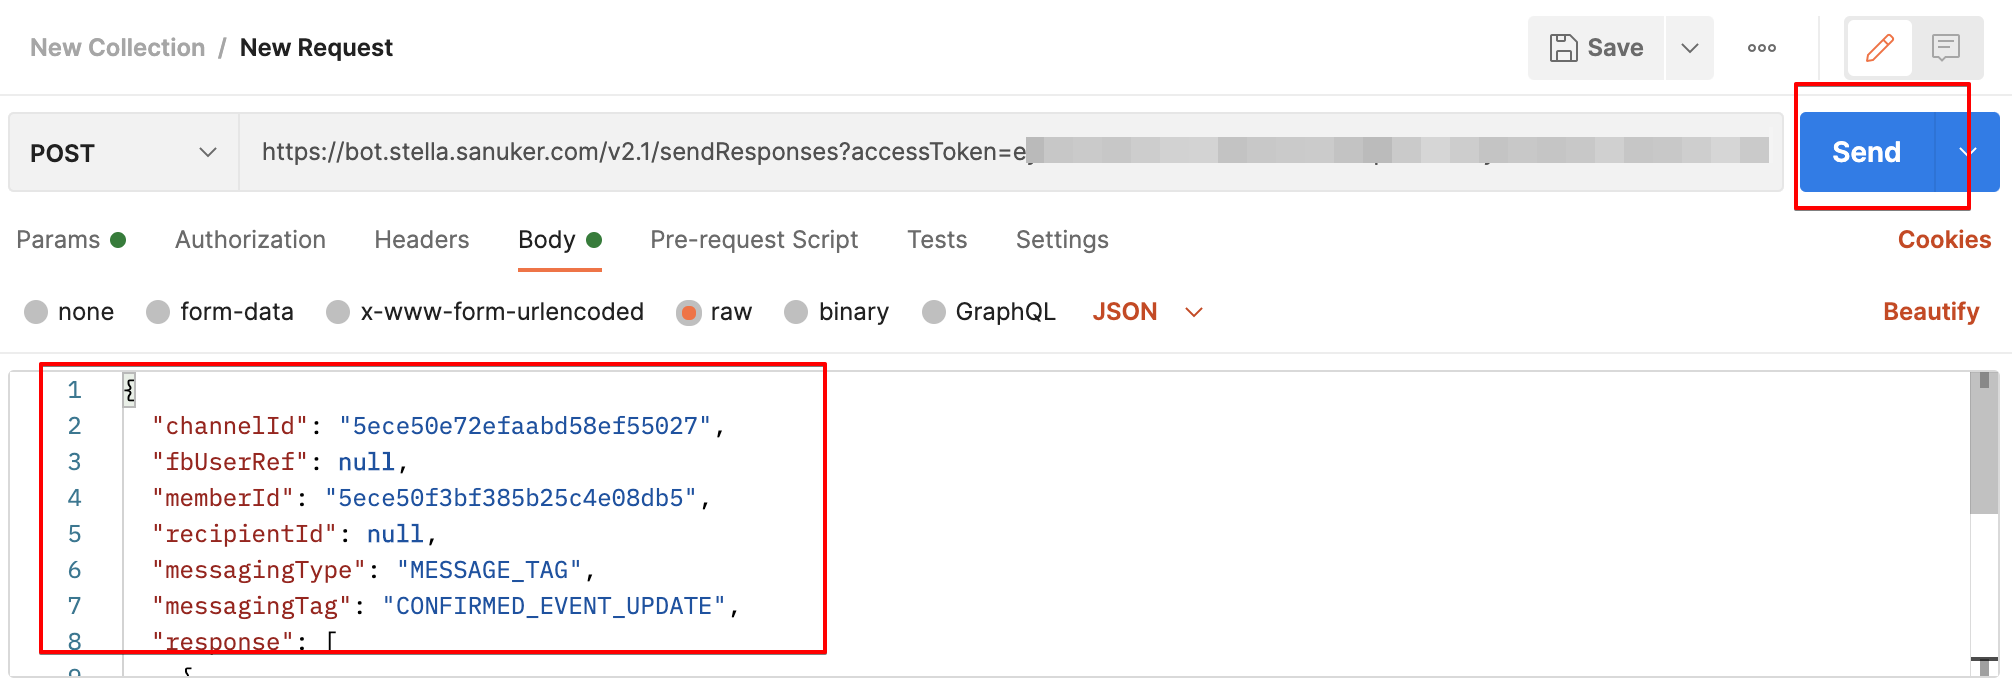
- Paste the body code of "Send Responses". The code below is just a sample, you should edit the response according to your needs. You can find out the JSON for the response object in the advanced tab of the response builder. You can also generate different types of responses on WOZTELL.
{
  "channelId": "5ece50e72efaabd58ef55027",
  "memberId": "5ece50f3bf385b25c4e08db5",
  "recipientId": null,
  "response": [
    {
      "type": "TEXT",
      "text": "Hello World"
    },
    {
      "type": "IMAGE",
      "url": "https://miro.medium.com/max/1200/1*mk1-6aYaf_Bes1E3Imhc0A.jpeg"
    }
  ]
}
- You should be able to find the channelID from your Channel and recipientID/memberID from the Members page
- Click "Send". It should return the following 200 response:
- Successful:
{
  "ok": 1,
  "member": "5ece50f3bf385b25c4e08db5",
  "sendResults": [
    {
      "result": [
        {
          "result": {
            "recipient_id": "10152368852405295",
            "message_id": "m_U0EmmN476hlyPr-0iH2cXMcrTLJ5HeVUQjzqok8vkkF8wnJpPkagYbXU5hr0bXWHM5PPYjgd9RWG10K0oujeHQ"
          },
          "messageEvent": {
            "from": "124830722411862",
            "to": "10152368852405295",
            "data": {
              "text": "Hello World"
            },
            "type": "TEXT",
            "timestamp": 1583292367324,
            "messageId": "  -0iH2cXMcrTLJ5HeVUQjzqok8vkkF8wnJpPkagYbXU5hr0bXWHM5PPYjgd9RWG10K0oujeHQ"
          }
        },
        {
          "result": {
            "recipient_id": "10152368852405295",
            "message_id": "m_U0EmmN476hlyPr-0iH2cXMcrTLJ5HeVUQjzqok8vkkF8wnJpPkagYbXU5hr0bXWHM5PPYjgd9RWG10K0oujeHQ"
          },
          "messageEvent": {
            "from": "124830722411862",
            "to": "10152368852405295",
            "data": {
              "url": "https://miro.medium.com/max/1200/1*mk1-6aYaf_Bes1E3Imhc0A.jpeg"
            },
            "type": "IMAGE",
            "timestamp": 1583292367324,
            "messageId": "  -0iH2cXMcrTLJ5HeVUQjzqok8vkkF8wnJpPkagYbXU5hr0bXWHM5PPYjgd9RWG10K0oujeHQ"
          }
        }
      ]
    }
  ]
}
- Failure:
{
  "ok": 0,
  "err_code": 108,
  "err": "Either memberId or recipientId or fbUserRef is required.\""
}
You can also check out the list of error code.
Redirect Member To Node
Create a general node in a chatbot and add this chatbot to the channel you will use for this POST request.
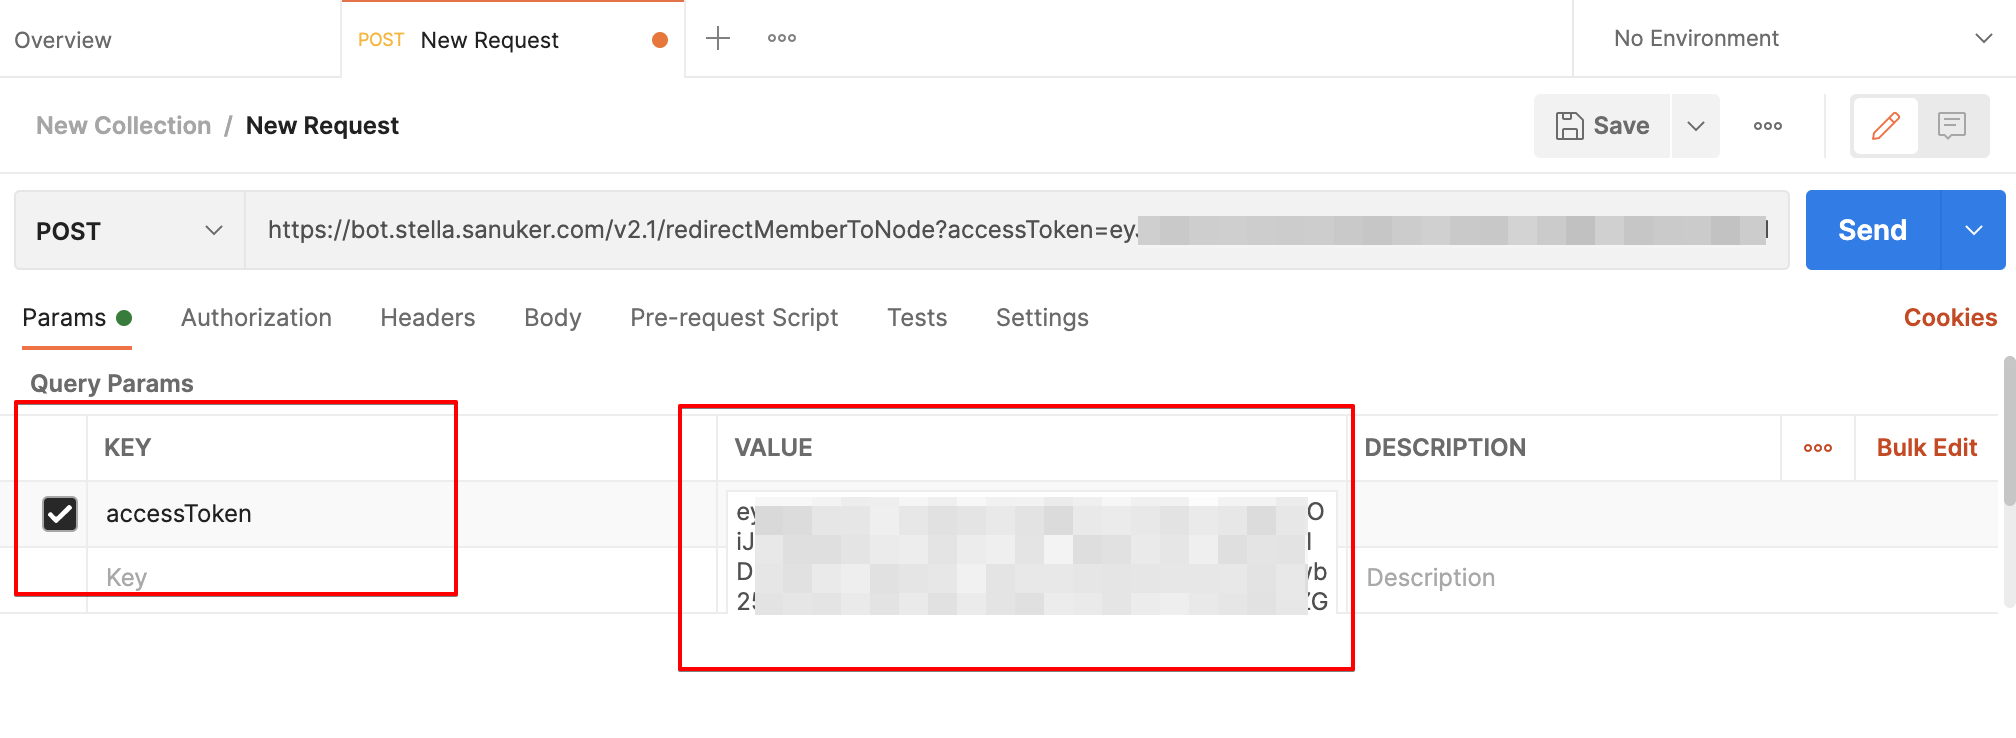
Create a new request on Postman and add
https://bot.api.woztell.com/redirectMemberToNodeto the request URL.

Change the request type to
POST.Generate an Access Token with
bot:redirectMemberToNodepermission and put it to "VALUE" under "Params". MarkaccessTokenunder "KEY".
- Head to "Body" and choose "raw" and "JSON".
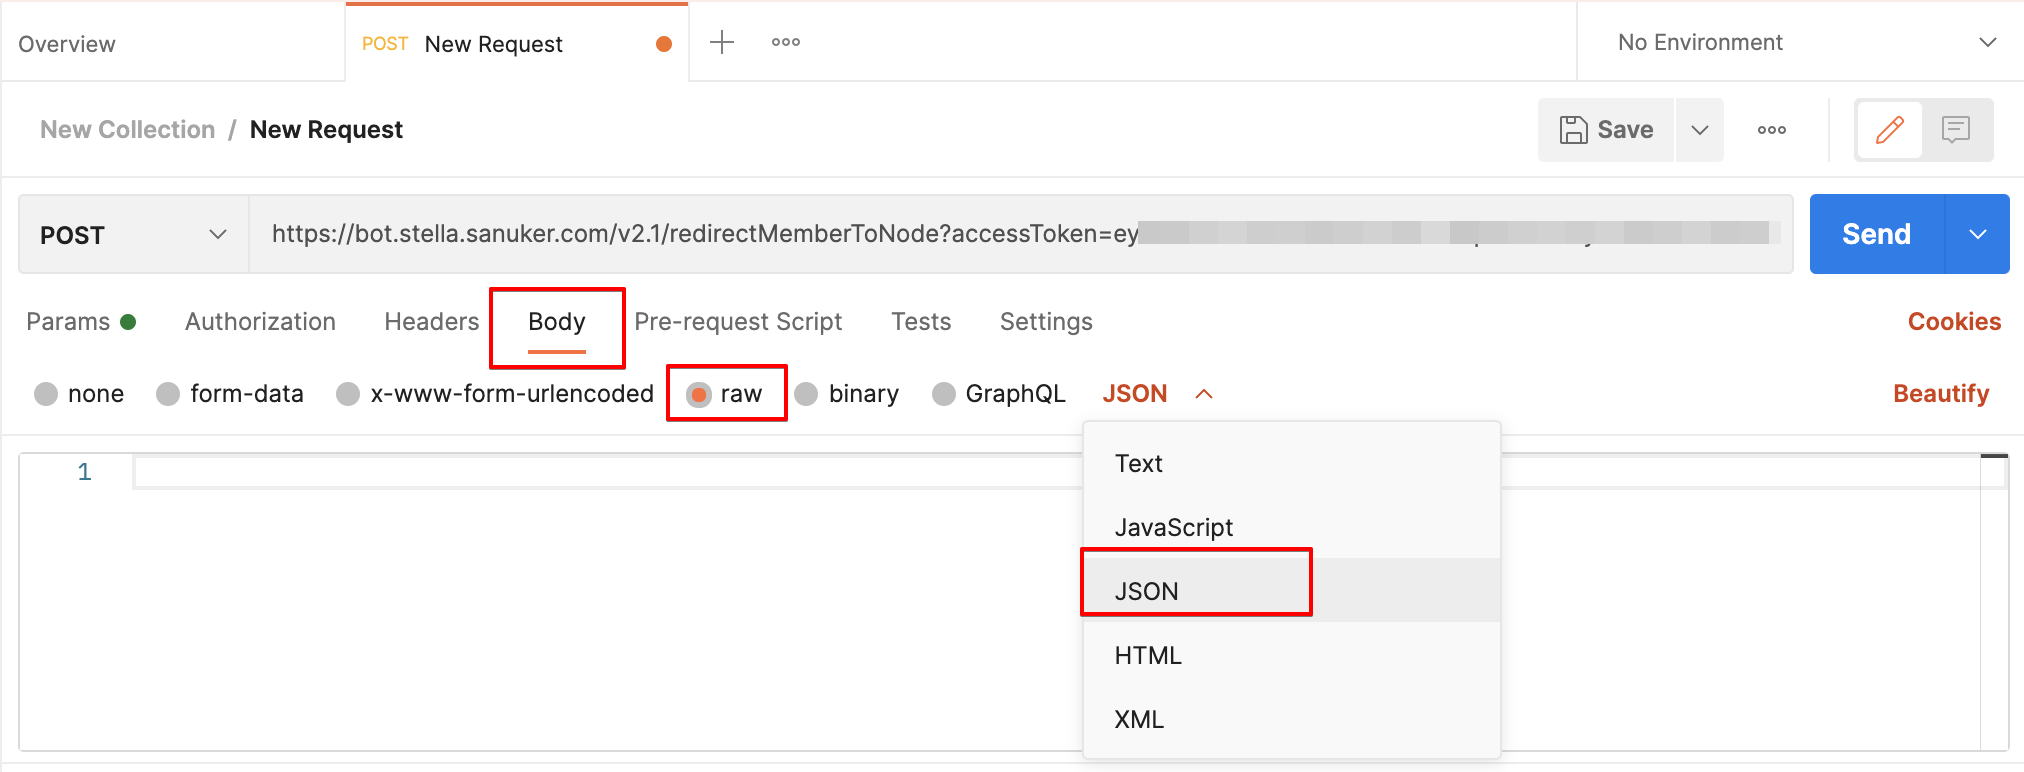
- Paste the body code of "Redirect Member To Node". The code below is just a sample, you should change the
tree&nodeCompositeIdto the ones in the node you created in step 1.
{
  "channelId": "5ece50e72efaabd58ef55027",
  "memberId": "5ece50f3bf385b25c4e08db5",
  "recipientId": null,
  "redirect": {
    "tree": "5ecf6cfba3b6643c33a64079",
    "nodeCompositeId": "j4Bivxm0GWhnNV1m",
    "runPreAction": true,
    "sendResponse": null,
    "runPostAction": false
  },
  "meta": {
    "name": "Sanuker",
    "orderId": "5ecf6be76fcfda6b139d802c"
  }
}
- You should be able to find the channelID from your channel and recipientID/memberIDfrom the member page.
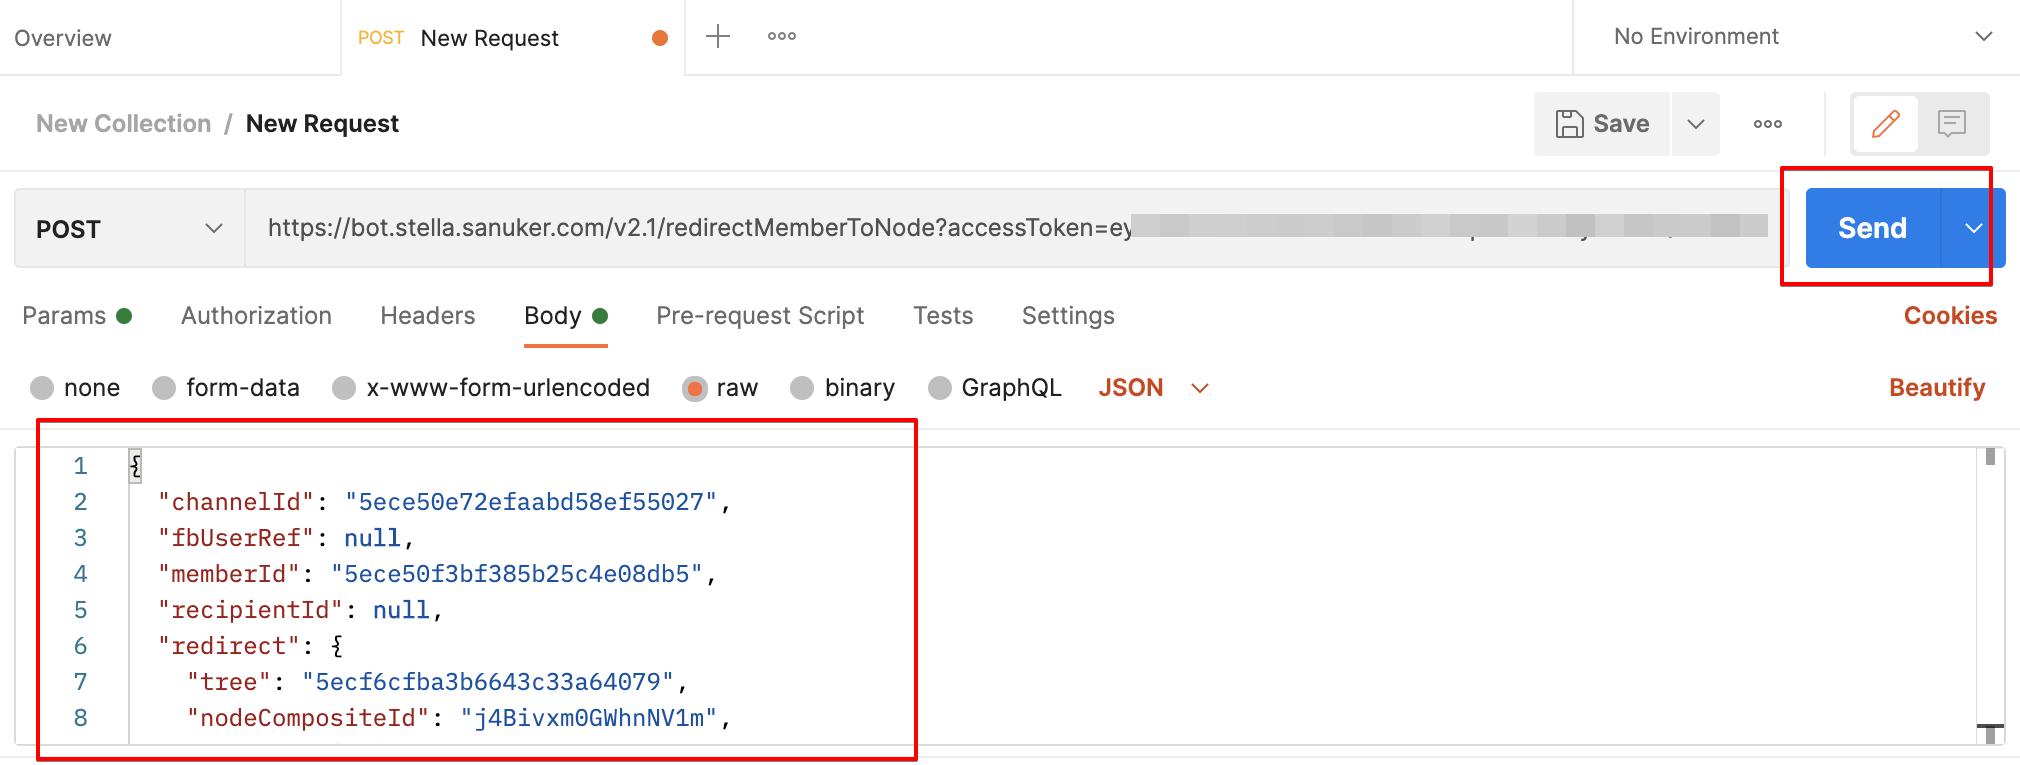
- Click "Send". It should return the following 200 response:
- Successful:
{
  "ok": 1,
  "member": "5ece50f3bf385b25c4e08db5",
  "sendResults": [
    {
      "result": [
        {
          "result": {
            "recipient_id": "10152368852405295",
            "message_id": "m_U0EmmN476hlyPr-0iH2cXMcrTLJ5HeVUQjzqok8vkkF8wnJpPkagYbXU5hr0bXWHM5PPYjgd9RWG10K0oujeHQ"
          },
          "messageEvent": {
            "from": "124830722411862",
            "to": "10152368852405295",
            "data": {
              "text": "Hello World"
            },
            "type": "TEXT",
            "timestamp": 1583292367324,
            "messageId": "  -0iH2cXMcrTLJ5HeVUQjzqok8vkkF8wnJpPkagYbXU5hr0bXWHM5PPYjgd9RWG10K0oujeHQ"
          }
        },
        {
          "result": {
            "recipient_id": "10152368852405295",
            "message_id": "m_U0EmmN476hlyPr-0iH2cXMcrTLJ5HeVUQjzqok8vkkF8wnJpPkagYbXU5hr0bXWHM5PPYjgd9RWG10K0oujeHQ"
          },
          "messageEvent": {
            "from": "124830722411862",
            "to": "10152368852405295",
            "data": {
              "url": "https://miro.medium.com/max/1200/1*mk1-6aYaf_Bes1E3Imhc0A.jpeg"
            },
            "type": "IMAGE",
            "timestamp": 1583292367324,
            "messageId": "  -0iH2cXMcrTLJ5HeVUQjzqok8vkkF8wnJpPkagYbXU5hr0bXWHM5PPYjgd9RWG10K0oujeHQ"
          }
        }
      ]
    }
  ]
}
- Failure:
{
  "ok": 0,
  "err_code": 108,
  "err": "Either memberId or recipientId or fbUserRef is required.\""
}
You can also check out the list of error code .
Advanced Use Case
As mentioned in the previous section, Redirect Member to Node allows you to redirecting a member to a specific node in the chatbot, and execute all or partial components of the node. It is useful for performing complex operations on a member and keeping all the bot logic in the chatbot instead of hardcoding in an api.
In some cases, you might want to send customized message to customers instead of a standardized message. Therefore, this advanced guide is going to demonstrate how you can send message with variables using Redirect Member to Node.
Introduction
In this example, we would like to send an order confirmation to customers on WhatsApp using Redirect Member to Node. The message will include variables such as the purchased item and the order number.
To do this, you will need to make use of meta object to pass the variables to the node using API. After that, the variables can be extracted and applied to the response you are going to send out.
Meta Object
While applying Redirect Member to Node, you can also use API to pass meta object to the targeted node. In this example, the Meta Object contains two info: the orderID and item, which we would like to later apply to the response as variables.
For more details about how to construct the request, please refer to BotAPI.
{
 "channelId": "611492017e746925434536d",
 "recipientId": "65874121234",
 "redirect": {
  "tree": "60ff7a60fe96167111244s",
  "nodeCompositeId": "gQEytkyMjZdwR69N"
 },
 "meta": {
  "orderID": "FP123456789",
  "item": "Graphic T-shirt"
 }
}
Create a Node
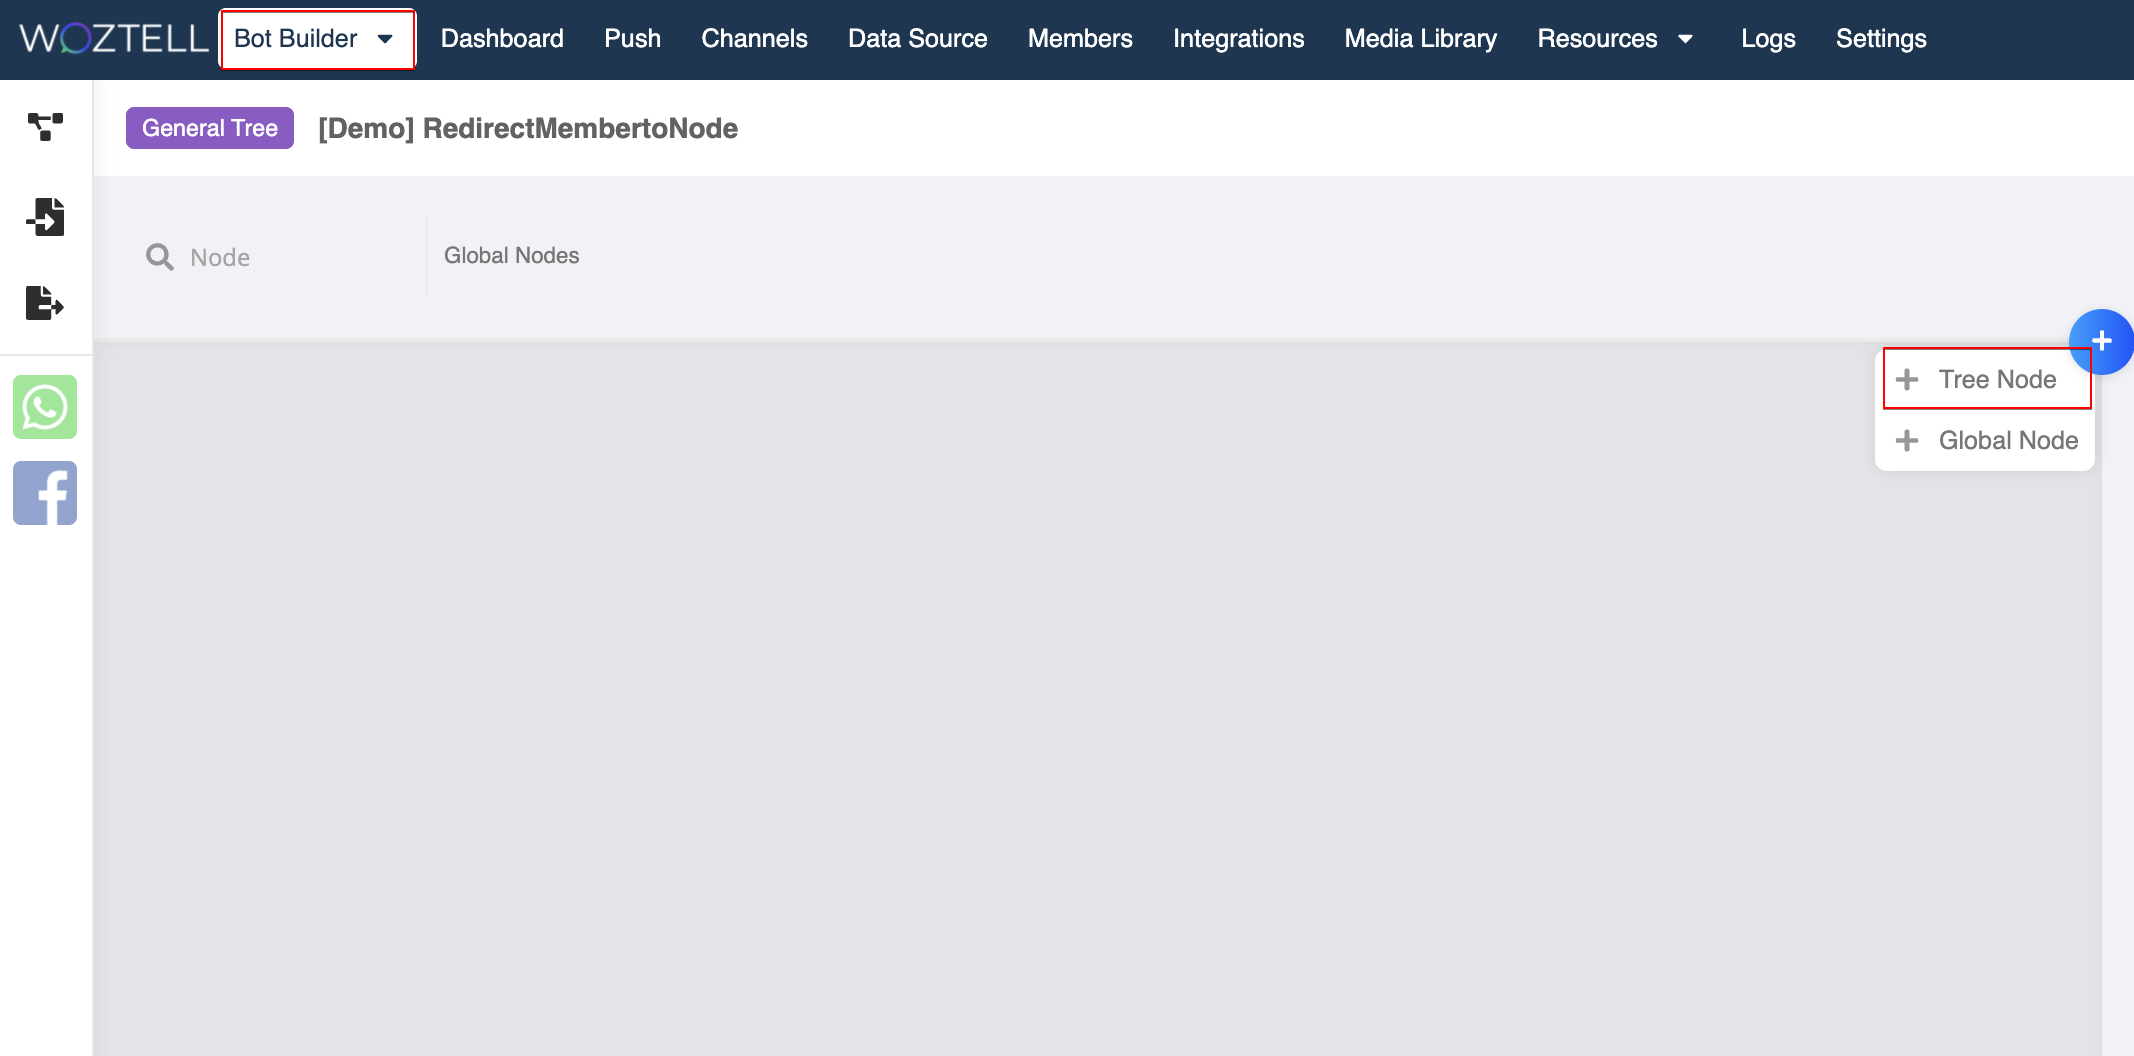
- In WOZTELL, select Bot Builder and first create a new chatbot.
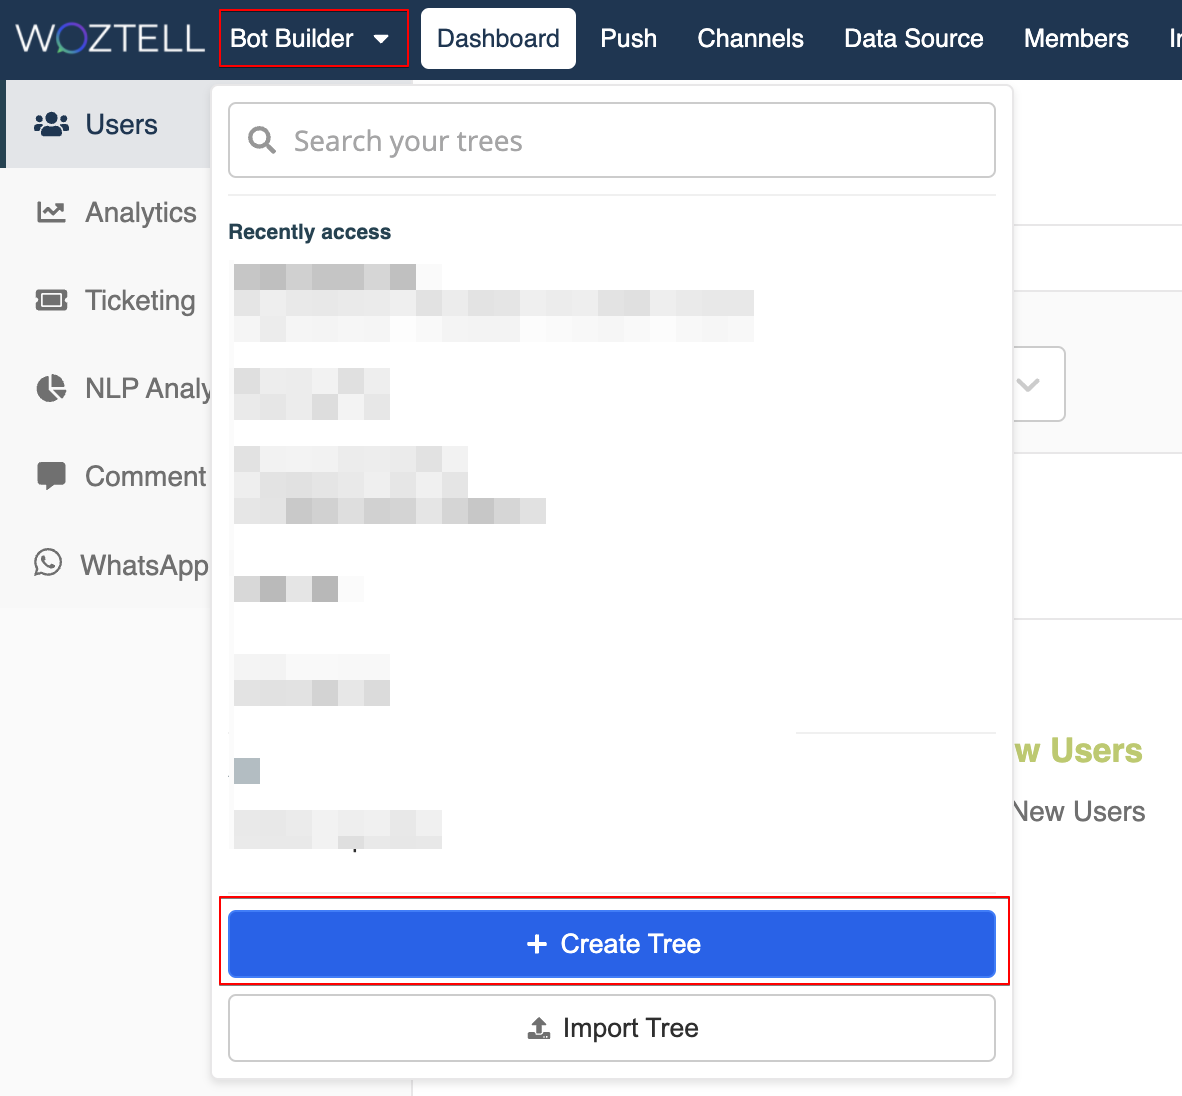
- Create a general node, this node will be used for
Redirect Member to Node. End users will be redirected to this node, and the components of this node will be executed.
Create a Pre-action
- Create a new pre-action.

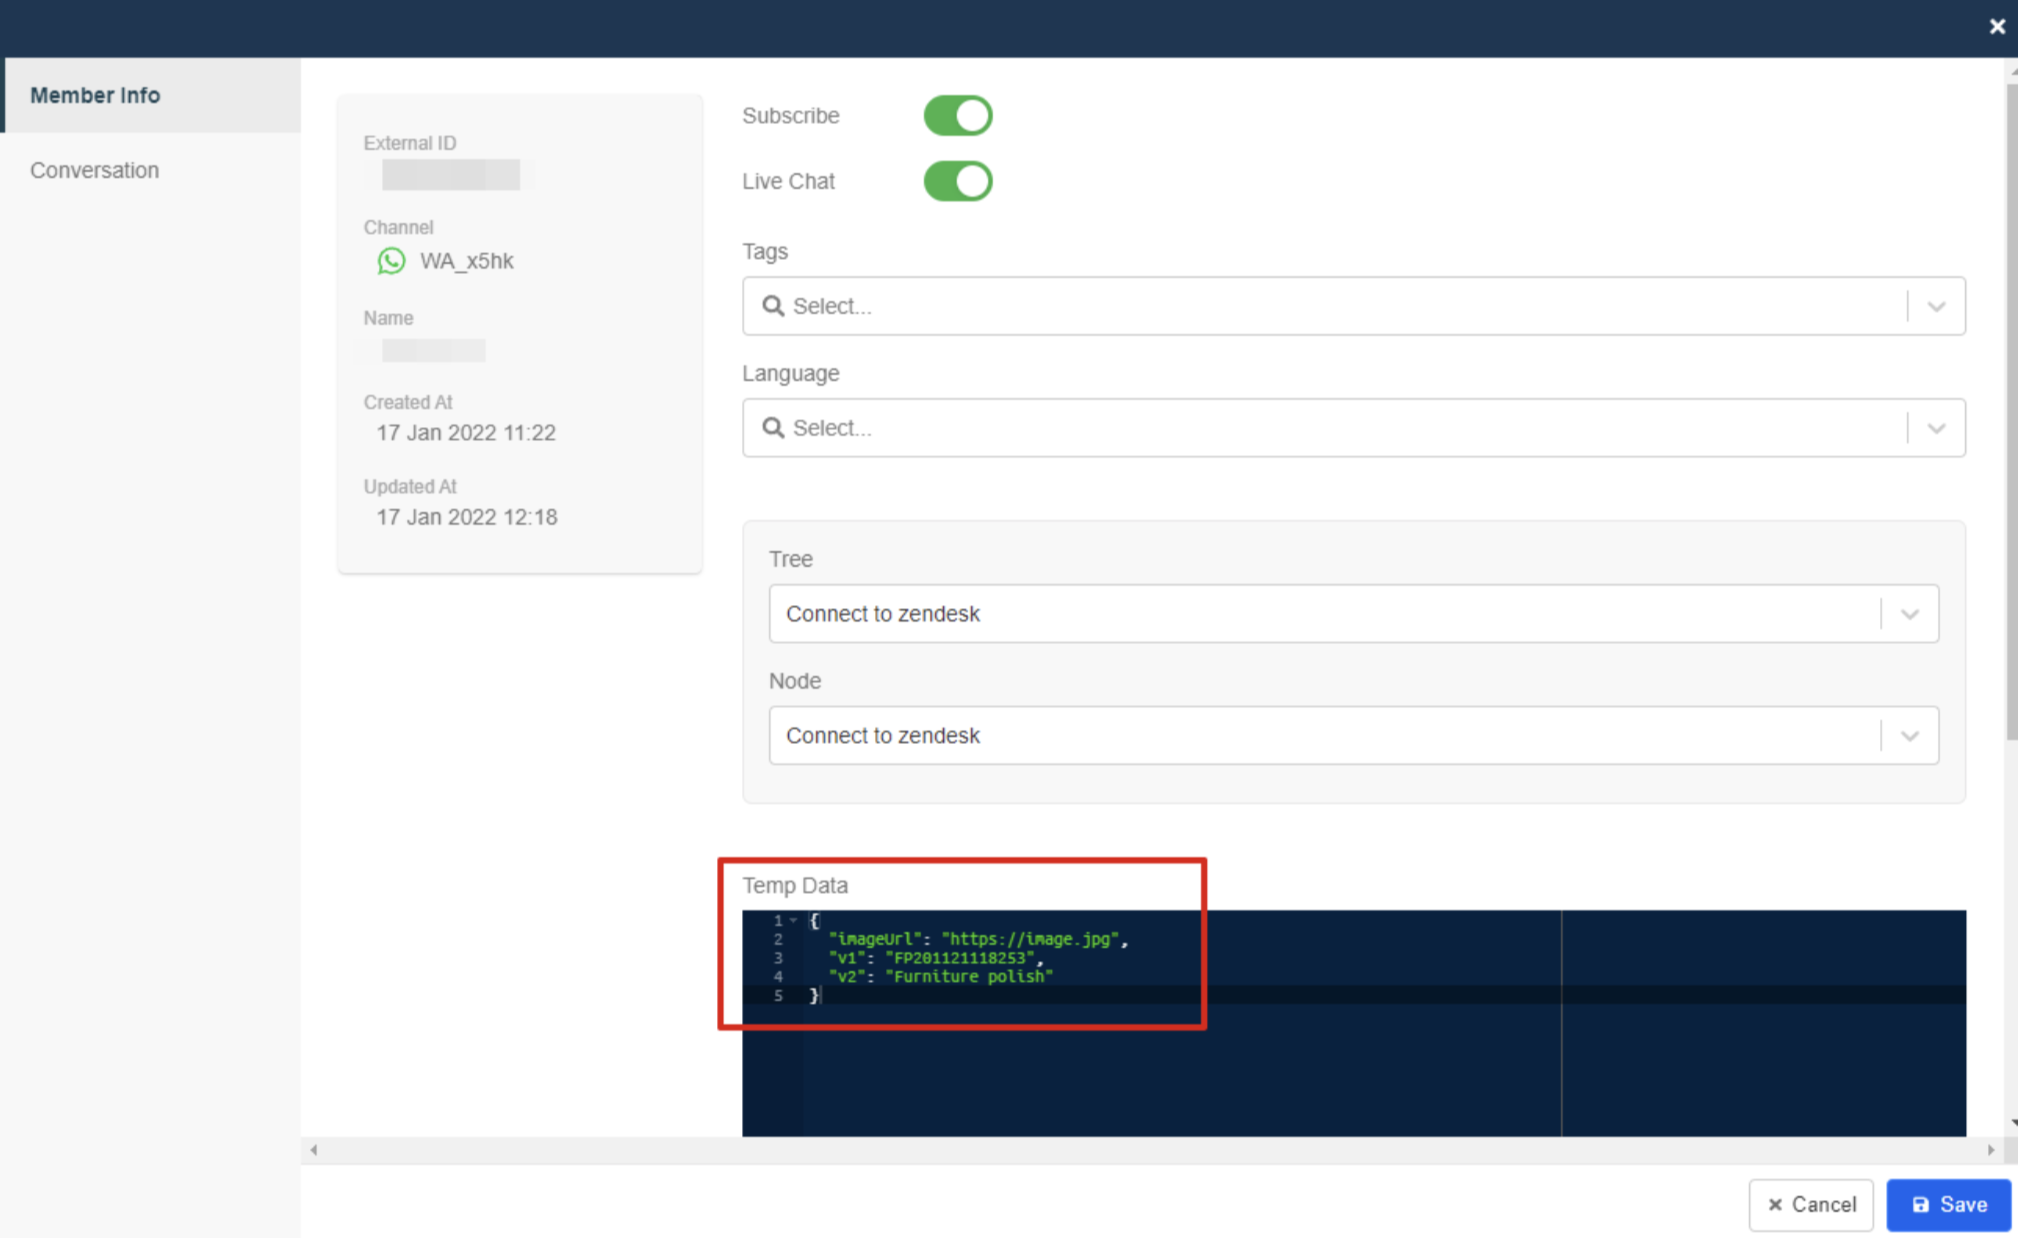
- Insert the following code into the pre-action. It is for saving the
MetaObject in the member's tempData.
return new Promise((resolve) => {
  this.member.botMeta.tempData.orderID = this.agendaMeta.orderID
  this.member.botMeta.tempData.item = this.agendaMeta.item
  resolve({ member: this.member })
})

In Members, you can view the tempData in a member's profile.
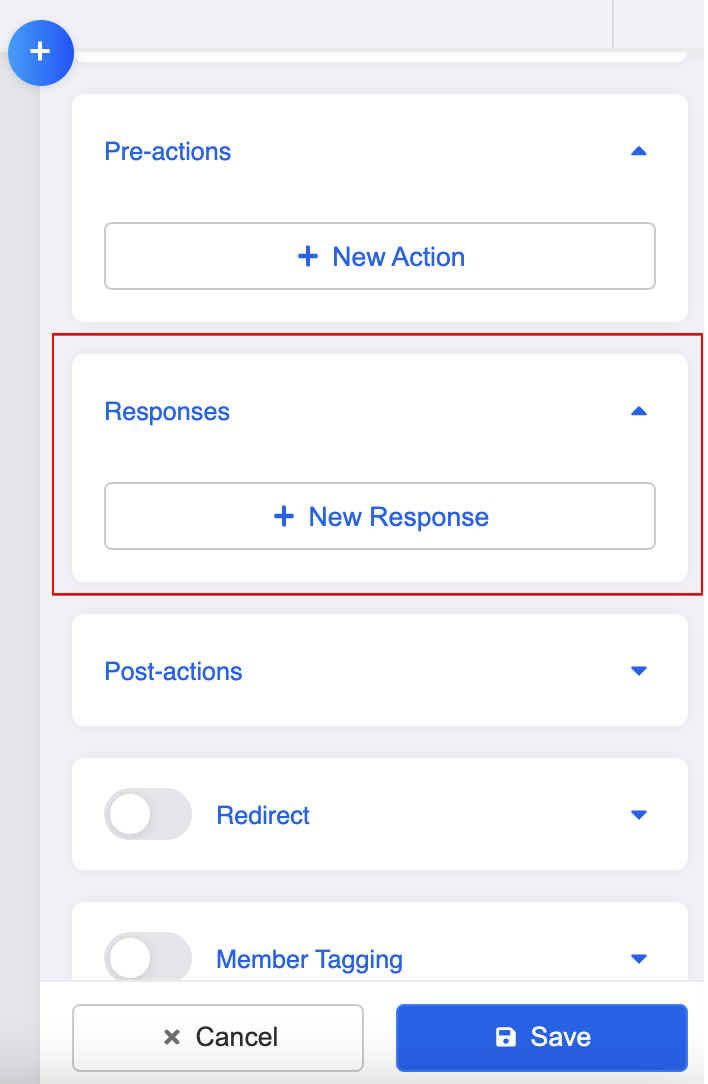
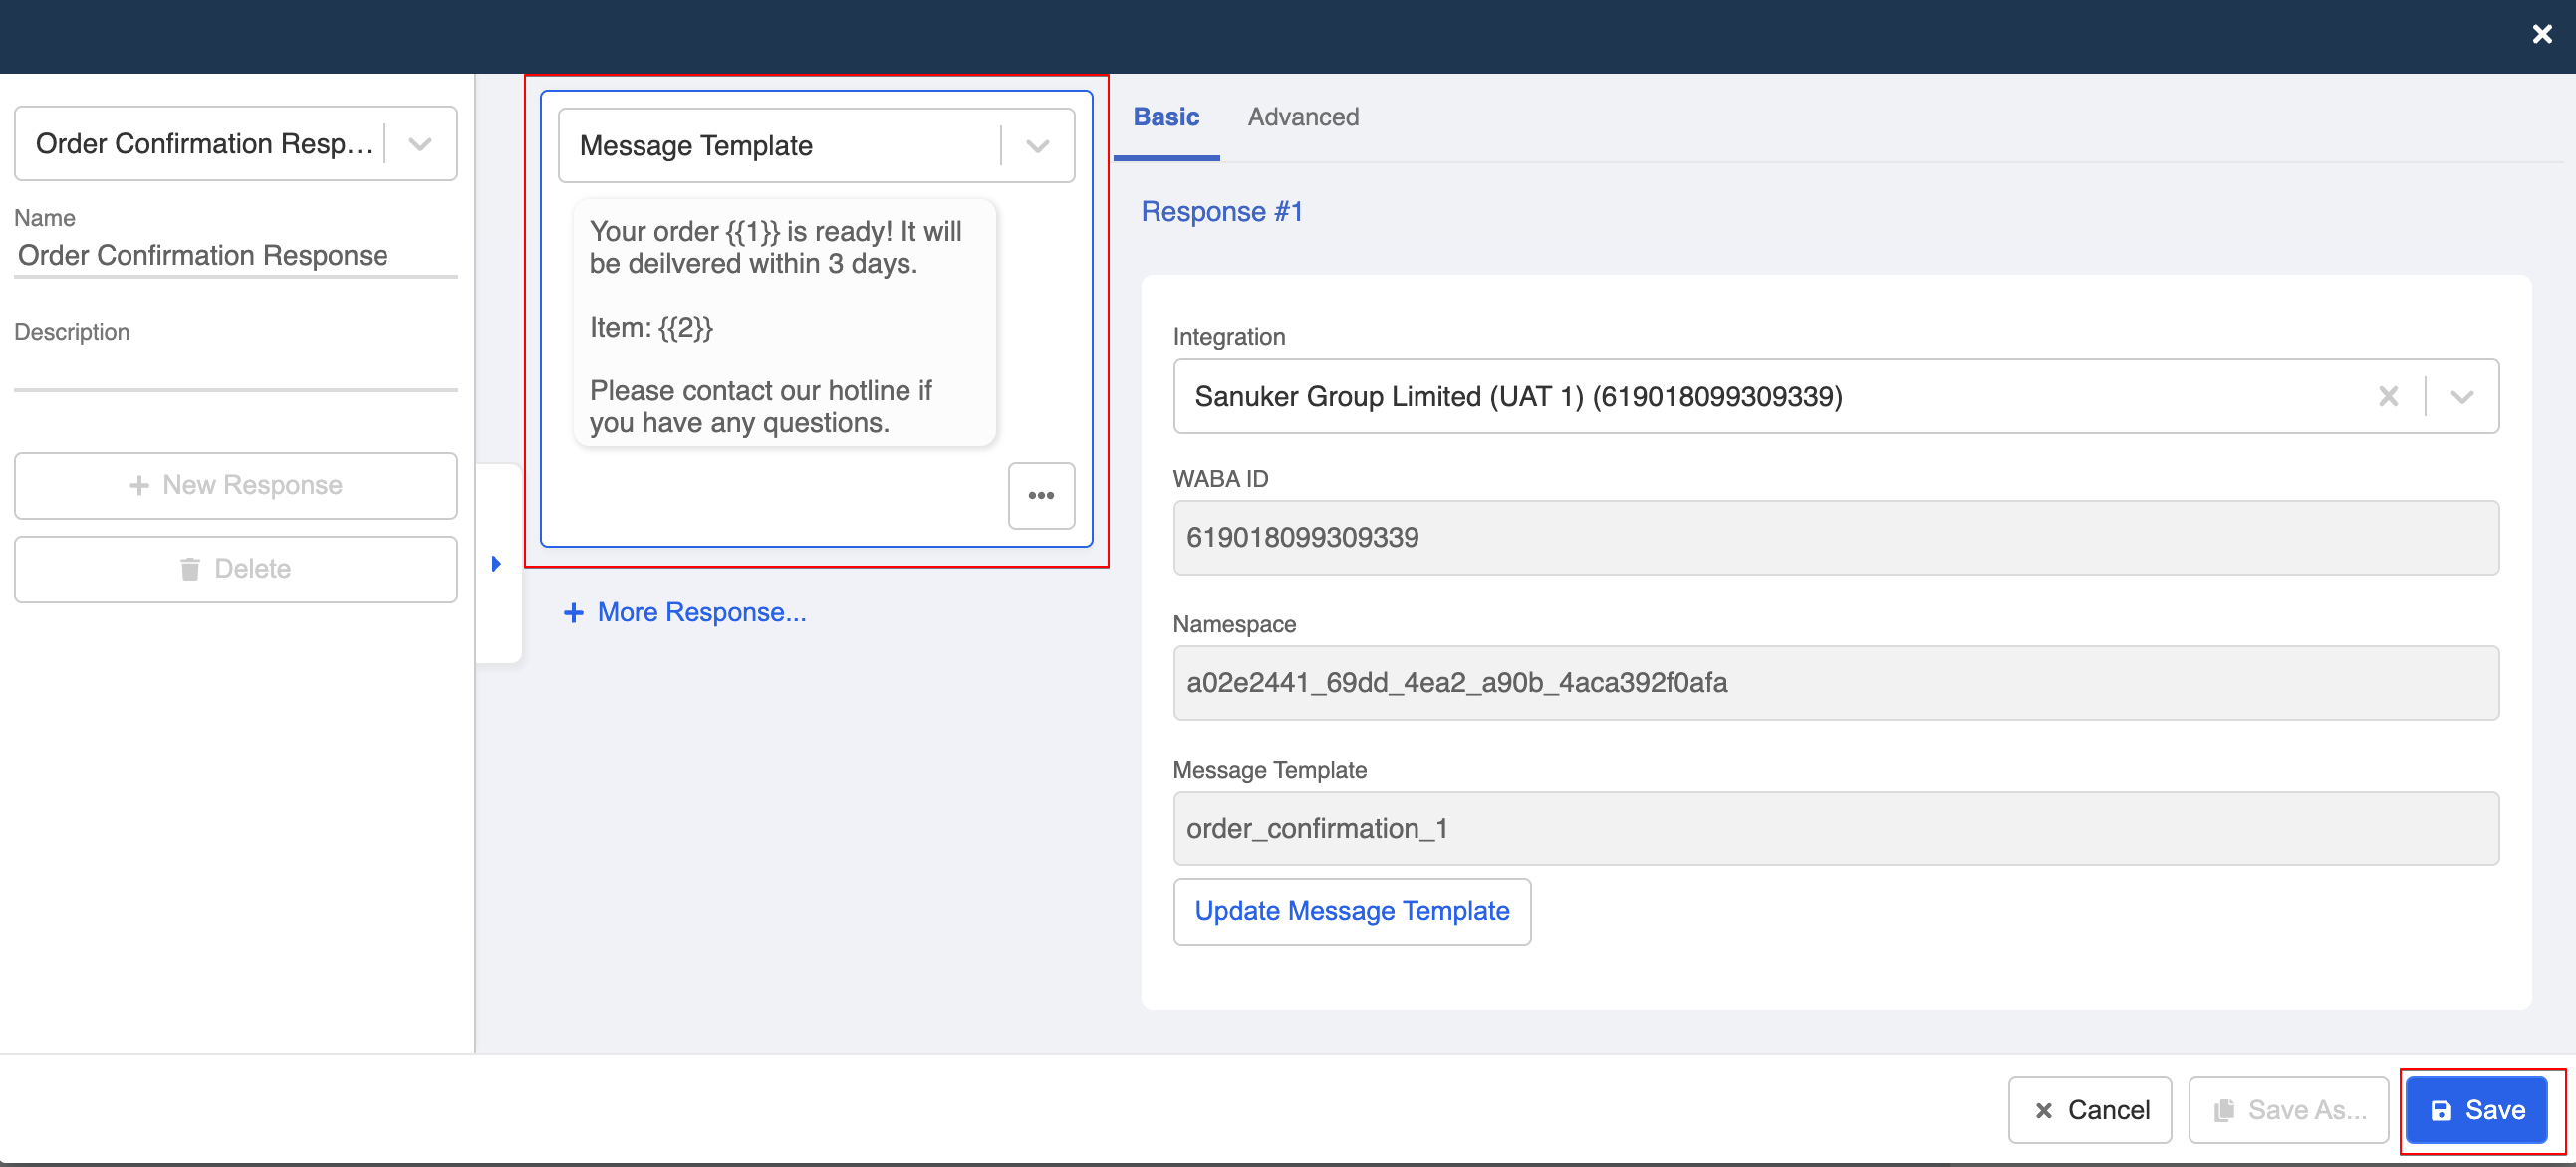
Apply Variable to Response
- Create a new response.
- Click "Add Platform" and select "WhatsApp Cloud".

- Select "Message Template" as the response type. Then, select the corresponding WhatsApp Cloud Integration and click "Update Message Template".

- Select the corresponding template from the dropdown.
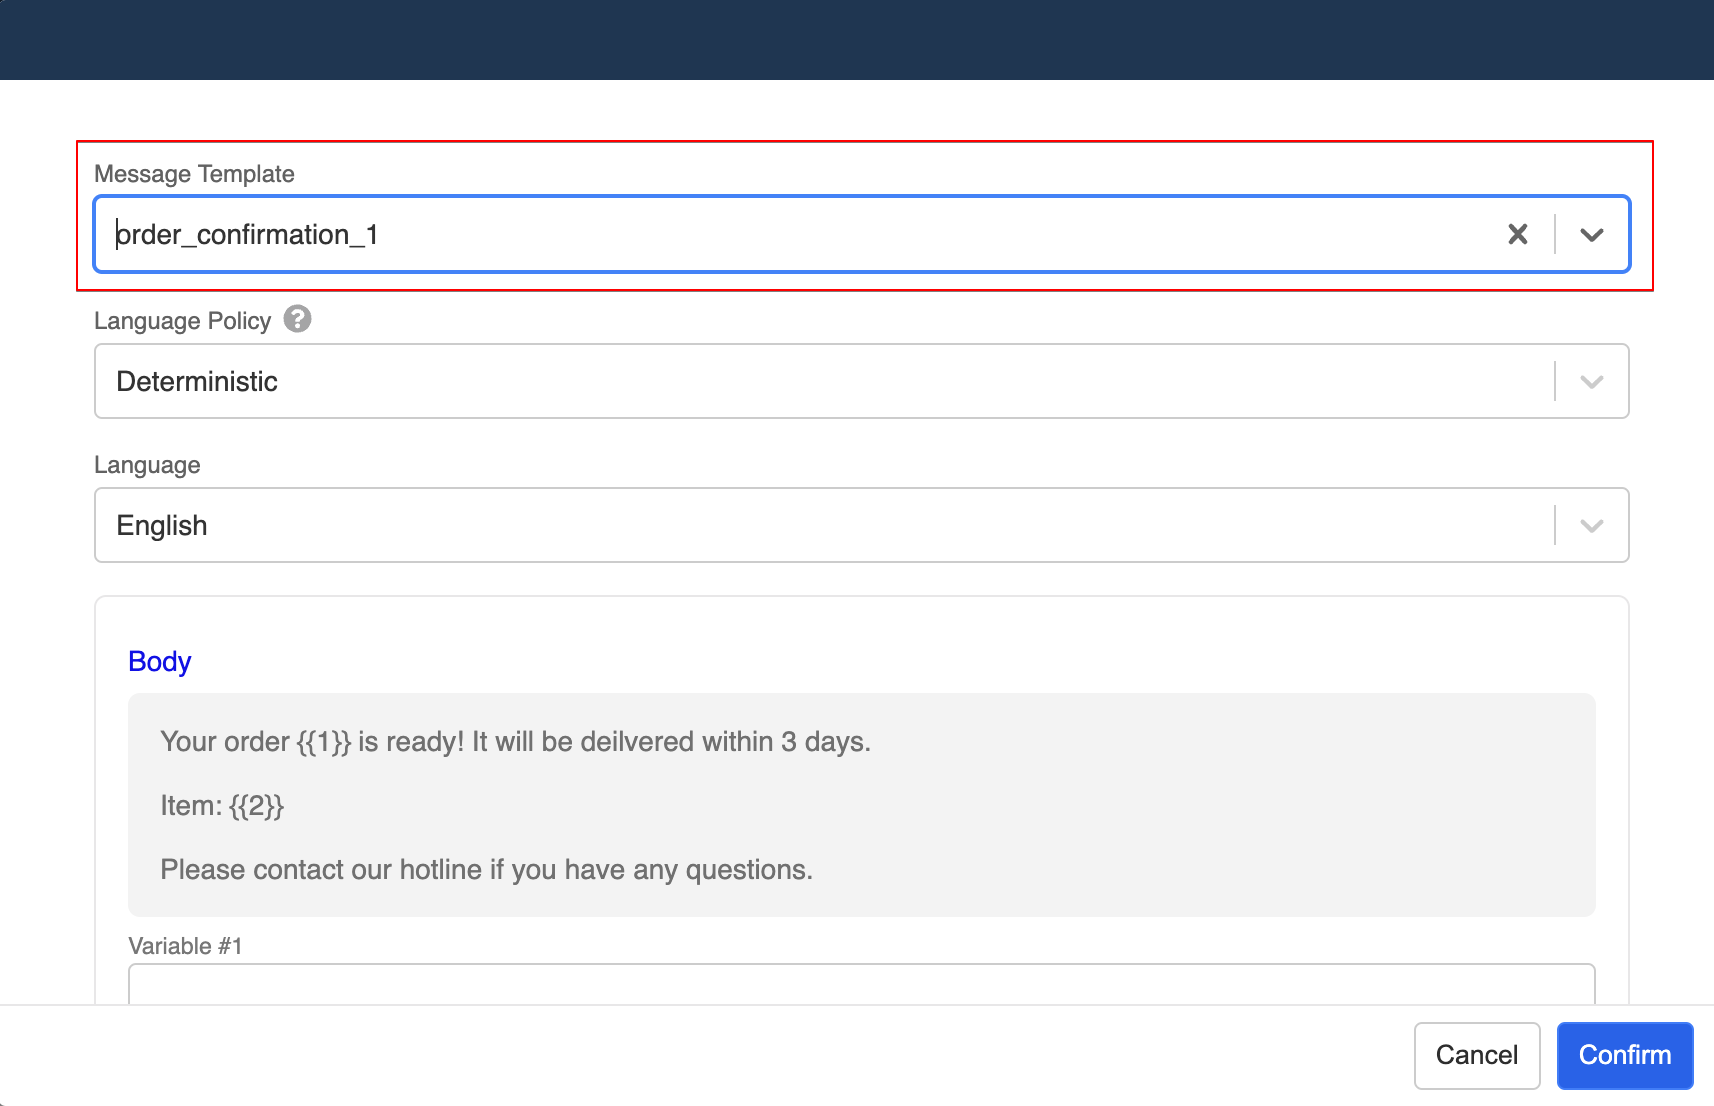
- Fill in the variables and click "Confirm". The following code can let you have access to the variables saved in
tempData.
{{botMeta.tempData.orderID}}
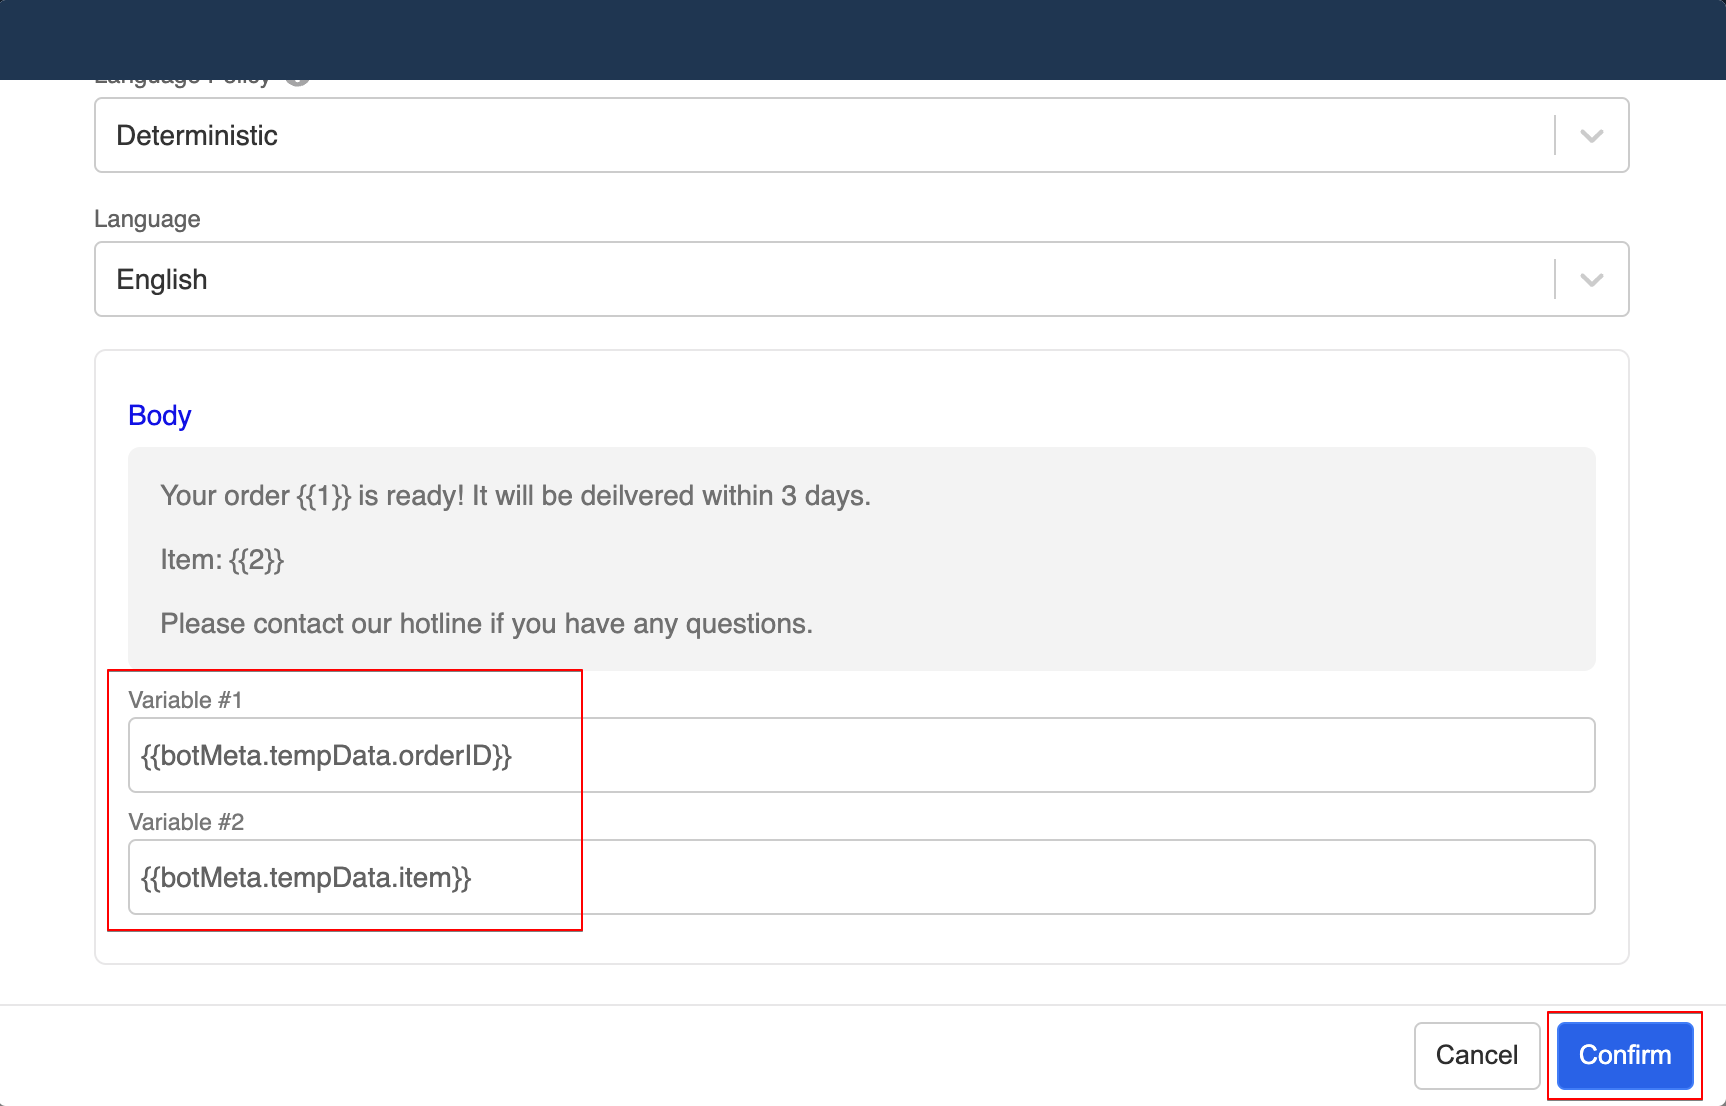
- Now the preview of the response can be displayed. Finally, "Save" the response.
- Now, you can test by sending the API request of
Redirect Member to Nodeto a tester and see if it can display the expected order confirmation message.